10. How to manage style configurator in Owlpress Pro?
11. How to manage 404 Page in Spintech
12. How to manage General Section?
13. How to manage colors in Seokart Lite?
14. How to manage Service Section in Seokart
15. How to manage Service Section in Appetizer Pro?
16. How to manage Gallery Section in Decorme?
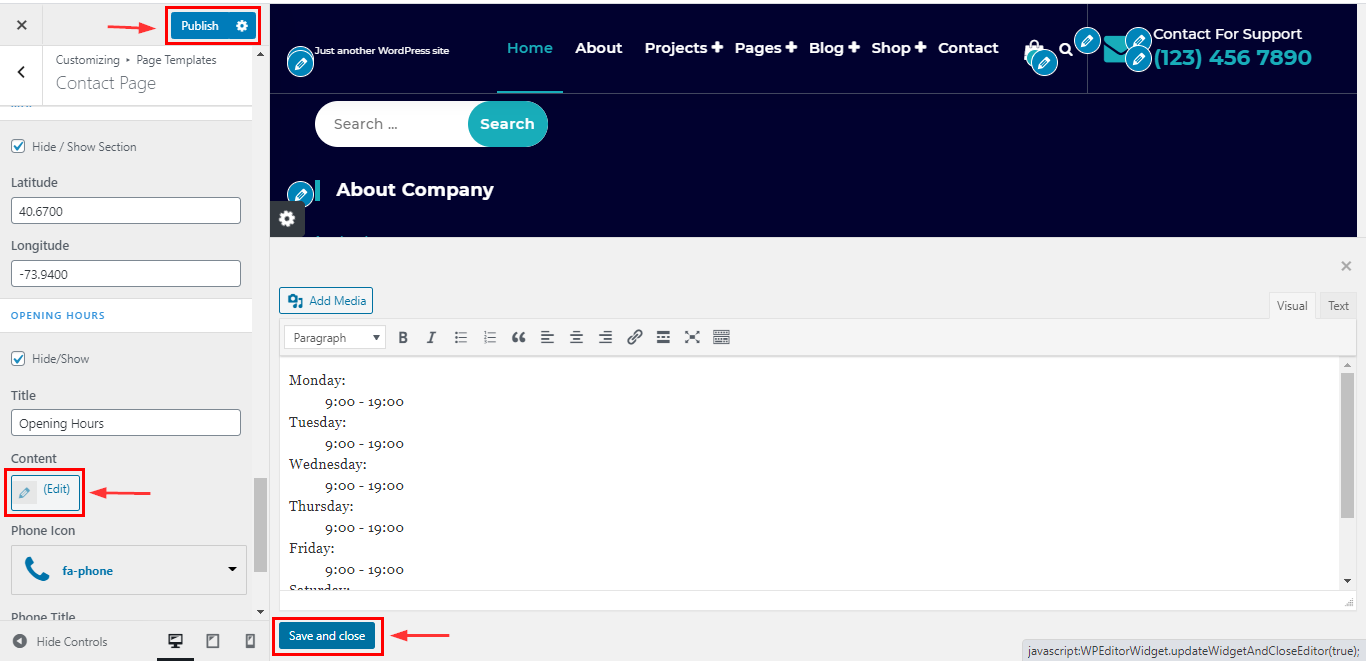
17. How to manage Contact page in Setto Pro?
18. How to manage Product Section?
19. How to manage Blog Section in CoziPress
20. How to manage header text & background color?
21. How to manage header section in StoreBiz?
22. How to setup Header image in Appetizer Pro?
23. Additional CSS in CoziPress
24. How to Demo Import for CoziPress pro
25. How to install Seokart Pro Theme
26. How to manage About page in CoziPress
27. How to manage General Section in Owlpress Pro?
28. How to manage Contact Page in Seokart Pro?
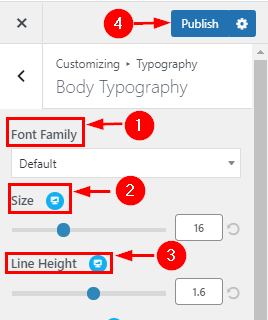
29. How to manage Typography?
30. How to manage section Reorder in Decorme?
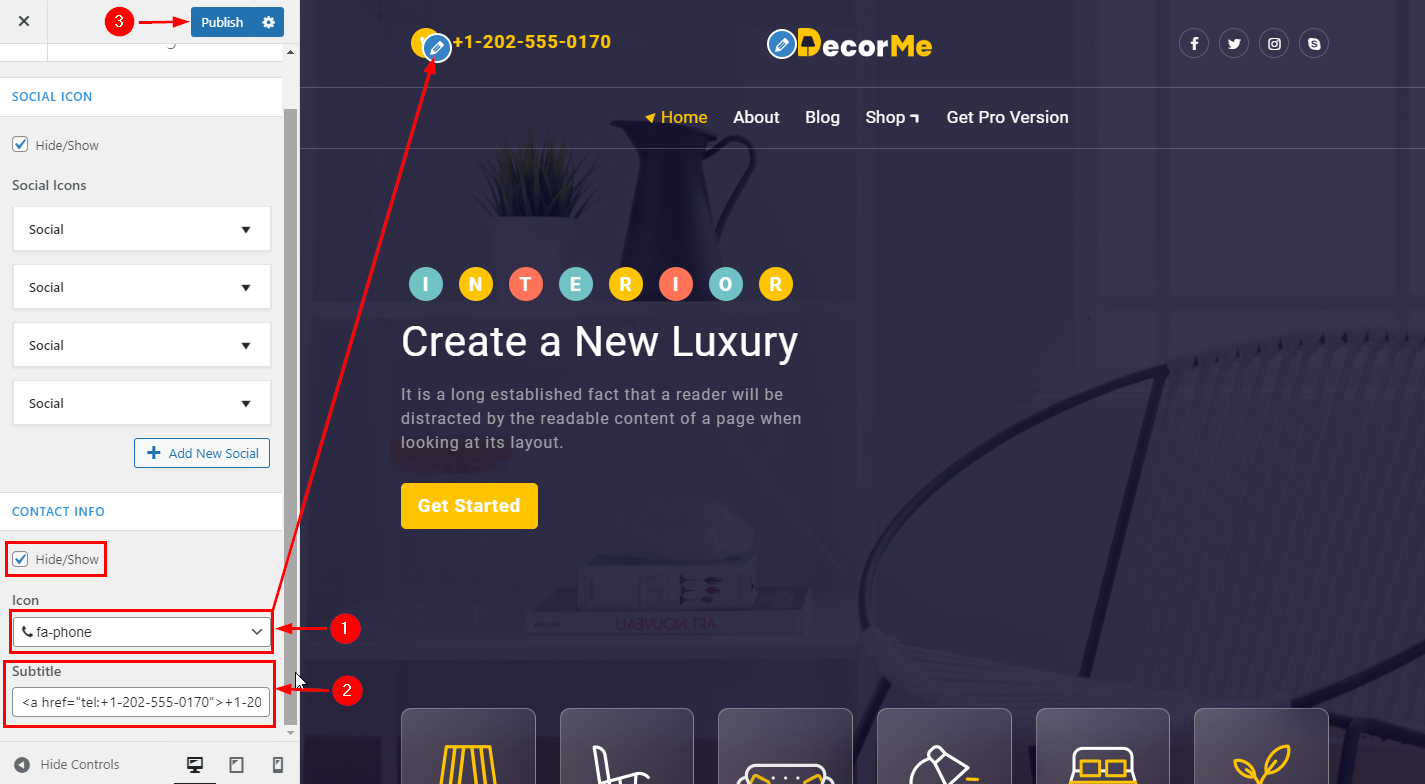
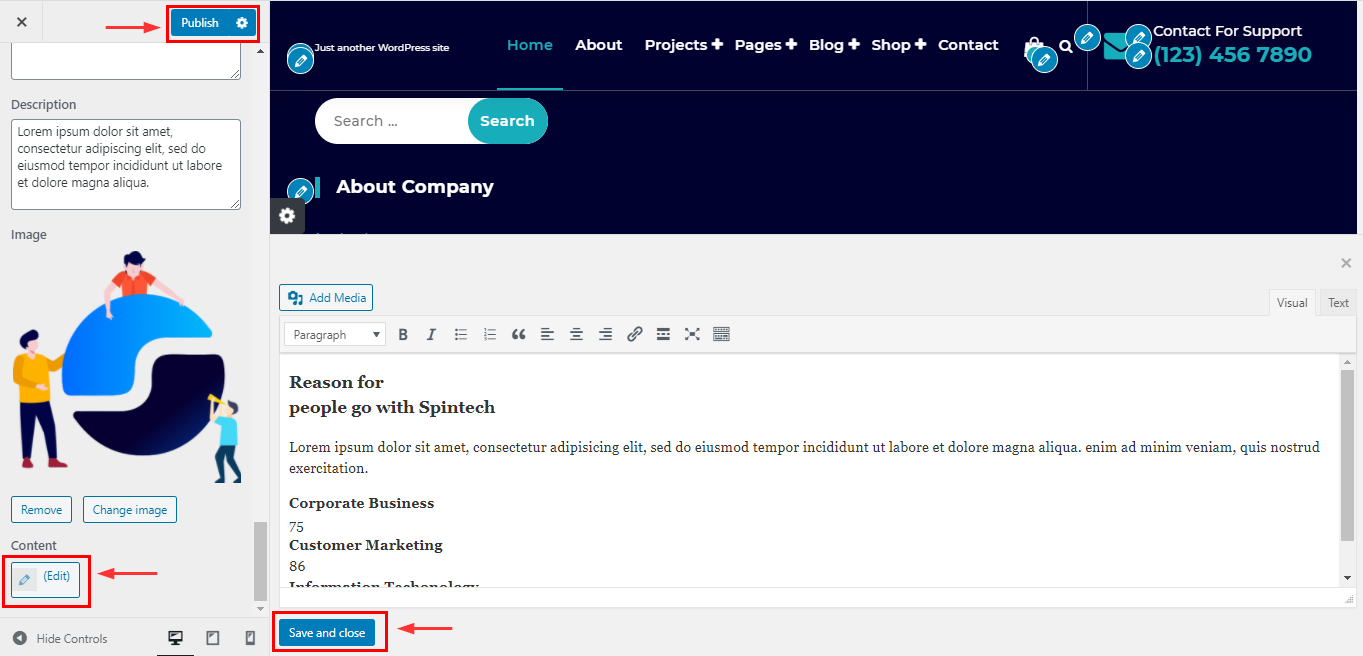
31. How to manage content info?
32. Slider Manage of Lingerie Home Page!
33. How to manage blog Section?
34. How to manage Company FAQ Page in Owlpress Pro?
35. How to demo import for Owlpress pro?
36. How to Demo Import for Spintech pro
37. How to manage Pricing Section in Owlpress Pro?
38. How to manage About Section in SpaBiz Pro?
39. How to Activate license in Kundoo pro
40. How to manage colors in StoreBiz?
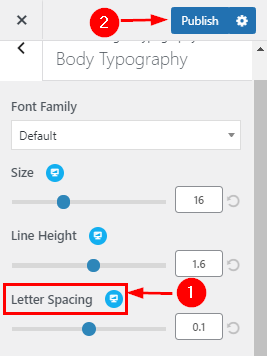
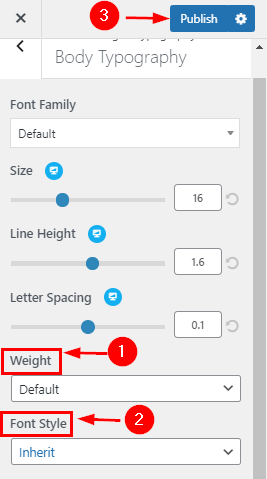
41. How to manage Typography in Owlpress Pro?
42. How to manage content info?
43. How to manage Pricing Section in Kundoo
44. How to manage style configurator in CoziPress
45. How to manage Gallery Page?
46. Newsletter Section Manage of Electronics Home Page!
47. Browse Category Section Manage of Lifestyle Home Page!
48. How to manage colors?
49. How to manage Team Page in Kundoo
50. How to manage Pricing Page in Spintech
51. Slider Manage of Watch Home Page!
52. How to manage Slider 1 in SpaBiz Pro?
53. How to manage footer section in Owlpress Pro?
54. How to manage Funfact Section in Owlpress Pro?
55. How to add Additional CSS?
56. How to manage Team Section in Seokart Pro?
57. How to manage Funfact Section in Seokart Pro?
58. How to manage Service Section in Owlpress Lite?
59. How to manage menu setup?
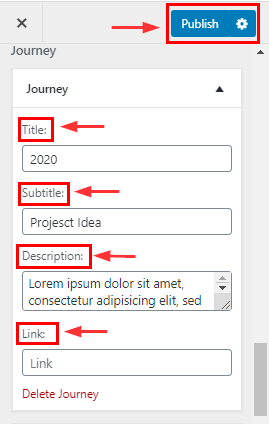
60. How to Create a Project Page & Select Template
61. How to manage Expertise Section in Seokart Pro?
62. Testimonial Section Manage of Home Page!
63. How to manage Slider Section in Appetizer Lite?
64. How to manage style configurator in Astrocare Pro
65. How to manage About page in Astrocare
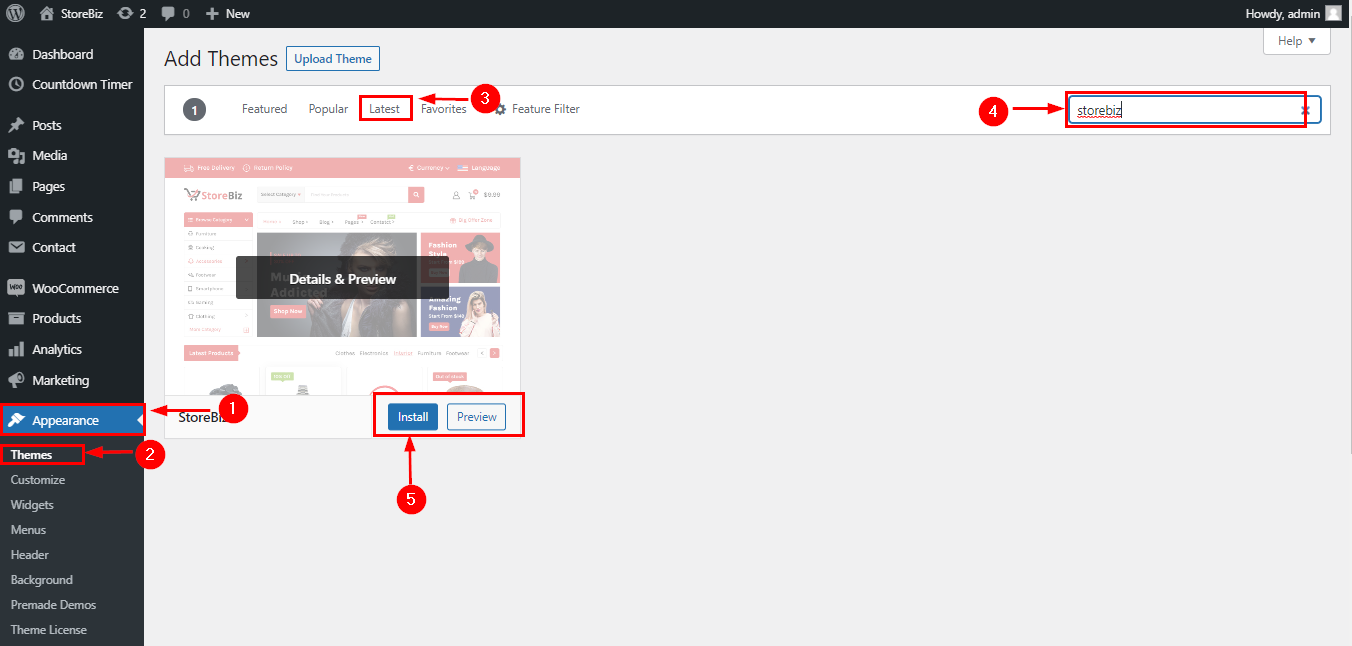
66. How to install StoreBiz?
67. How to manage Testimnonial Page in SpaBiz Pro?
68. How to manage Service Section?
69. How to manage header image?
70. How to manage Custom Section in Appetizer pro?
71. How to Setup Home Page
72. How to manage Blog page in Seokart Pro?
73. How to manage new products?
74. How to manage Typography?
75. How to manage Pricing Section in Seokart Pro?
76. How to manage menu setup in Seokart Pro?
77. How to manage Design & Development Section in CoziPress
78. How to manage Pricing Page in Owlpress Pro?
79. How to manage Testimonial Section in Spintech
80. How to manage Astro Form Section
81. How to manage Team Section in Decorme?
82. How to manage General Section in Owlpress Lite?
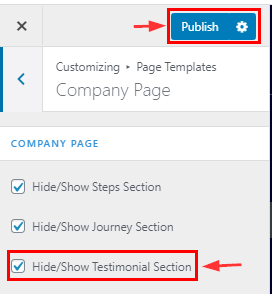
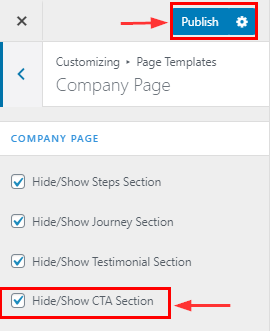
83. How to manage Company Page in Spintech
84. How to manage menu setup?
85. How to manage Video Section in SpaBiz Pro?
86. How to install Seokart Lite?
87. How to manage header image in Owlpress Lite?
88. How to manage section Reorder in Owlpress Pro?
89. Custom Section Manage of Electronics Home Page!
90. How to manage Panchang page in Astrocare Pro
91. How to manage CTA Section in Kundoo
92. How to setup Home Page?
93. How to Activate a license in Hotel Galaxy Pro
94. How to manage footer section in Seokart Lite?
95. Blog Section Manage of Goggles Home Page!
96. How to manage Blog Section in Owlpress Pro?
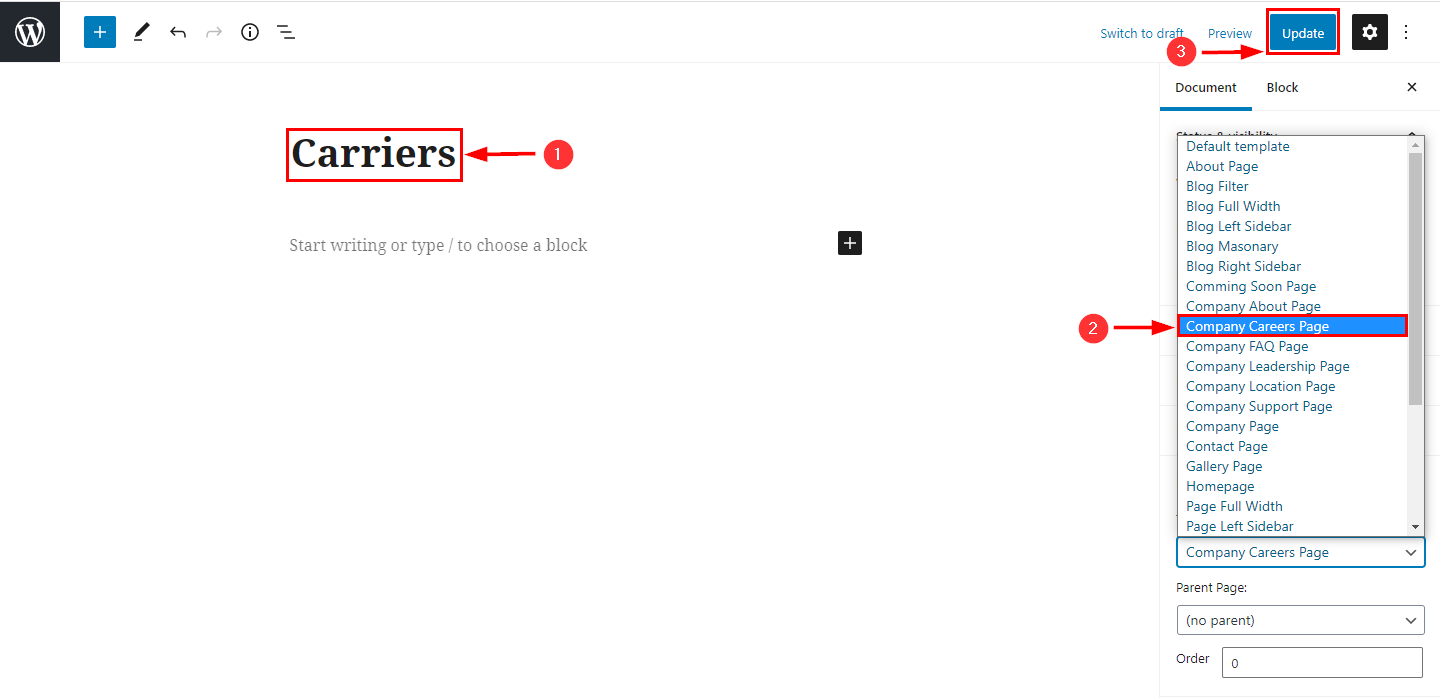
97. How to manage Company Career Page in Spintech
98. How to manage Testimonial Section in Owlpress Pro?
99. Slider Manage of Electronics Home Page!
100. How to manage About page in SpaBiz Pro?
101. How to manage FAQ Page?
102. How to manage content info section?
103. How to manage Gallery page?
104. How to create blog post of CoziPress
105. Required image size all section Spintech
106. Video Section Manage of Watch Home Page!
107. Home Page Setup in CoziPress
108. How to manage Team Section in Crowl Lite?
109. How to manage About page in Kundoo
110. How to manage Horoscope section in Astrocare
111. How to manage Pricing Page in CoziPress
112. How to manage General Section in Kundoo
113. How to manage Slider Section in Kundoo
114. How to manage sections Reorder in SpaBiz Pro?
115. How to manage footer section Setto Pro?
116. Demo Import For StoreBiz?
117. How to manage kundli page in Astrocare
118. How to manage menu setup in Astrocare
119. How to setup Header image in Astrocare
120. How to manage Slider Section in Seokart?
121. Demo Import For Decorme?
122. How to manage Custom Section in Spintech
123. How to manage blog Page in Appetizer?
124. How to manage footer-3 in SpaBiz Pro?
125. How to manage widget footer?
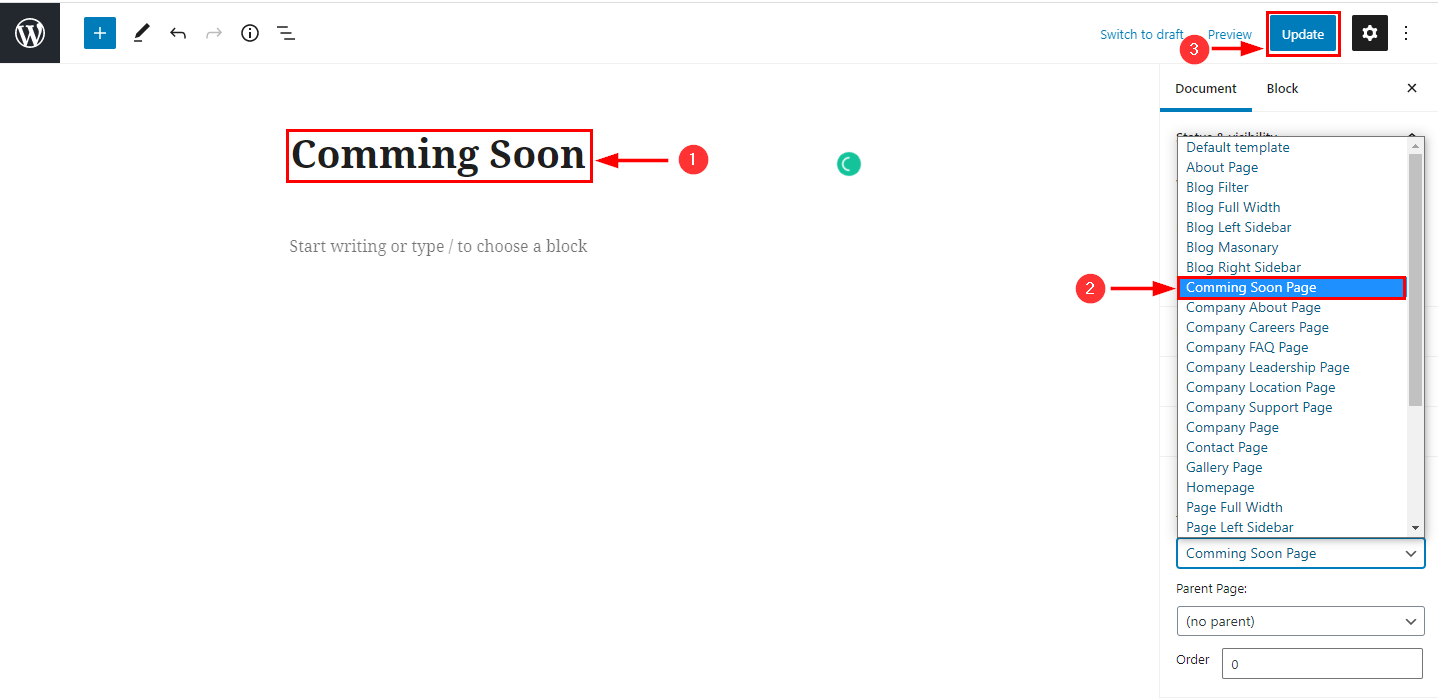
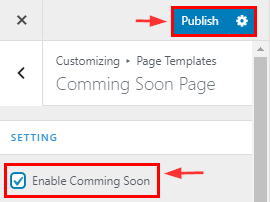
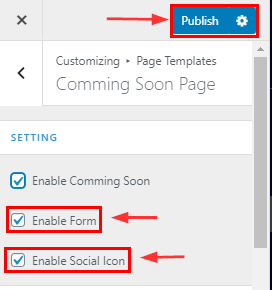
126. How to manage Coming Soon Page in CoziPress
127. How to manage Title Feature Product Section
128. How to manage Pricing Page in SpaBiz Pro?
129. How to Demo Import for Appetizer pro?
130. How to manage header section in Seokart Lite?
131. How to manage Page Right Sidebar page in Astrocare Pro
132. How to manage Slider Section in Setto Lite?
133. How to manage colors in Decorme Pro?
134. How to manage header section in Seokart Pro?
135. How to manage Kundli Section in Astrocare
136. Manage 404 Page StoreBiz?
137. How to manage colors in Setto Lite?
138. How to setup Header image in Seokart Pro?
139. How to manage colors Decorme?
140. How to Activate license in Spintech pro
141. How to manage Slider Section in Astrocare Pro
142. How to manage Deal Products Section
143. How to manage Term & Condition page in Setto Pro?
144. How to manage footer section?
145. How to create new project of Kundoo
146. How to manage footer section in CoziPress
147. How to add Additional CSS?
148. How to manage header section in Setto Lite?
149. How to manage Slider 3 in SpaBiz Pro?
150. Install & Activate Burger Companion Plugin?
151. Banner Section Manage of Goggles Home Page!
152. How to manage Blog Section in Kundoo
153. How to manage Background Image in Setto Pro?
154. How to manage Pricing Section in CoziPress
155. How to manage Contact Page in Spintech
156. How to setup Widgets Footer 1 to Footer 5 layout
157. How to manage Funfact Section in Astrocare
158. How to manage Slider Section in Spintech
159. How to manage header section in Setto Pro?
160. How to manage Slider Section in Owlpress Pro?
161. How to manage Pricing Section SpaBiz Pro?
162. How to manage General Section in Seokart Pro?
163. Home Page Setup in Seokart Pro?
164. How to manage Project Section in CoziPress
165. How to manage Sponsor Section in CoziPress
166. How to manage Testimonial Section in Seokart Pro?
167. How to manage Sale Section?
168. Slider Manage of Lifestyle Home Page!
169. How to manage Feature Section in Seokart Pro?
170. How to Setup Home Page?
171. How to install StoreBiz Lite?
172. How to setup Background image in Astrocare
173. How to manage Gallery page?
174. How to manage Service Section Decorme?
175. How to manage Info Section in Seokart Pro?
176. How to manage style configurator in Decorme?
177. How to manage menu setup in Spintech
178. How to manage Typography?
179. How to manage Slider Section in Owlpress Lite?
180. How to manage colors in Kundoo
181. How to manage Custom Section in Kundoo
182. Required image size all section CoziPress
183. How to manage header section in StoreBiz Lite?
184. How to install Owlpress Pro Theme?
185. How to manage 404 Page in SpaBiz Pro?
186. How to manage colors in Setto pro?
187. How to Activate license in SpaBiz Pro?
188. Product Section Manage of Watch Home Page!
189. How to manage footer section?
190. Manage Title Latest Product Section
191. How to manage Company FAQ Page in Seokart Pro?
192. Banner Section Manage of Electronics Home Page!
193. How to manage Banner Section in SpaBiz Pro?
194. How to manage section Reorder in Seokart Pro?
195. How to manage Typography in Appetizer?
196. How to setup Home Page?
197. How to manage Contact Page?
198. How to Manage Info-2 Section?
199. How to manage General Section in Seokart Lite?
200. How to manage section Reorder in CoziPress
201. How to manage Service Section in Kundoo
202. How to manage style configurator?
203. How to Setup Home Page?
204. How to manage header section in CoziPress
205. How to manage food menu Page in Appetizer?
206. How to manage Error Page in Seokart Pro?
207. How to manage menu setup?
208. How to manage Latest Product Section ?
209. How to manage header section in SpaBiz Pro?
210. How to manage About page in Setto Pro?
211. How to manage Gallery Section in Appetizer Pro?
212. How to Setup Home Page?
213. Product Section Manage of Goggles Home Page!
214. How to manage menu setup in CoziPress
215. How to manage Slider 2 in SpaBiz Pro?
216. How to manage blog Section?
217. How to install SpaBiz Pro?
218. How to setup Background image in Spintech
219. How to manage Portfolio Section in Seokart Pro?
220. How to manage Booking Page in Astrocare
221. How to manage Typography in Owlpress Lite?
222. How to Demo Import for Hotel Galaxy Pro
223. Home Page Setup in Spintech
224. How to manage blog Section?
225. How to setup Background image in CoziPress
226. How to manage About page in Appetizer?
227. Sponsor Section Manage of Goggles Home Page!
228. How to Demo Import for Kundoo pro
229. How to manage Footer Section in Spintech
230. How to install Setto Pro?
231. How to install Spintech Pro Theme
232. How to manage Info Section in Spintech
233. How to manage Team Section in Spintech
234. How to manage section Reorder in Kundoo
235. Banner Section Manage of Lingerie Home Page!
236. How to manage section Reorder in Astrocare Pro
237. How to manage Typography in SpaBiz Pro?
238. How to manage Team Section in CoziPress
239. How to setup Header image in SpaBiz Pro?
240. How to manage Mobile Section in Astrocare
241. Home Page Setup in Kundoo Pro
242. How to Activate license in Decorme?
243. How to manage Slide in Decorme?
244. Install & Activate Burger Companion Plugin?
245. How to manage section Reorder in Appetizer Pro?
246. Additional CSS in Astrocare
247. How to Activate a license in Astrocare pro
248. How to manage Product Section Setto Lite?
249. How to manage Company Support Page in Spintech
250. How to create blog post of Kundoo
251. How to manage header section in Decorme Lite?
252. How to manage Funfact Section in CoziPress
253. How to create Job of CoziPress
254. How to manage Custom Section in Seokart Pro?
255. How to manage General Section?
256. How to manage background image?
257. How to manage Sponsor section in Astrocare
258. How to Demo Import for Astrocare pro
259. How to manage Service Section in Spintech
260. How to manage Gallery page in Owlpress Pro?
261. How to install CoziPress Pro Theme
262. How to manage Design & Development Section in Spintech
263. How to manage footer section in CoziPress
264. How to manage style configurator in Seokart Pro?
265. How to manage FAQ Page in SpaBiz Pro?
266. How to manage Sade Sati page in Astrocare Pro
267. How to manage FAQ Page in Kundoo
268. How to Activate license in Owlpress pro?
269. How to manage Company Location Page in Spintech
270. How to manage Project Section in Decorme?
271. How to install Kundoo Pro Theme
272. How to manage Recipes Section?
273. How to manage Feature Section?
274. How to manage Blog Section?
275. How to manage About page in Spintech
276. How to manage Service Page in Owlpress Pro?
277. How to manage style configurator in SpaBiz Pro?
278. How to manage colors in Owlpress Pro?
279. How to setup Header image in CoziPress
280. Insta Section Manage of Lingerie Home Page!
281. How to setup Background image in Decorme?
282. How to manage Team Section in Owlpress Pro?
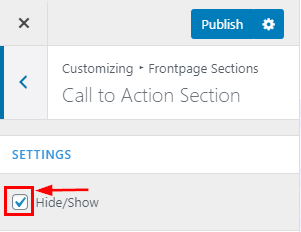
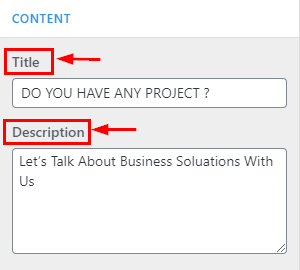
283. How to manage Call to Action Section?
284. How to setup Header image in Decorme?
285. How to manage Blog Section in Decorme?
286. How to manage Blog Section in Seokart Lite?
287. Collection Section Manage of Lingerie Home Page!
288. About Section Manage of Watch Home Page!
289. How to manage Testimonial Section in Astrocare
290. How to Setup Home Page?
291. How to manage Info Section in CoziPress
292. How to manage style configurator in Kundoo
293. How to manage Blog Section in Seokart Pro?
294. How to Activate license in CoziPress pro
295. How to manage header section in Owlpress Lite?
296. Newsletter Section Manage of Lingerie Home Page!
297. How to manage Blog Page in SpaBiz Pro?
298. How to manage colors in Appetizer Pro?
299. Manage Testimonial Section?
300. How to manage Testimonial Section
301. How to manage Feature Section in Appetizer Pro?
302. How to manage Typography?
303. How to Activate license in Setto Pro?
304. How to Setup Home Page?
305. How to manage Funfact Section in Kundoo
306. How to setup Background image in Owlpress Pro?
307. How to manage Team Page in SpaBiz Pro?
308. How to manage header section in Astrocare
309. How to manage colors in CoziPress
310. How to manage Typography?
311. How to manage Funfact Section in Decorme?
312. Required image size for all section in StoreBiz Pro.
313. How to manage General Section in StoreBiz Lite?
314. How to manage footer section?
315. Manage Gallery Section?
316. How to manage Slider Section in Appetizer Pro?
317. How to manage kundli Matching page in Astrocare
318. Product Section Manage of Lifestyle Home Page!
319. How to manage Blog Section in Appetizer Pro?
320. How to manage footer section in Owlpress Lite?
321. How to manage Return Policy page in Setto Pro?
322. How to setup Background image in Seokart Pro?
323. Slider Category Manage of Lingerie Home Page!
324. How to manage team section in Seokart?
325. How to manage Company Leadership Page
326. How to manage colors in SpaBiz Pro?
327. How to install Appetizer Pro Theme
328. How to manage background image?
329. How to manage 404 Page in Astrocare
330. How to manage Gallery Section in CoziPress
331. How to manage header section in Appetizer Pro?
332. How to manage Typography in Astrocare
333. How to manage the General Section
334. How to manage Slider Section in Seokart Pro?
335. How to manage Team Section in SpaBiz Pro?
336. Additional CSS in Kundoo
337. How to manage sponsor Section?
338. How to manage work flow section in Seokart Pro?
339. How to manage Design Section in Kundoo
340. How to manage colors in Owlpress Lite?
341. How to manage Contact Page in Appetizer?
342. How to manage Working Section in Kundoo
343. How to manage Reservation Section in Appetizer Pro?
344. How to manage Typography in Decorme?
345. How to manage Special Menu Section in Appetizer Pro?
346. Collection Section Manage of Goggles Home Page!
347. How to manage 404 Page in Appetizer?
348. Install & Activate Burger Companion Plugin?
349. Required image size all section Kundoo
350. How to manage Testimonial Section in Kundoo
351. How to manage Portfolio Section in Owlpress Pro?
352. How to add Additional CSS?
353. How to manage Free Calculators Section in Astrocare Pro
354. How to install Setto Lite?
355. How to manage Service Page in Kundoo
356. Home Page Setup in Appetizer Pro?
357. How to manage Portfolio Page in Owlpress Pro?
358. How to manage Featuer Section in Kundoo
359. How to manage style configurator in Appetizer Pro?
360. How to manage CTA 2 Section in Kundoo
361. How to install Hotel Galaxy Pro Theme
362. How to manage colors in Astrocare
363. How to manage Company FAQ Page in Spintech
364. How to manage footer section?
365. How to manage Kundli Matching Section in Astrocare
366. Deal Section Manage of Electronics Home Page!
367. How to manage Funfact Section in SpaBiz Pro?
368. How to manage section Reorder in Spintech
369. How to manage Sponsor Section in Owlpress Pro?
370. How to manage Feature Section in Owlpress Lite?
371. How to manage 404 page in Setto Pro?
372. How to manage Typography in Spintech
373. How to manage Call To Action Section in Spintech
374. How to manage About page in Decorme?
375. How to manage Call To Action Section in Seokart Pro?
376. How to manage FAQ page in Setto Pro?
377. How to manage Blog Section in Astrocare
378. How to manage to browse category in Setto Lifestyle?
379. How to Setup Home Page
380. How to manage header section in Kundoo
381. How to manage Typography in Kundoo
382. How to manage general section in Appetizer Pro?
383. How to manage style configurator in Spintech
384. How to manage Service Section in Owlpress Pro?
385. How to manage Slider 2 in Decorme?
386. How to manage Feature Section in owlpress Pro?
387. How to manage Testimonial Section in SpaBiz Pro?
388. How to Activate license in StoreBiz ?
389. How to manage Slider Section in StoreBiz?
390. Home Page Setup in Owlpress Pro?
391. Sponsor Section Manage of Watch Home Page!
392. How to manage Gallery Section in Owlpress Pro?
393. How to manage Blog Section in Owlpress Lite?
394. How to manage Call to Action Section in Decorme?
395. How to manage Slider Section in CoziPress
396. Info Section Manage of Goggles Home Page!
397. How to manage menu setup?
398. How to manage Sponsor Section SpaBiz Pro?
399. Install & Activate Burger Companion Plugin?
400. How to add Additional CSS?
401. How to manage footer section in Astrocare
402. Banner Section Manage of Watch Home Page!
403. Manage Best Seller Products Section?
404. How to Set Home Page3?
405. Newsletter Section Manage of Lifestyle Home Page!
406. Demo Import For Setto Pro?
407. How to manage Company Career Page in CoziPress
408. How to manage Contact Page in Kundoo
409. How to manage footer section?
410. How to manage Service page in Astrocare
411. How to manage Special Menu Page in Appetizer?
412. Required image size all section Astrocare Pro
413. How to manage Gallery page in Kundoo
414. How to manage menu setup?
415. How to manage Page Full Width page in Astrocare Pro
416. How to manage Feature Product Section
417. How to add Additional CSS
418. How to manage Contact Page in Owlpress Pro?
419. Additional CSS in Spintech
420. How to setup Background image in SpaBiz Pro?
421. How to manage Elementor Plugin
422. How to manage Astrologer Section in Astrocare Pro
423. How to manage Team Section in Kundoo
424. How to Create a Service Page & Select Template?
425. How to manage Blog Section in Spintech
426. How to add icon to category on electronic homepage?
427. How to manage Slider 1 in Decorme?
428. How to manage item menu Page in Appetizer?
429. How to setup Header image in Owlpress Pro?
430. How to manage Product Section?
431. How to manage header image ?
432. How to manage header image in Seokart?
433. How to manage Company FAQ Page in CoziPress
434. How to manage Header Image in storebiz?
435. How to manage Appointment Section in SpaBiz Pro?
436. How to manage Pricing Section in Spintech
437. How to manage Typography in Spintech
438. How to manage Slider Section in StoreBiz?
439. How to manage Coming Soon Page in Owlpress Pro?
440. How to manage Background Image in storebiz?
441. How to manage General Section in Setto Lite?
442. How to manage Horoscope Report page in Astrocare
443. How to manage Sponsor Section in Kundoo
444. How to manage 404 Page in Owlpress Pro?
445. How to setup Header image in Spintech
446. How to manage Contact page in Astrocare
447. How to Create a Service Page & Select Template
448. How to manage sponsor Section?
449. How to manage Header Image in Setto Lite?
450. Service Section Manage of Lifestyle Home Page!
451. How to manage Pricing Section Decorme?
452. How to manage Blog Section in SpaBiz Pro?
453. How to manage General Section in Setto Pro?
454. How to manage Page Left Sidebar page in Astrocare Pro
455. How to manage Header Image in Setto Pro?
456. Hide/Show Sidebar in Blog Single Page?
457. How to manage header section in Spintech
458. How to manage General Section in CoziPress
459. Deal Section Manage of Lifestyle Home Page!
460. How to manage footer-2 in SpaBiz Pro?
461. How to manage footer section in Decorme?
462. How to manage menu setup?
463. How to manage header section in Owlpress Pro?
464. How to manage Service Section SpaBiz Pro?
465. How to Activate license in Appetizer pro?
466. How to manage About page in Owlpress Pro?
467. How to manage 404 Page in Decorme?
468. How to manage Blog Section?
469. How to install Appetizer Lite?
470. How to manage Gallery page in CoziPress
471. How to manage Testimonial Section in CoziPress
472. How to setup Widgets Footer 1 to Footer 4 layout
473. How to manage Blog page in Owlpress Pro?
474. How to manage Funfact Section in Spintech
475. How to manage Contact Page in SpaBiz Pro?
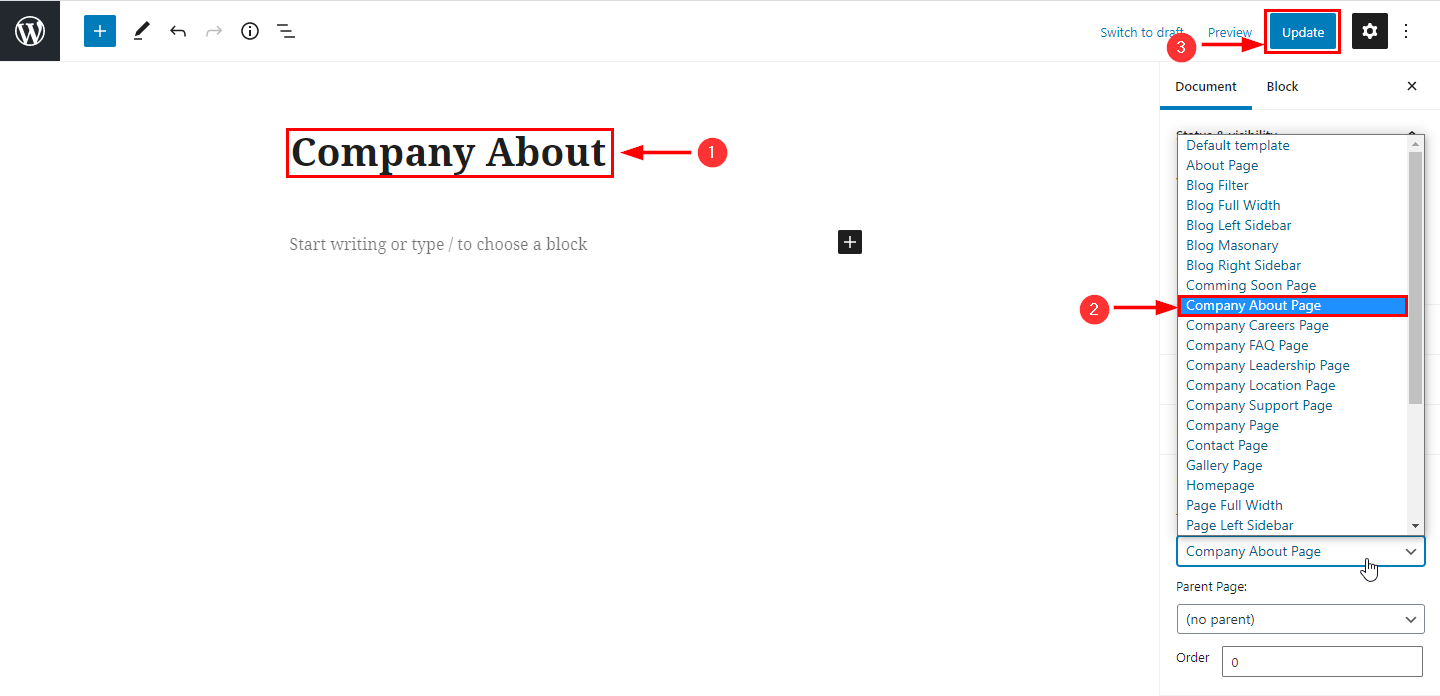
476. How to manage Company About Page
477. How to manage header section in Appetizer Lite?
478. How to install Owlpress Lite?
479. Manage Coming soon Page?
480. How to manage Background Image in Setto Lite?
481. How to manage Offer zone Section?
482. Home Page Setup in CoziPress Pro
483. How to Manage Privacy Policy page in Setto Pro?
484. Install & Activate Burger Companion Plugin?
485. How to manage header section in Hotel Galaxy Pro
486. How to manage About page in Seokart Pro?
487. How to manage Menu Section in SpaBiz Pro?
488. How to manage Coming Soon Page in Seokart Pro?
489. How to setup Footer Widgets
490. How to manage footer section in Appetizer Pro?
491. How to manage Gallery Section in Spintech
492. How to manage Gallery Section in SpaBiz Pro?
493. How to manage colors in Seokart Pro?
494. Product Section Manage of Lingerie Home Page!
495. How to manage Custom Section in CoziPress
496. How to select Digipress Theme?
497. How to manage background image in Seokart Lite?
498. How to manage section Reorder in Setto Pro?
499. How to manage Call To Action Section in Owlpress Pro?
500. Blog Section Manage of Electronics Home Page!
501. How to manage footer section in Spintech
502. How to manage menu setup?
503. How to create new project of CoziPress
504. How to install Decorme?
505. Slider Manage of Goggles Home Page!
506. How to manage Custom Section in SpaBiz Pro?
507. How to Activate license in Seokart pro?
508. How to Setup Home Page?
509. How to manage General Section in Spintech
510. How to manage footer-1 in SpaBiz Pro?
511. How to manage Coming Soon Page in Spintech
512. How to manage Gallery Section in Kundoo
513. How to manage Team Section in Appetizer Pro?
514. How to manage Project Page in Kundoo
515. How to setup countdown on Products?
516. How to manage footer section in Seokart Pro?
517. How to Demo Import for Seokart pro?
518. How to manage Blog Masonary in Decorme?
519. Product Section Manage of Electronics Home Page!
520. How to manage background image?
521. How to manage Testimonial Section in Decorme?
522. How to manage Pricing Page in Kundoo
523. How to manage Typography?
524. Newsletter Section Manage of Watch Home Page!
525. How to manage Typography in Seokart Pro?
526. How to manage General Section in Appetizer Lite?
527. How to manage Specific Questions Section in Astrocare Pro
528. How to manage Project Section in Spintech
529. Testimonial Section Manage of Watch Home Page!
530. How to setup Background image in Owlpress Pro?
531. How to manage Portfolio Page in Seokart Pro?
532. How to manage the General Section
533. How to Setup Home Page?
534. How to manage style configurator?
535. How to manage team page in Astrocare
536. How to manage Typography in Seokart Pro?
537. How to manage header section in Decorme?
538. How to manage Service Section in Appetizer Lite?
539. How to manage Service page in SpaBiz Pro?
540. How to manage Contact Page in Decorme?
541. How to manage General Section?
542. How to manage Custom Section in Owlpress Pro?
543. How to manage payment page in Setto Pro?
544. How to manage colors in Spintech
545. How to add Additional CSS?
546. How to manage Typography in CoziPress
547. How to setup Background image in Appetizer Pro?
548. How to manage Custom Section in Decorme?
549. How to manage Horoscope page in Astrocare Pro
550. How to manage 404 Page in Kundoo
551. How to manage FAQ section in Astrocare
552. How to Set Home Page2?
553. How to manage Pricing Page in Seokart Pro?
554. How to manage Service Section in CoziPress
555. How to manage General Section?
1. How to manage footer section in Kundoo
1.How to manage footer Top related setting in footer
From your dashboard, go to the Appearance > Customize > Footer > Footer Top
Here you can change footer icon, link title & text related setting.
Click on Publish.
2.How to manage footer Bottom related setting in footer
From your dashboard, go to the Appearance > Customize > Footer > Footer Bottom
Here you can change footer Copytight , Country, Social icons, & PaymentMethods related setting.
Click on Publish.
3.How to manage footer widget layout in footer
From your dashboard, go to the Appearance > Customize > Footer > Footer Widget Area
Here you can manage footer widget layout.
Click on Publish.
2. How to manage Info 1 in SpaBiz Pro?
1.How to Manage Content info-1?
From your dashboard, go to the Appearance > Customize > FrontPage Sections > Info Section
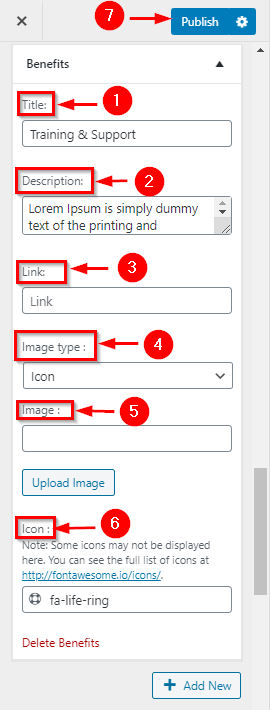
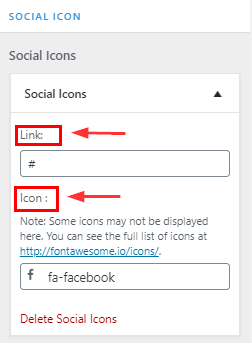
Here you can manage content (Like- Title, Link, Icon, Image) in the info section.
Click on Publish.
2.How to Manage Info Column?
From your dashboard, go to the Appearance > Customize > FrontPage Sections > Info Section
Here you can manage info column in the info section.
Click on Publish.
3. How to install Astrocare Pro Theme
Via WordPress Dashboard install Astrocare Pro
Go to the menu Appearance > Themes and click on the Add New button.
Click on the Upload Theme button.
Click on the Browse button and navigate to the unzipped theme package on your computer.
Look for a file called astrocare-pro.zip Click on it to select, then click OK.
Click on the Install Now button and wait until the installation is complete.
Click on the Activate link to activate the theme on your WordPress site.
4. How to manage menu setup?
From your dashboard, go to the Appearance > Menus > Select Menu
Here Select Menu according to you
Click on Save Menu.
5. How to manage Service Section in Astrocare
1. How to manage Title & Subtitles?
From your dashboard, go to the Appearance > Customize > FrontPage Sections > Service Section
Here you can change Title & Subtitle in the Service section.
Click on Publish.
2. Select a service type that likes you
From your dashboard, go to the Appearance > Customize > FrontPage Sections > Service Section
3. How to manage Service Style 2 Content & Image?
From your dashboard, go to the Appearance > Customize > FrontPage Sections > Service Section
Here you can change Content & Image in the Service section.
Click on Publish.
4. Select the service column that you require
From your dashboard, go to the Appearance > Customize > FrontPage Sections > Service Section
5. How to manage the Service Style 1 Content & Image Section?
From your dashboard, go to the Services
6. How to create service style 1 categories?
From your dashboard, go to the Services
7. Astrocare Pro allows you to add even more Service styles 2.Pro Features
6. How to manage 404 Page in CoziPress
1.How to manage Content in 404 Page
From your dashboard, go to the Appearance > Customize > Page Templates > 404 page
Here you can change title, Subtitle SUbtite2 & Description in 404 page.
Click on Publish.
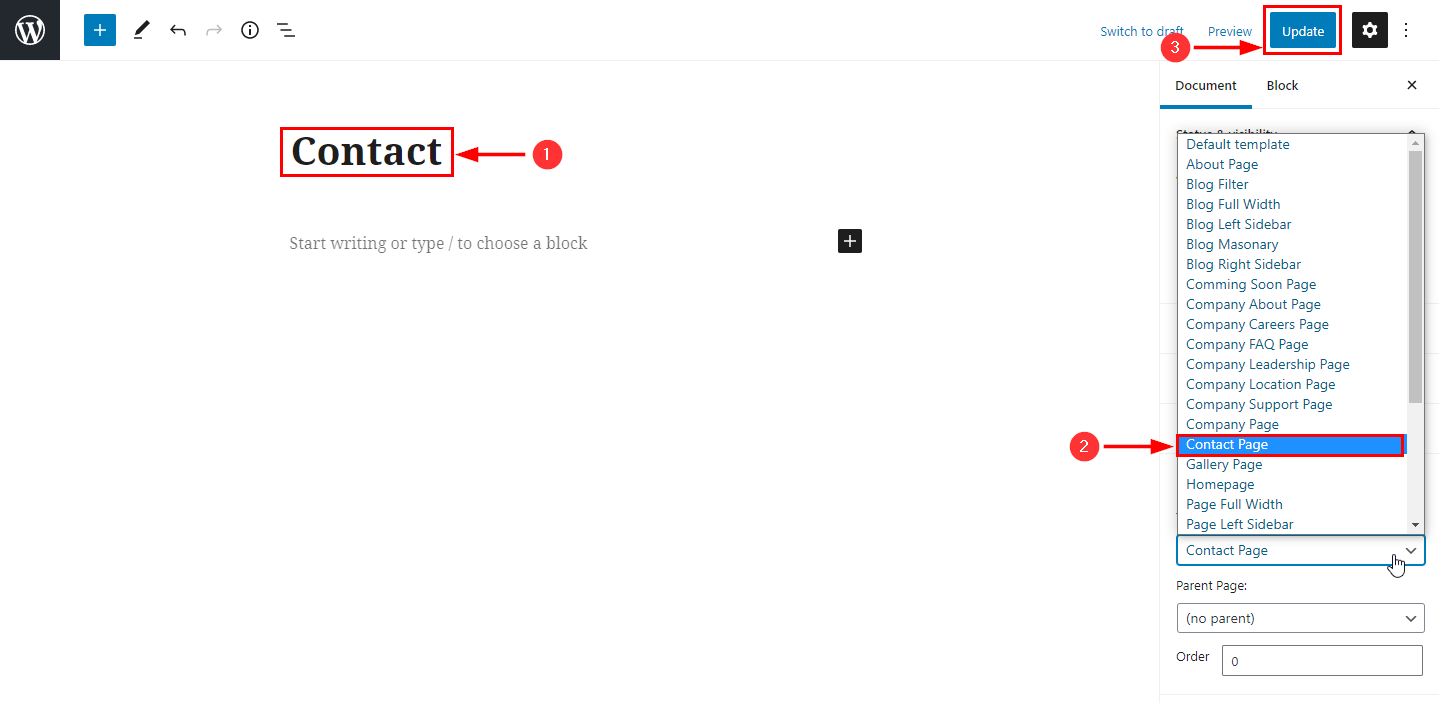
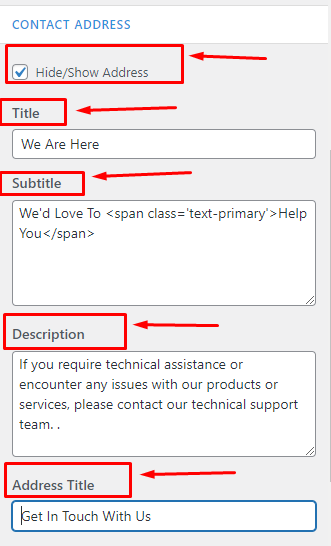
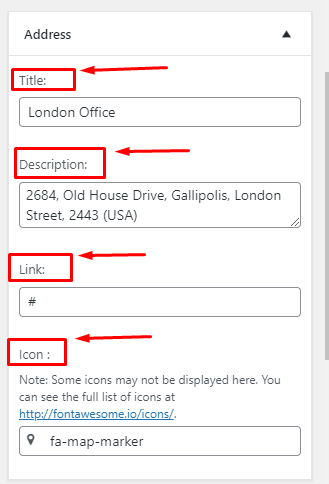
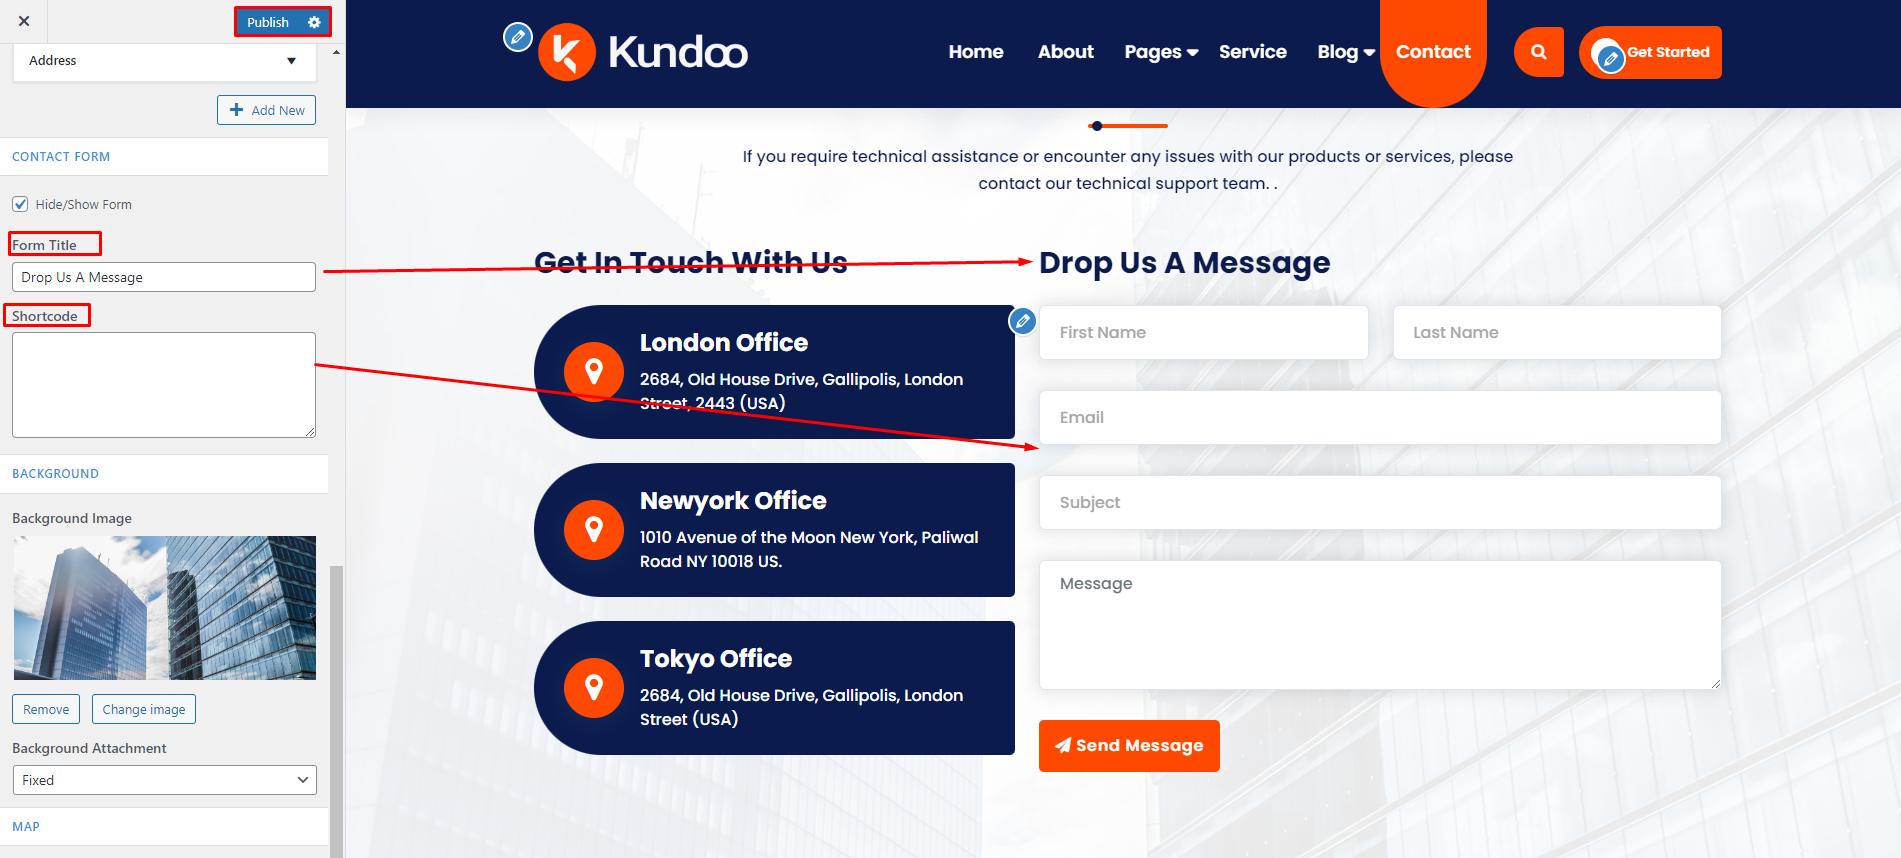
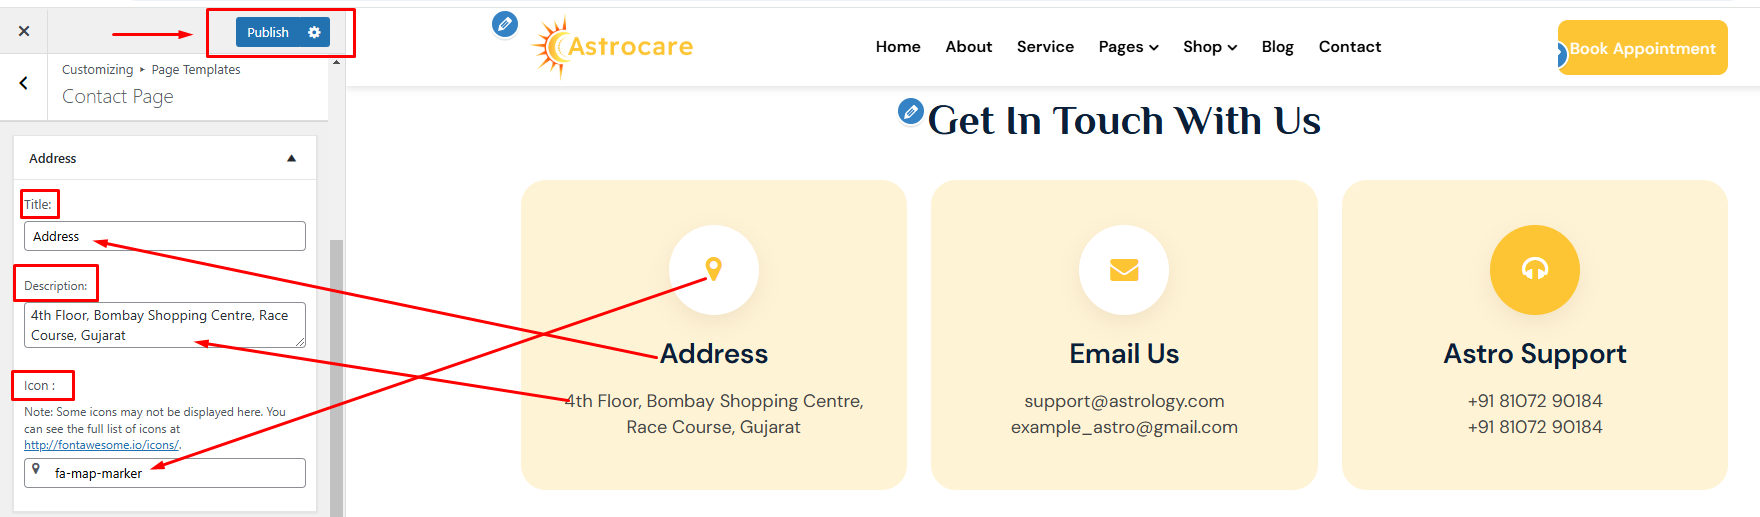
7. How to manage Contact Page in CoziPress
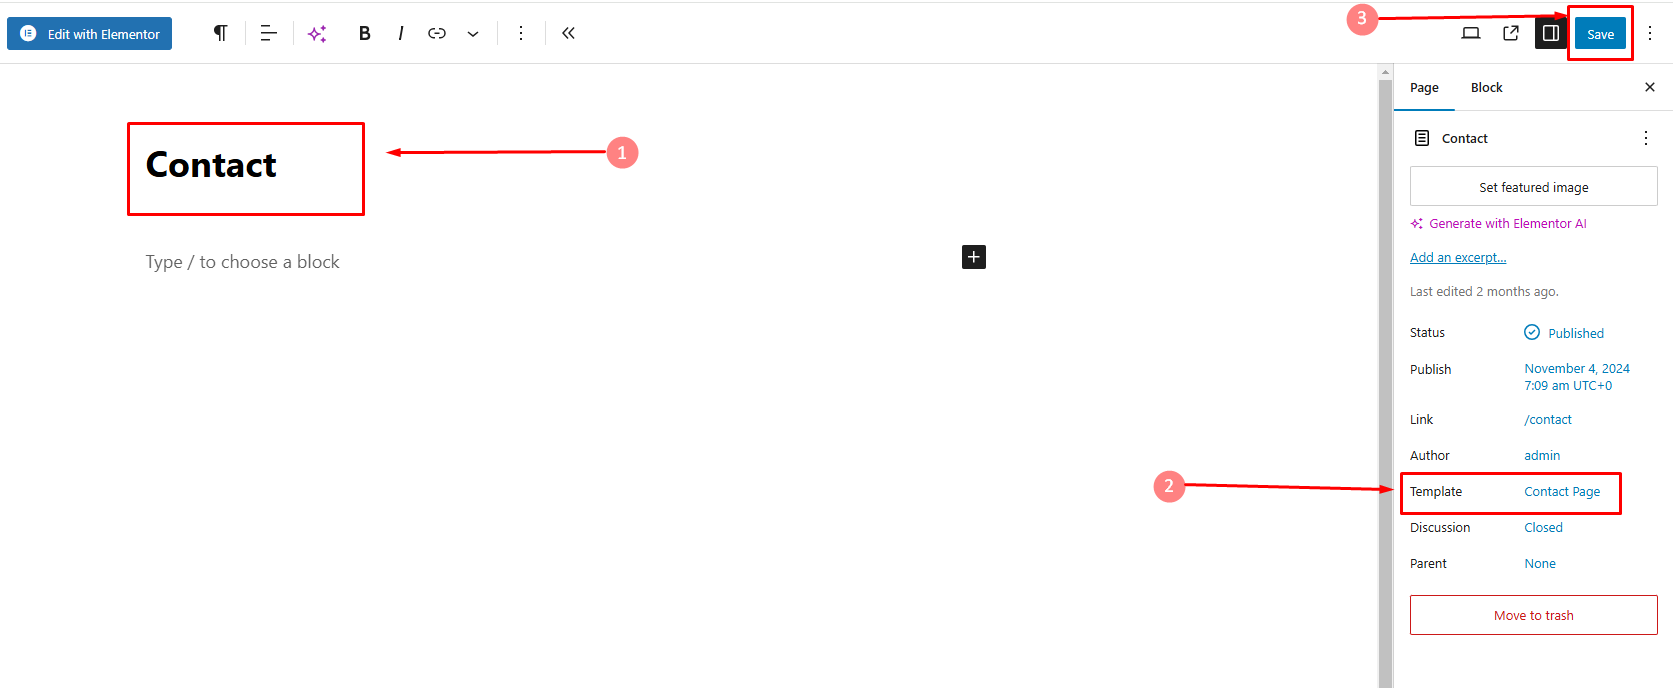
1.Create a Page & Select Template
From your dashboard, go to the Dashboard > Pages > Add New
Now Create a page & Select the Template.
Click on Publish.
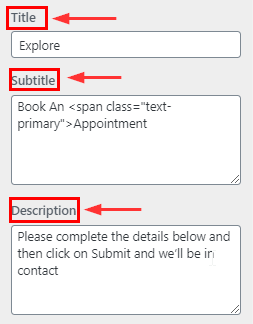
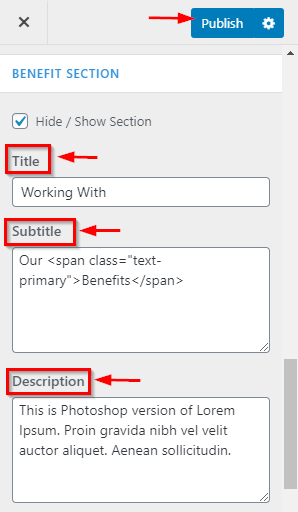
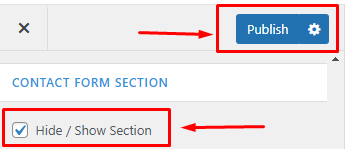
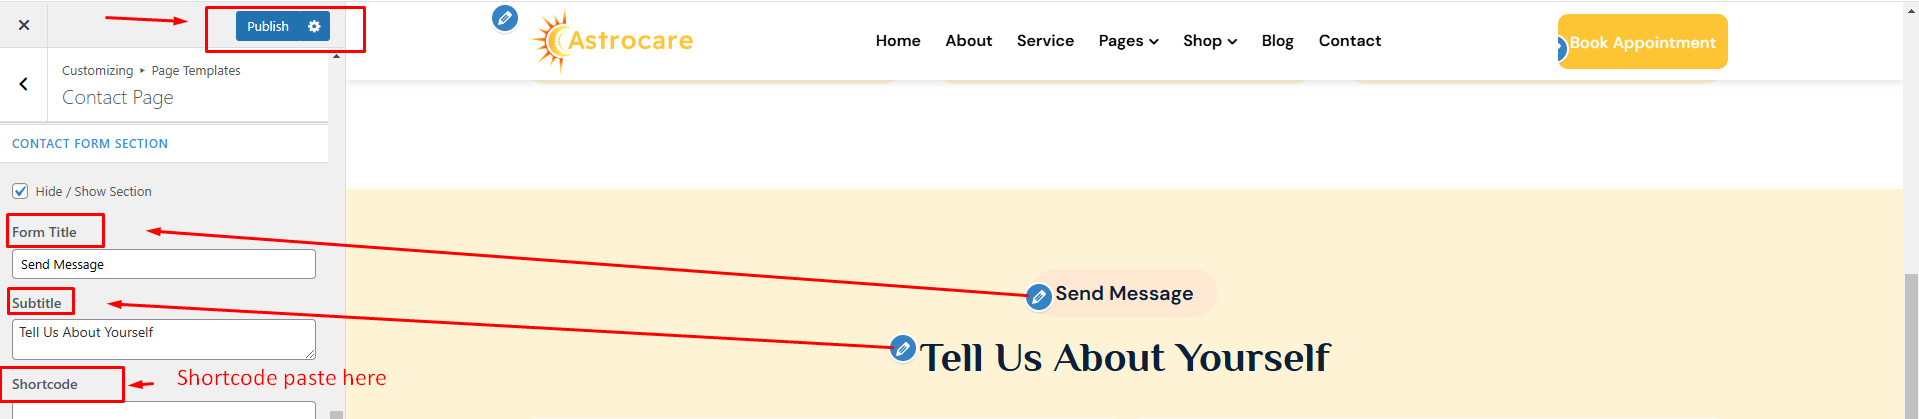
2.How to manage title, Subtitle & Description in Contact Form.
From your dashboard, go to the Appearance > Customize > Page Templates > Contact Page
Here you can change the title, Subtitle & Description in Contact Form Section.
Click on Publish.
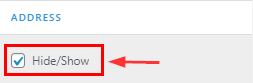
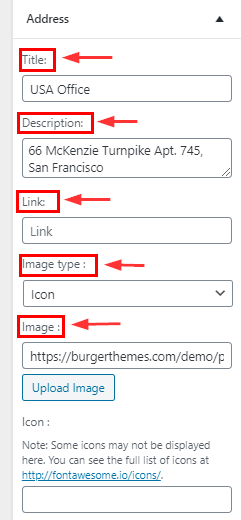
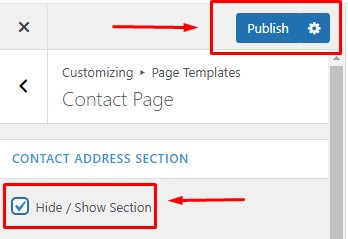
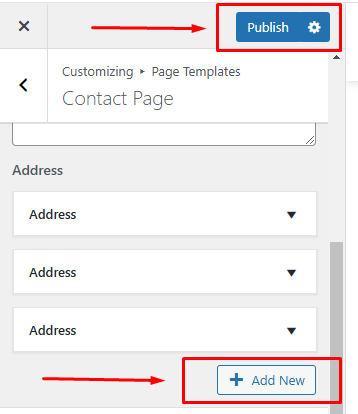
3.How to manage Address Content in Contact Form.
From your dashboard, go to the Appearance > Customize > Page Templates > Contact Page
Here you can change the Address Content in Contact Form Section.
Click on Publish.
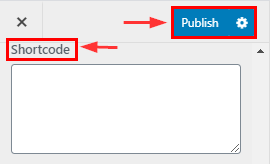
4.How to use shortcode in contact page for Form.
From your dashboard, go to the Appearance > Customize > Page Templates > Contact Page
Here you can use shortcode for form.
Click on Publish.
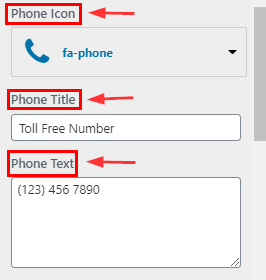
5.How to manage Content in Contact Info.
From your dashboard, go to the Appearance > Customize > Page Templates > Contact Page
Here you can change the content in contact info section.
Click on Publish.
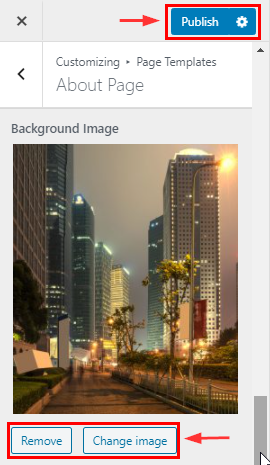
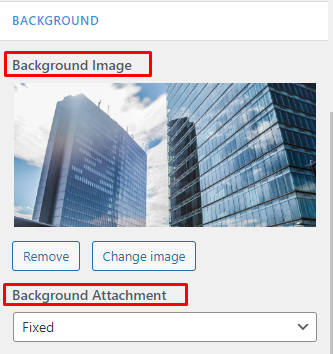
6.How to manage background image related setting .
From your dashboard, go to the Appearance > Customize > Page Templates > Contact Page
Here you can change background image related setting in contact info section.
Click on Publish.
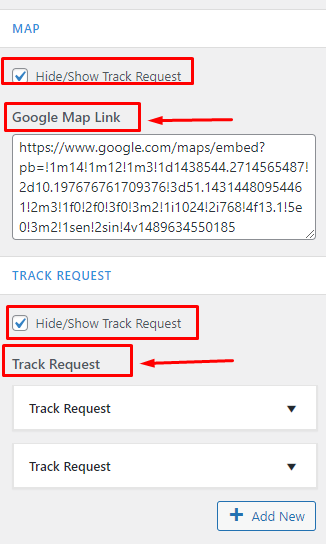
7.How to manage map related setting .
From your dashboard, go to the Appearance > Customize > Page Templates > Contact Page
Here you can change map related setting in contact info section.
Click on Publish.
8. How to manage Pricing Page in Decorme?
1.Create Pricing Filter Page & Select Template
From your dashboard, go to the Dashboard > Pages > Add New
Now Create a page & Select the Template.
Click on Publish.
2.How to manage content & Column?
From your dashboard, go to the Appearance > Customize > Page Templates > Pricing Page
Here you can change title, Subtitle & Description & Column in Pricing section.
Click on Publish.
9. Install & Activate Burger Companion Plugin?
In the WordPress dashboard go to the appearance submenu and click on customize. After clicking on customizing you will in theme customizer. Here you have to show in the recommended plugin then click on the install & activate Button.
10. How to manage style configurator in Owlpress Pro?
1. How to manage website layout & preset background image.
From your dashboard, go to the Appearance > Customize > Style Configurator > Page Layout
Here you can manage the website layout & preset background image.
Click on Publish.
2. How to manage prebuilt theme color.
From your dashboard, go to the Appearance > Customize > Style Configurator > prebuilt theme color
Here you can manage prebuilt theme color.
Click on Publish.
3. How to enable/disable custom color.
From your dashboard, go to the Appearance > Customize > Style Configurator > custom color
Here you can manage custom colors.
Click on Publish.
4. How to manage custom primary & secondary colors.
From your dashboard, go to the Appearance > Customize > Style Configurator > custom color
Here you can manage custom primary & secondary colors.
Click on Publish.
5. How to enable/disable the front pallate.
From your dashboard, go to the Appearance > Customize > Style Configurator > Front Pallate
Here you can enable/disable front pallate.
Click on Publish.
11. How to manage 404 Page in Spintech
1.How to manage title,Subtitle & Description in 404 Page
From your dashboard, go to the Appearance > Customize > Page Templates > 404 page
Here you can change title, Subtitle & Description in 404 page.
Click on Publish.
2.How to manage button in 404 Page
From your dashboard, go to the Appearance > Customize > Page Templates > 404 page
Here you can manage button in 404 page.
Click on Publish.
3.How to manage image without title in 404 Page
From your dashboard, go to the Appearance > Customize > Page Templates > 404 page
Here you can manage image without title in 404 page.
Click on Publish.
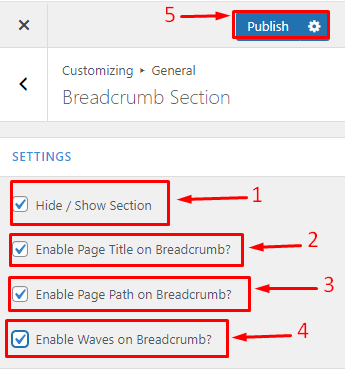
12. How to manage General Section?
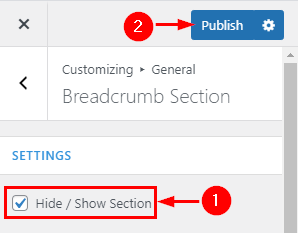
1.Hide/Show Breadcrumb Section
From your dashboard, go to the Appearance > Customize > General > Breadcrumb Section
Now Click on the check box for Hide/Show Breadcrumb Section.
Click on Publish.
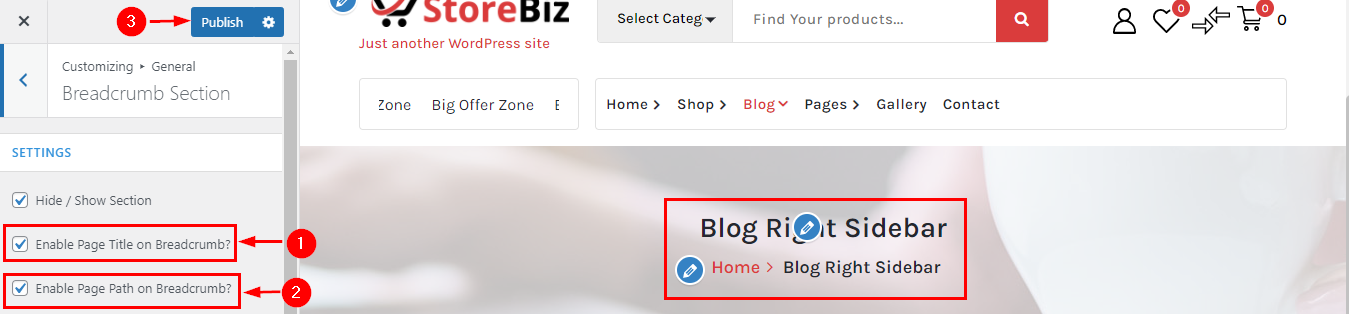
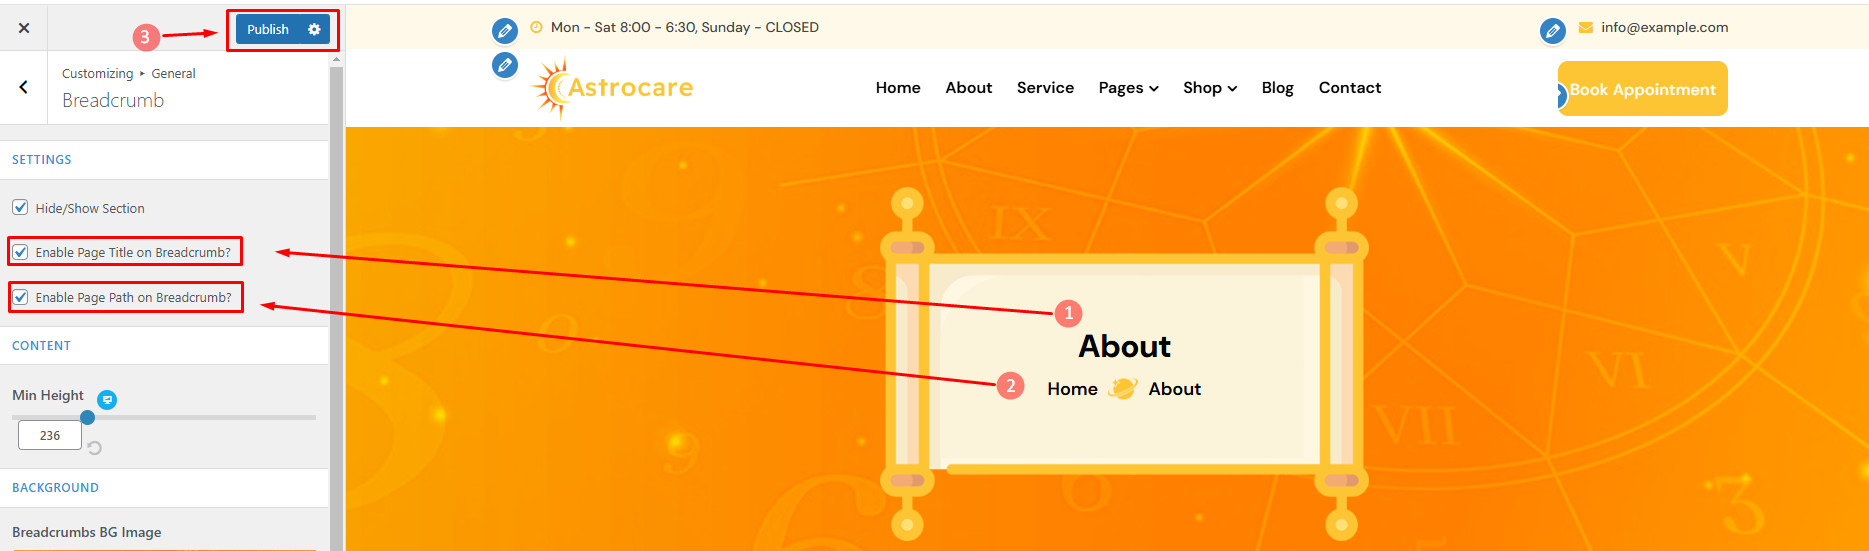
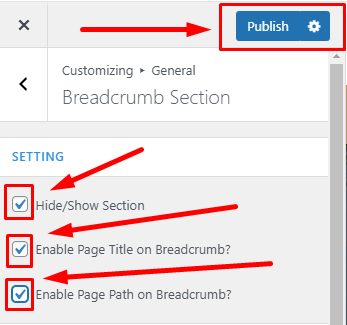
2.Hide/Show Enable Page Title & Page Path on Breadcrumb?
From your dashboard, go to the Appearance > Customize > General > Breadcrumb Section
Now Click on the check box for Hide/Show Enable Page Title & Page Path on Breadcrumb.
Click on Publish.
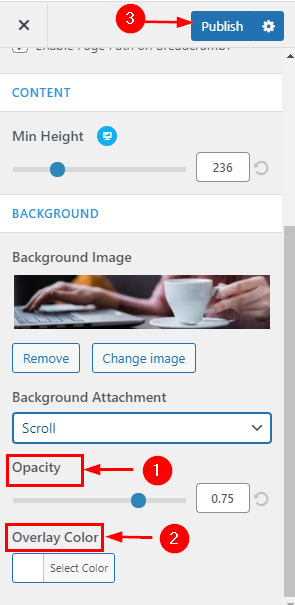
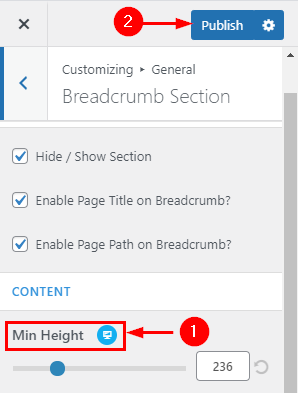
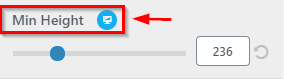
3.How to Manage Min Height
From your dashboard, go to the Appearance > Customize > General > Breadcrumb Section
Here you can manage min-height in Breadcrumb Section.
Click on Publish.
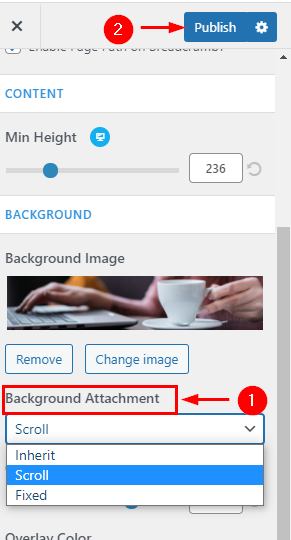
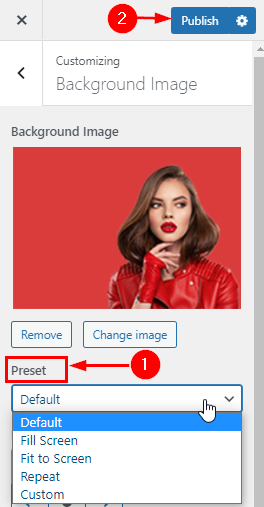
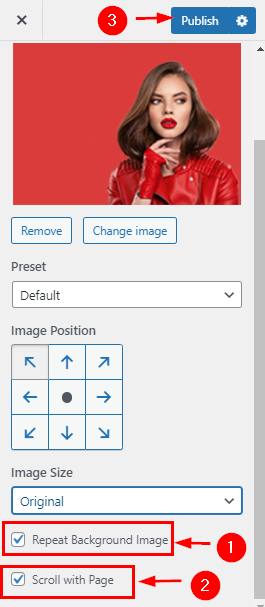
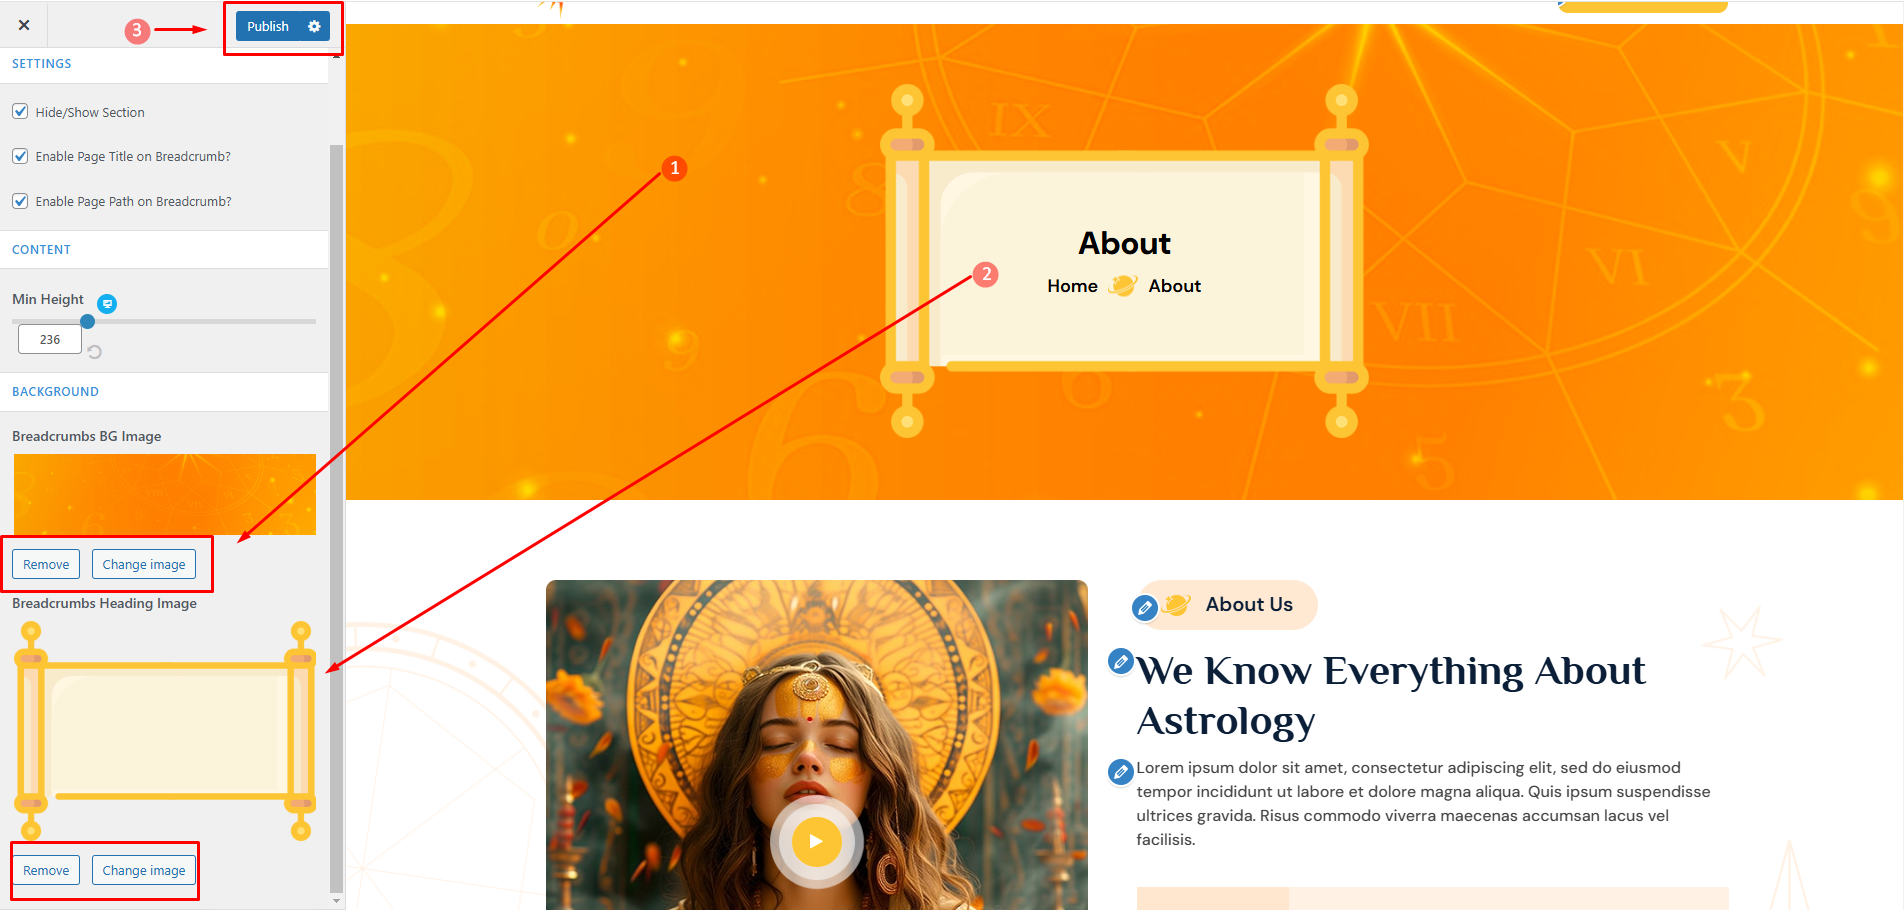
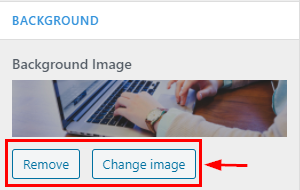
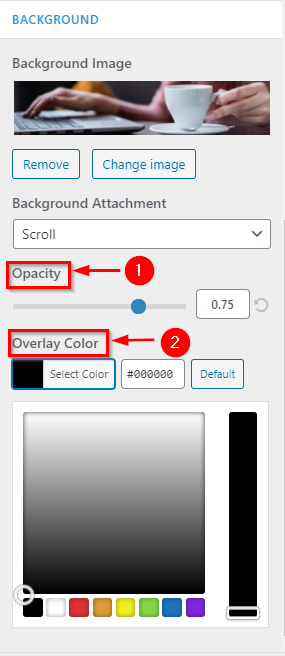
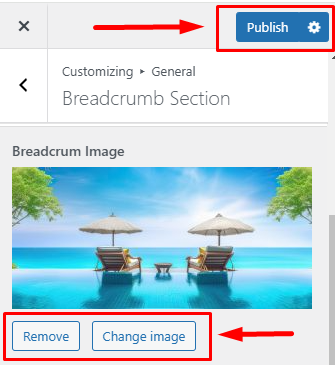
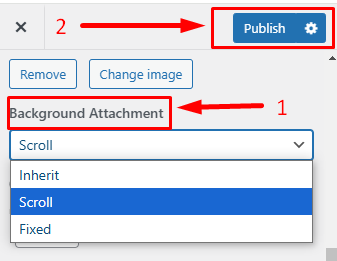
4.How to manage Background Image & Attachment image
From your dashboard, go to the Appearance > Customize > General > Breadcrumb Section
Here you can set the breadcrumb image according to you.
Click on Publish.
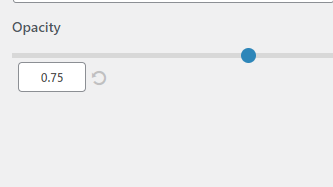
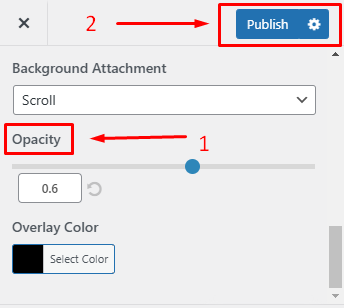
5.How to manage opacity & Overlay Color of Breadcrumb
From your dashboard, go to the Appearance > Customize > General > Breadcrumb Section
Here you can manage opacity & Color Overlay
Click on Publish.
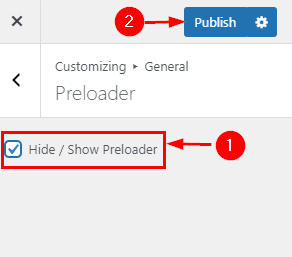
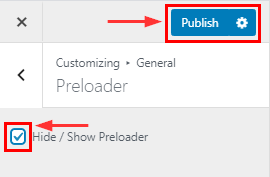
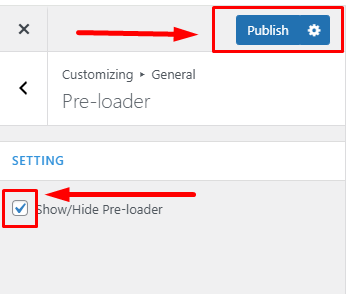
6.Hide/Show Preloader in StoreBiz
From your dashboard, go to the Appearance > Customize > General > Preloader Section
Now Click on the check box for Hide/Show Preloader.
Click on Publish.
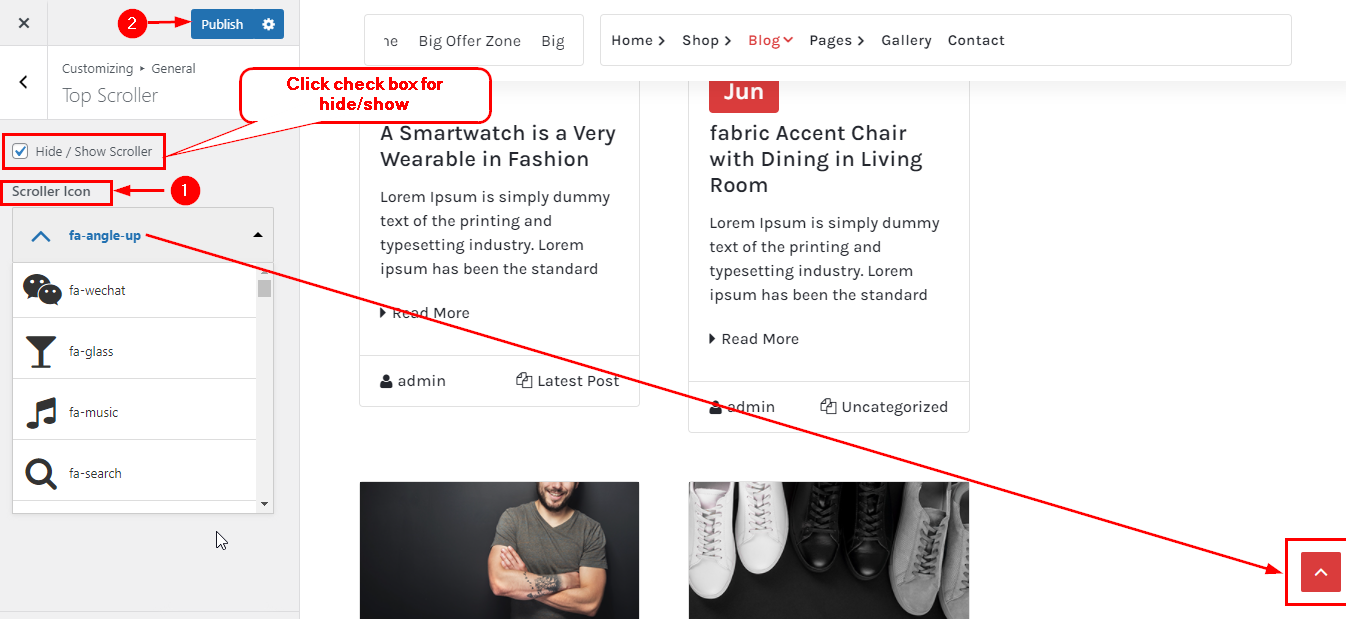
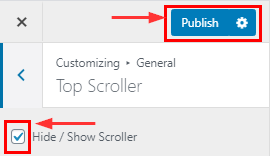
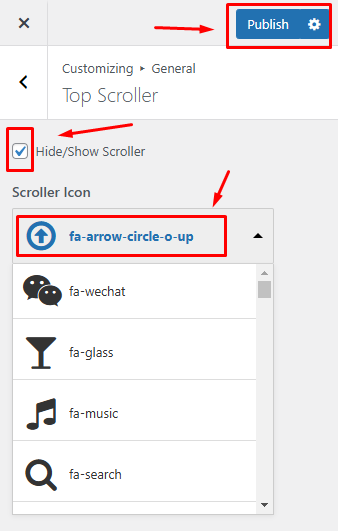
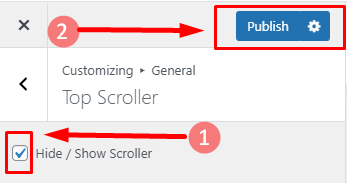
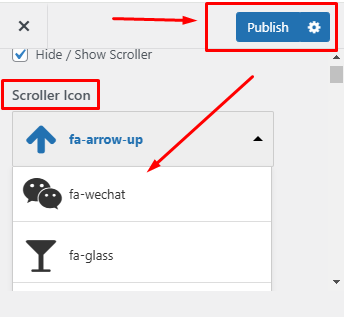
7.How to manage Top Scroller in StoreBiz
From your dashboard, go to the Appearance > Customize > General > Preloader Section
Here you can manage the Scroller icon & also the Hide/Show setting.
Click on Publish.
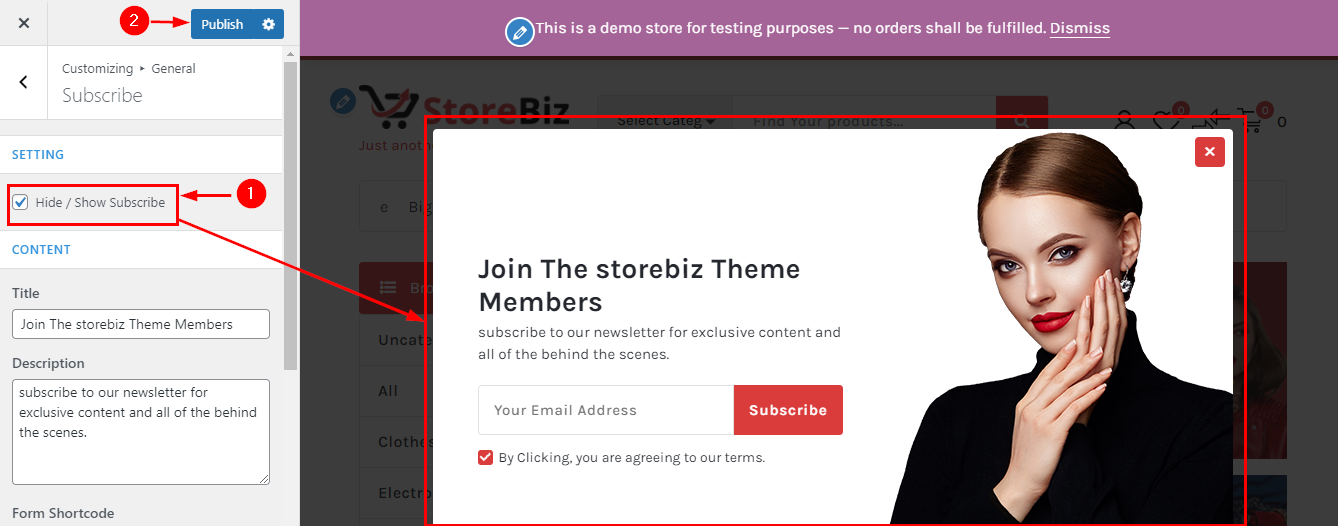
8.Hide/Show Subscribe in StoreBiz
From your dashboard, go to the Appearance > Customize > General > Subscribe Section
Now Click on the check box for Hide/Show Subscribe.
Click on Publish.
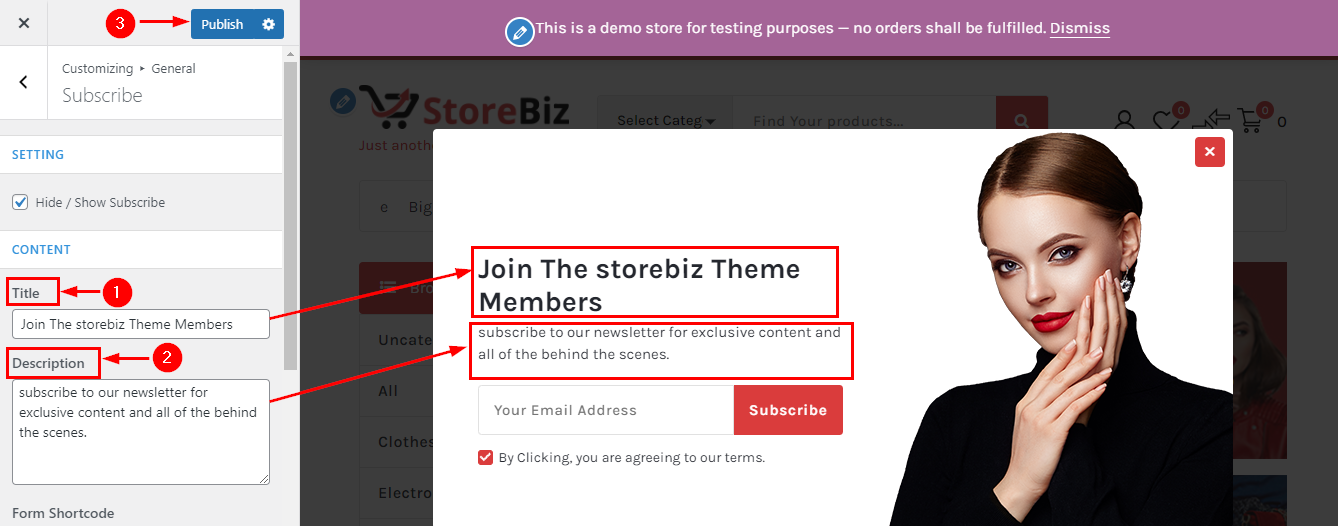
9.How to manage Title & Description in Subscribe section
From your dashboard, go to the Appearance > Customize > General > Subscribe Section
Here you can manage Title & Description in Subscribe.
Click on Publish.
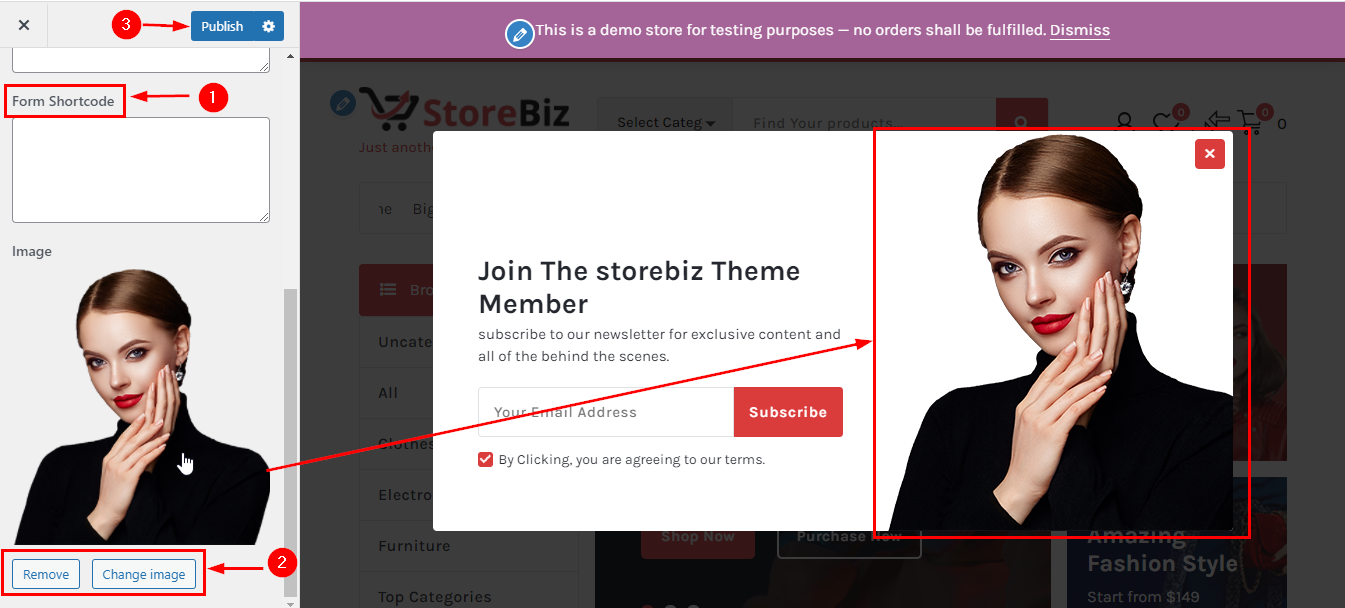
10.How to manage Shortcode & Image in Subscribe section
From your dashboard, go to the Appearance > Customize > General > Subscribe Section
Here you can manage Shortcode & Image in Subscribe.
Click on Publish.
13. How to manage colors in Seokart Lite?
How to manage Background Color
From your dashboard , go to the Appearance > Customize > Colors > Background Color
Here You can manage background color.
Click on Publish.
14. How to manage Service Section in Seokart
1. How to manage title, Subtitle & Description
From your dashboard, go to the Appearance > Customize > FrontPage Sections > Service Section
Here you can change the title, Subtitle & Description in the Service section.
Click on Publish.
2. How to manage content Service Section
From your dashboard, go to the Appearance > Customize > FrontPage Sections > Service Section
Here you can manage content in the Service section.
Click on Publish.
3.How to manage column layout
From your dashboard, go to the Appearance > Customize > FrontPage Sections > Service Section
Here you can manage Column Layout in Service section.
Click on Publish.
15. How to manage Service Section in Appetizer Pro?
1. How to manage title & description?
From your dashboard, go to the Appearance > Customize > FrontPage Sections > Service Section
Here you can change the title, Subtitle & Description in the Service section.
Click on Publish.
2. How to manage the content Service Section?
From your dashboard, go to the Appearance > Customize > FrontPage Sections > Service Section
Here you can manage content in the Service section.
Click on Publish.
3. How to manage column layout
From your dashboard, go to the Appearance > Customize > FrontPage Sections > Service Section
Here you can manage Column Layout in the Service section.
Click on Publish.
16. How to manage Gallery Section in Decorme?
1.How to manage content of gallery section?
From your dashboard, go to the Appearance > Customize > FrontPage Sections > Gallery Section
Here you can change content (image,title & Column)in Gallery section.
Click on Publish.
17. How to manage Contact page in Setto Pro?
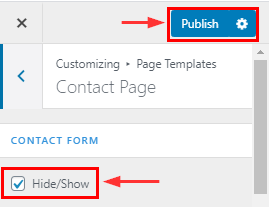
1.Manage Contact Section content!
From your dashboard, go to the Dashboard > Page template > contact Page.
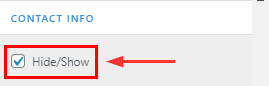
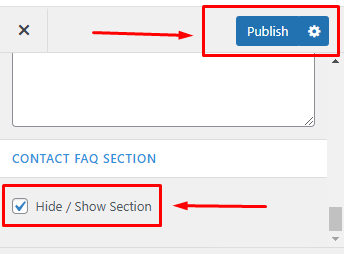
Here you can manage Section content & Hide/Show Section.
Click on Publish.
2.Manage Contact Form content!
From your dashboard, go to the Dashboard > Page template > contact Page.
Here you can manage Contact form Section content & Hide/Show Section.
Click on Publish.
18. How to manage Product Section?
1.Manage title, description & hide/show Section.
From your dashboard, go to the Appearance > Customize > FrontPage Sections > Product Section
Here you can manage title,description & hide/show.
Now Click on Publish.
2.No of Product Display & Background image setting.
From your dashboard, go to the Appearance > Customize > FrontPage Sections > Product Section
Here you can manage title,description & hide/show.
Now Click on Publish.
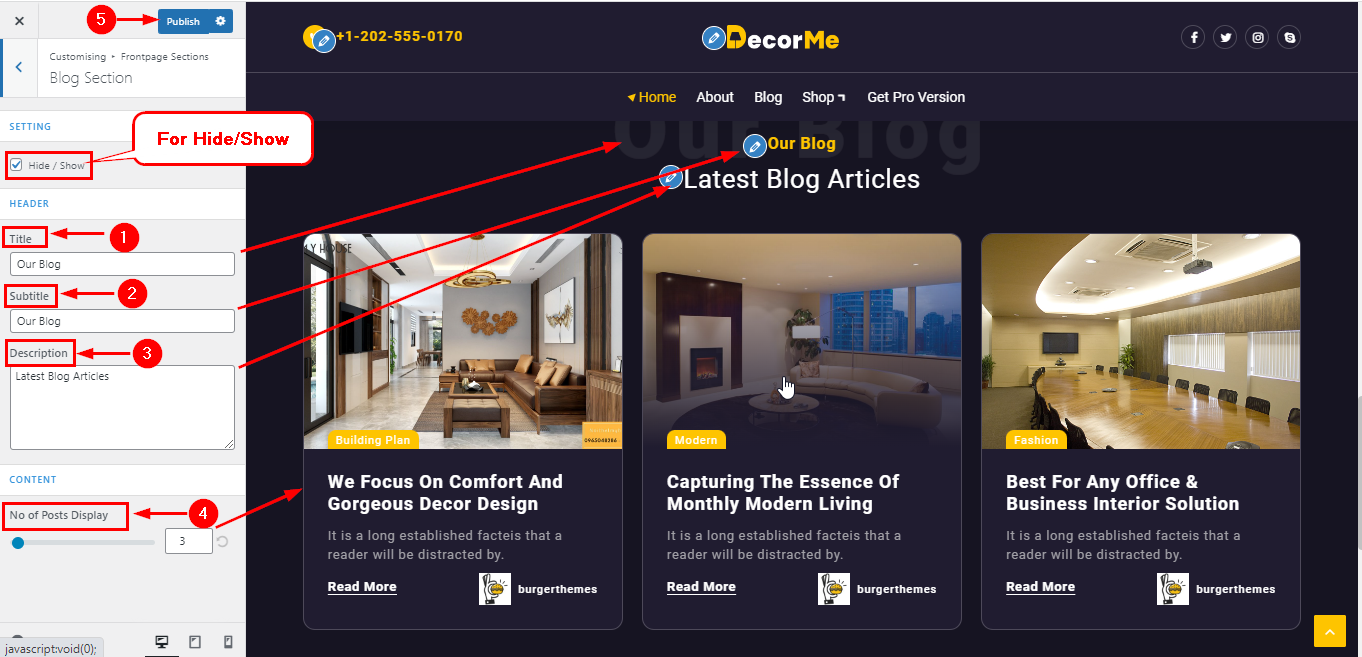
19. How to manage Blog Section in CoziPress
1.How to manage title, Subtitle & Description
From your dashboard, go to the Appearance > Customize > FrontPage Sections > Blog Section
Here you can change title, Subtitle & Description in Blog section.
Click on Publish.
2.How to manage no of posts display in FrontPage
From your dashboard, go to the Appearance > Customize > FrontPage Sections > Blog Section
Here you can manage no of posts display of Blog in FrontPage.
Click on Publish.
3.How to select category for blog section Pro Features
From your dashboard, go to the Appearance > Customize > FrontPage Sections > Blog Section
Here you can select category for blog section .
Click on Publish.
4.How to manage blog Column Pro Features
From your dashboard, go to the Appearance > Customize > FrontPage Sections > Blog Section
Here you can choose column layout in blog section.
Click on Publish.
5.How to manage Blog StylePro Features
From your dashboard, go to the Appearance > Customize > FrontPage Sections > Blog Section
Here you can change blog style in blog section.
Click on Publish.
20. How to manage header text & background color?
How to manage header text & background color?
From your dashboard , go to the Appearance > Customize > Colors > Background Color
Here You can manage header text & background color.
Click on Publish.
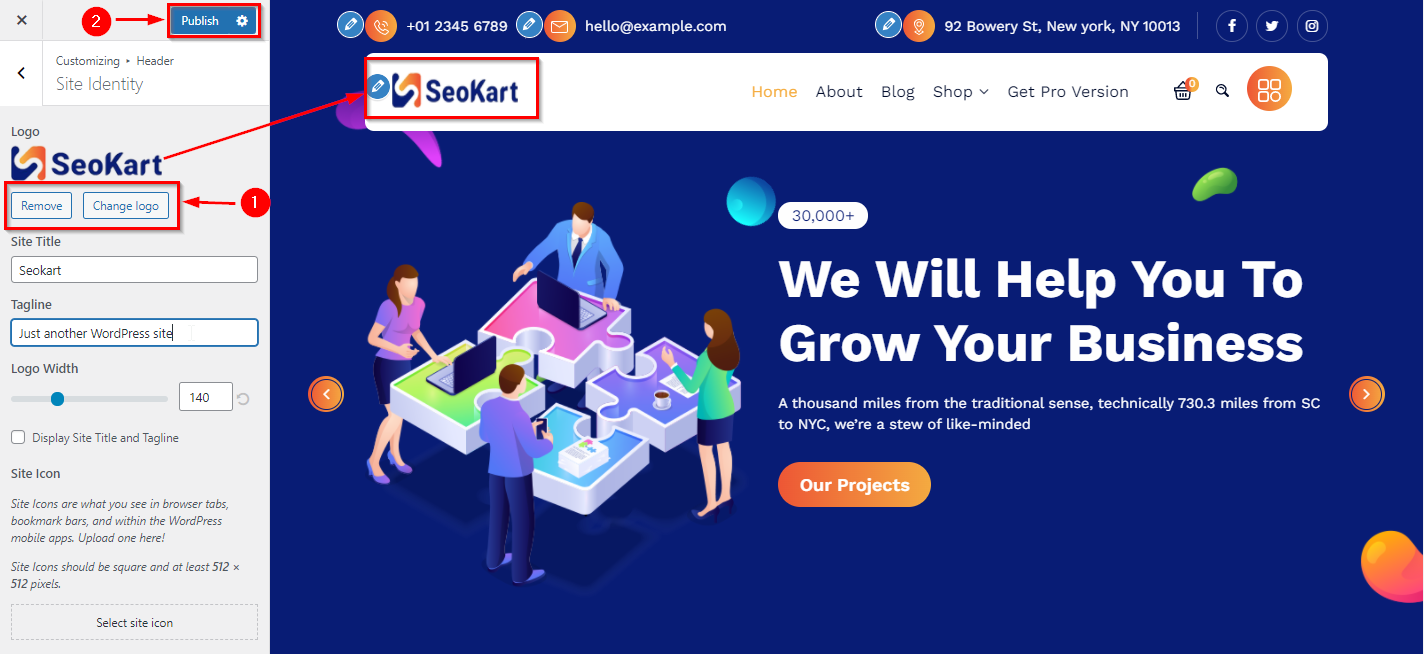
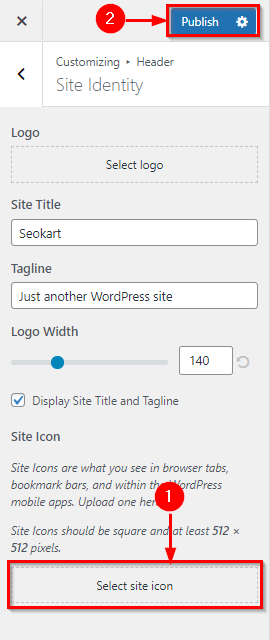
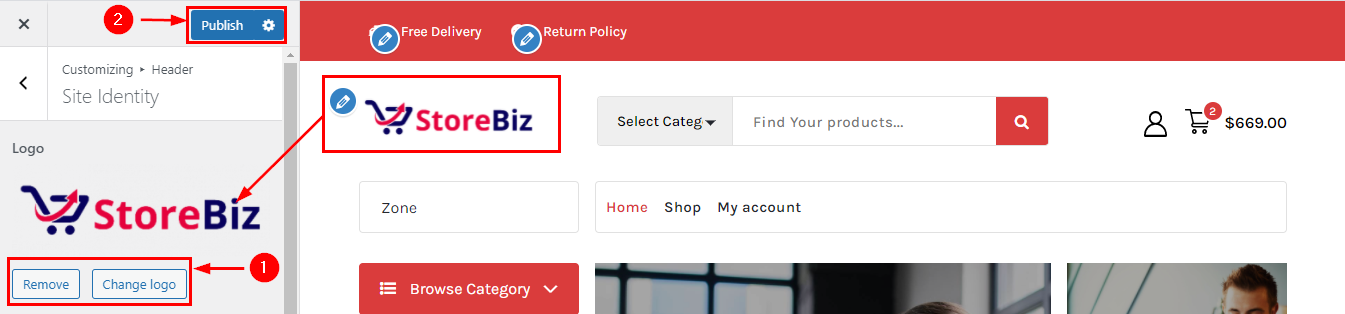
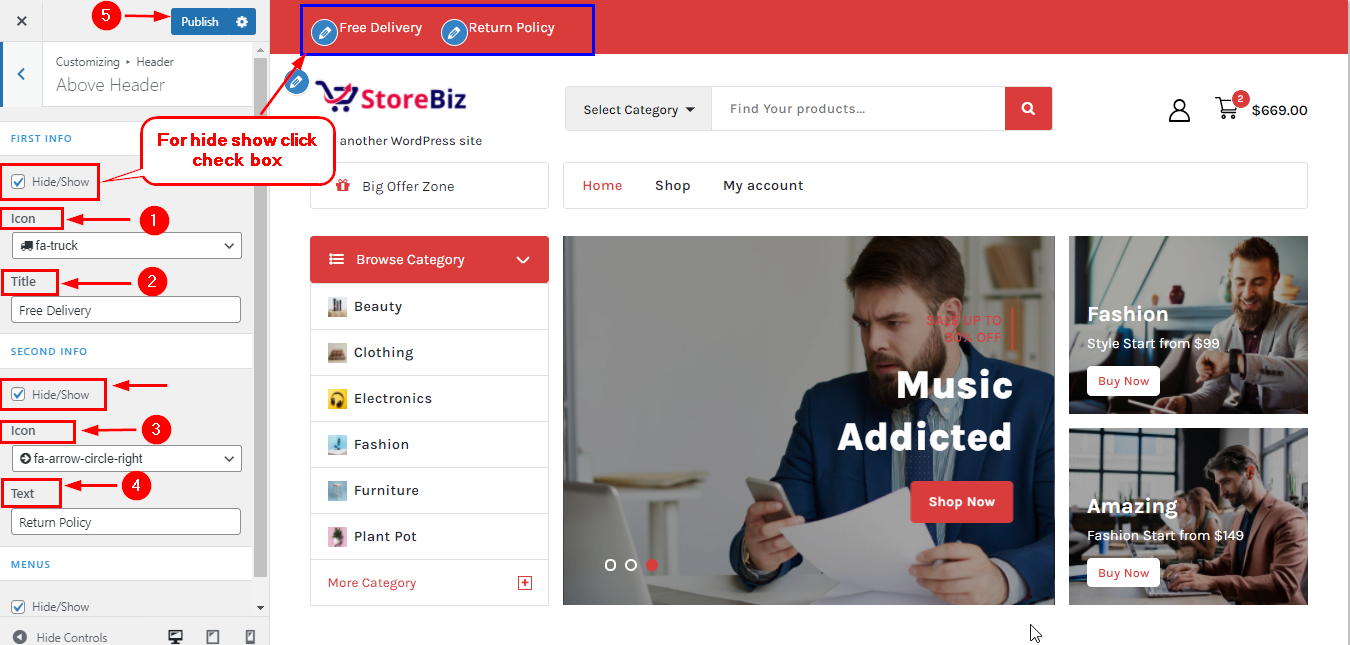
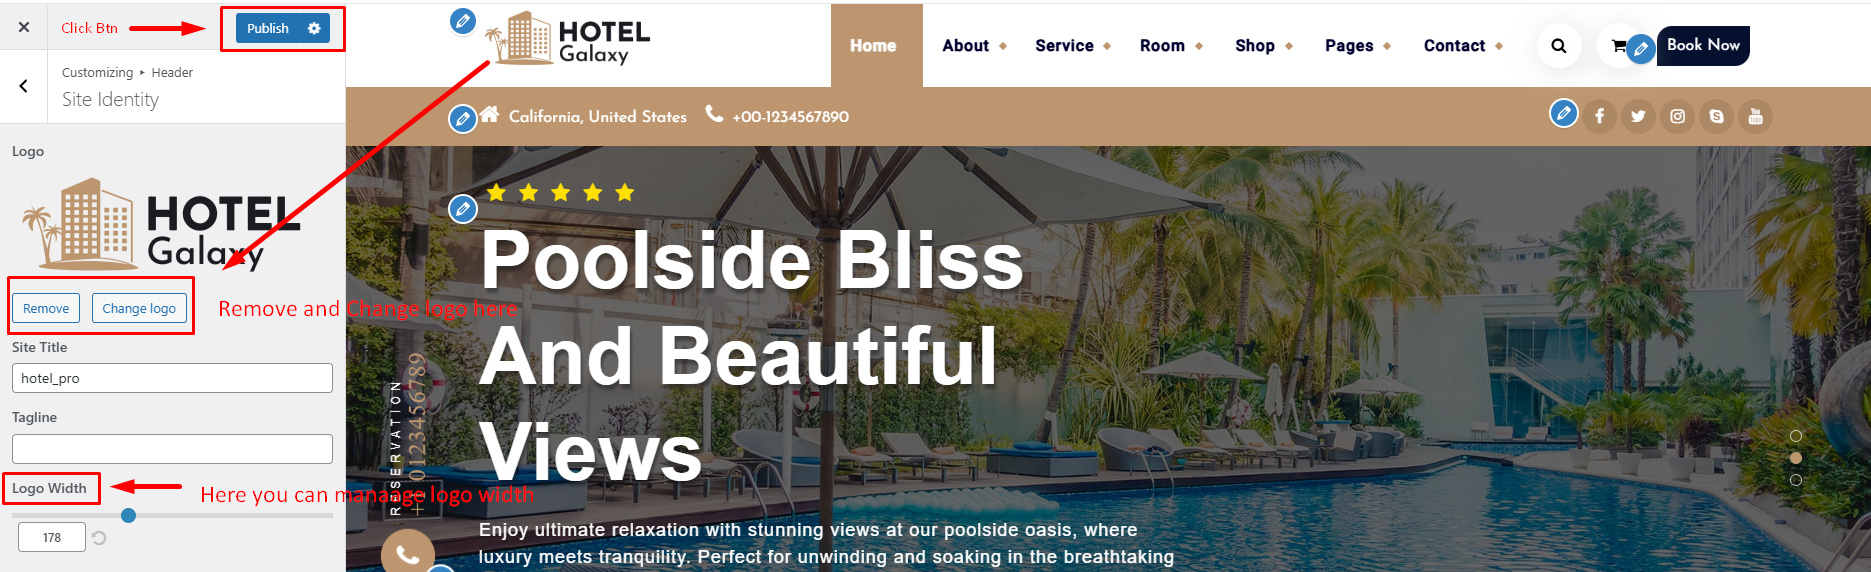
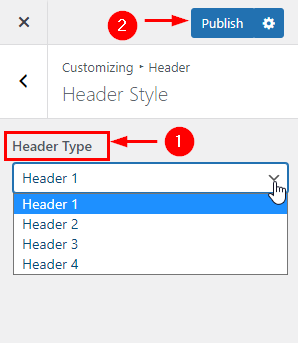
21. How to manage header section in StoreBiz?
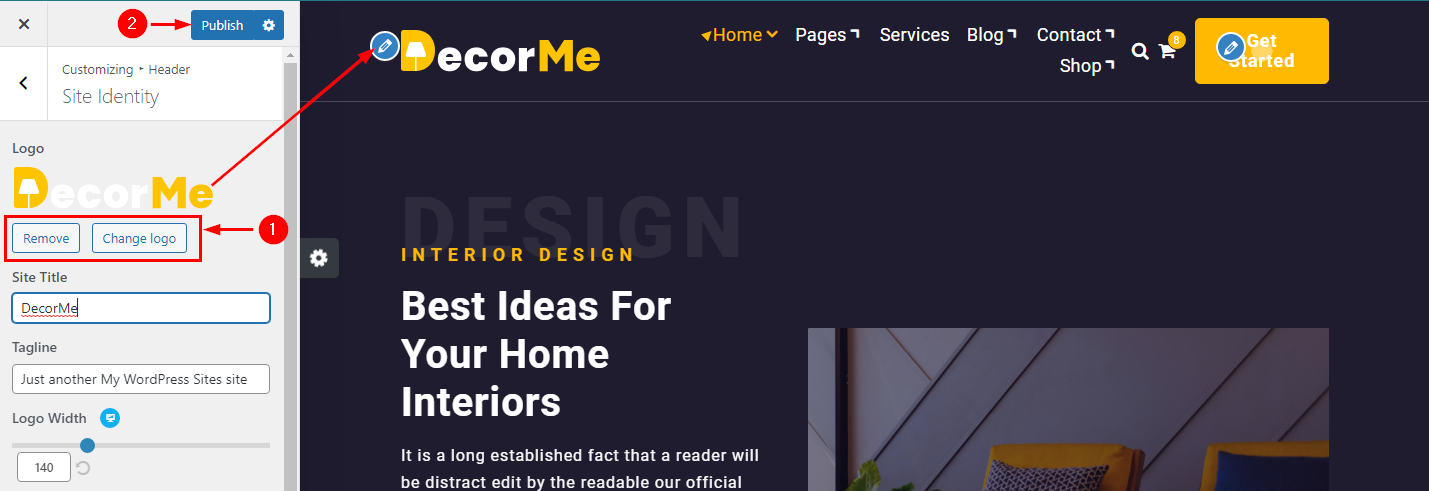
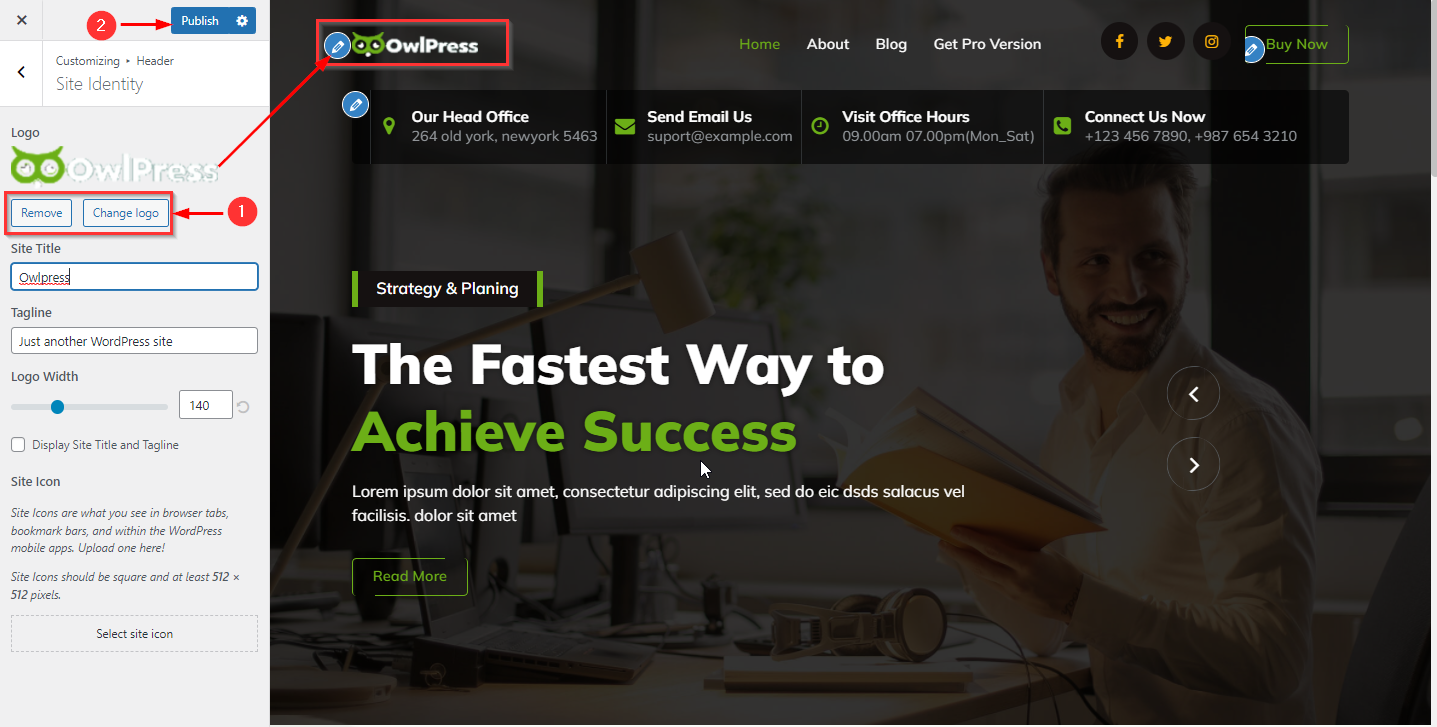
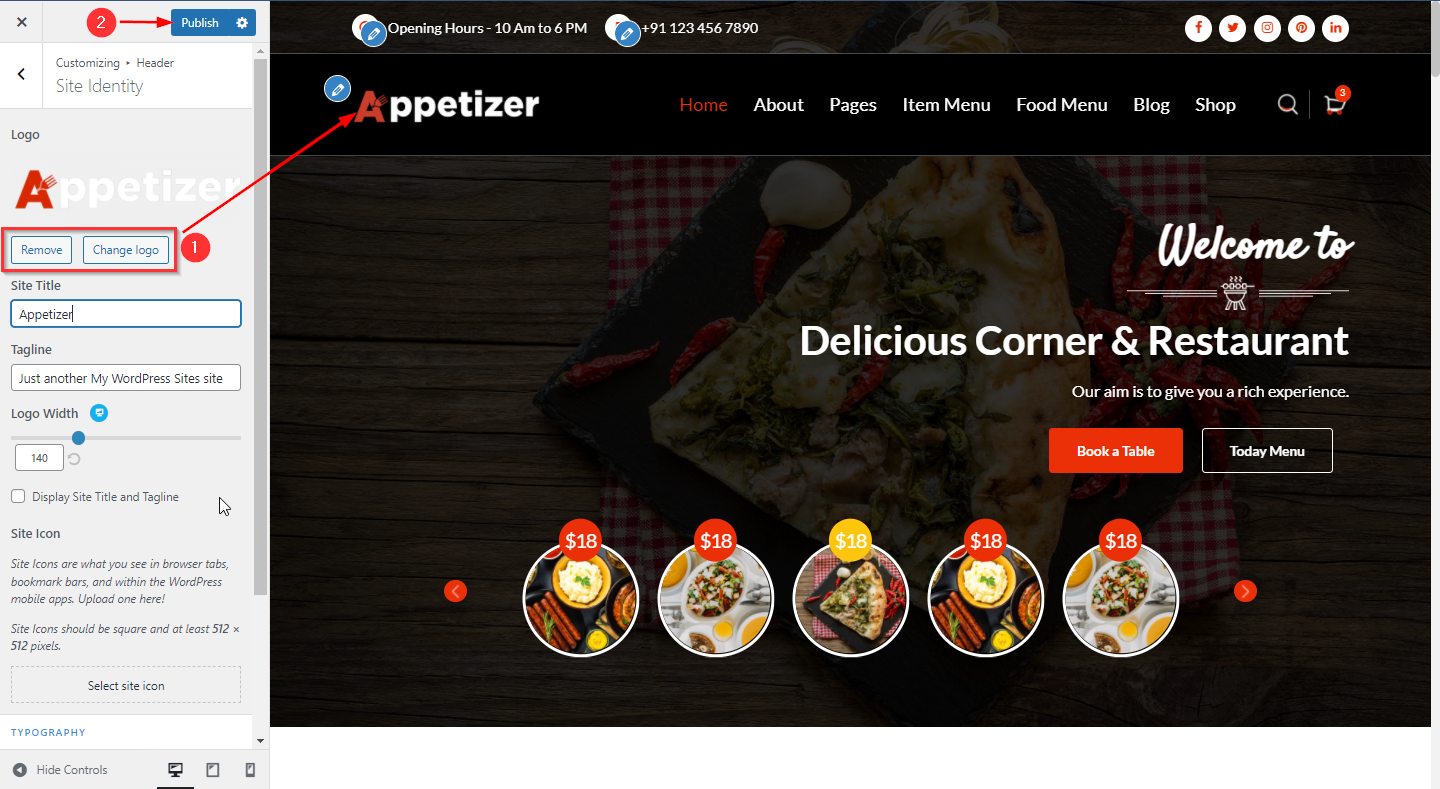
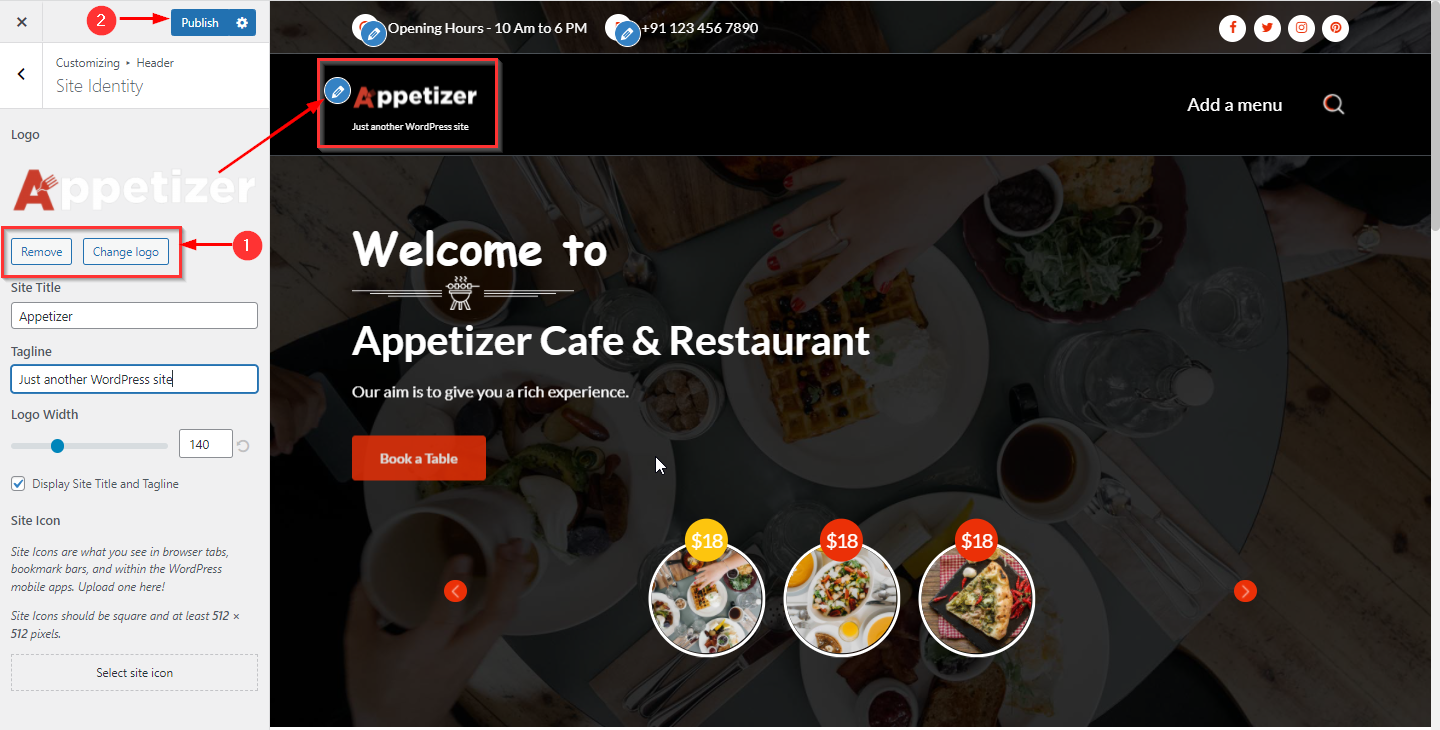
1. How to change the Site logo
From your dashboard, go to the Appearance > Customize > Header > Site Identity Section
Now Click on the select logo and choose a logo for your site.
If you change & remove the logo then you can use the buttons below it.
Click on Publish.
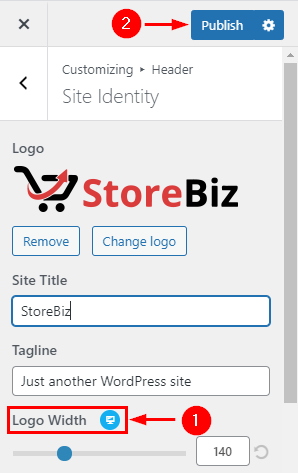
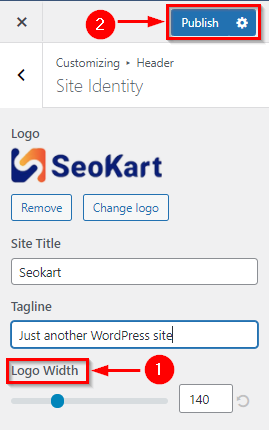
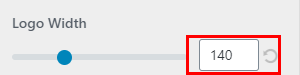
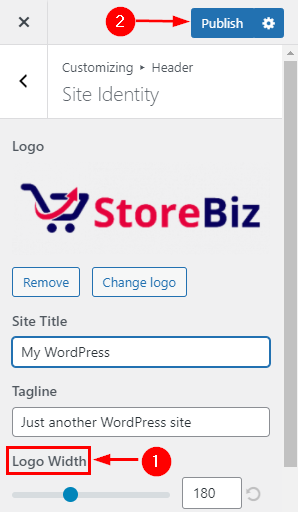
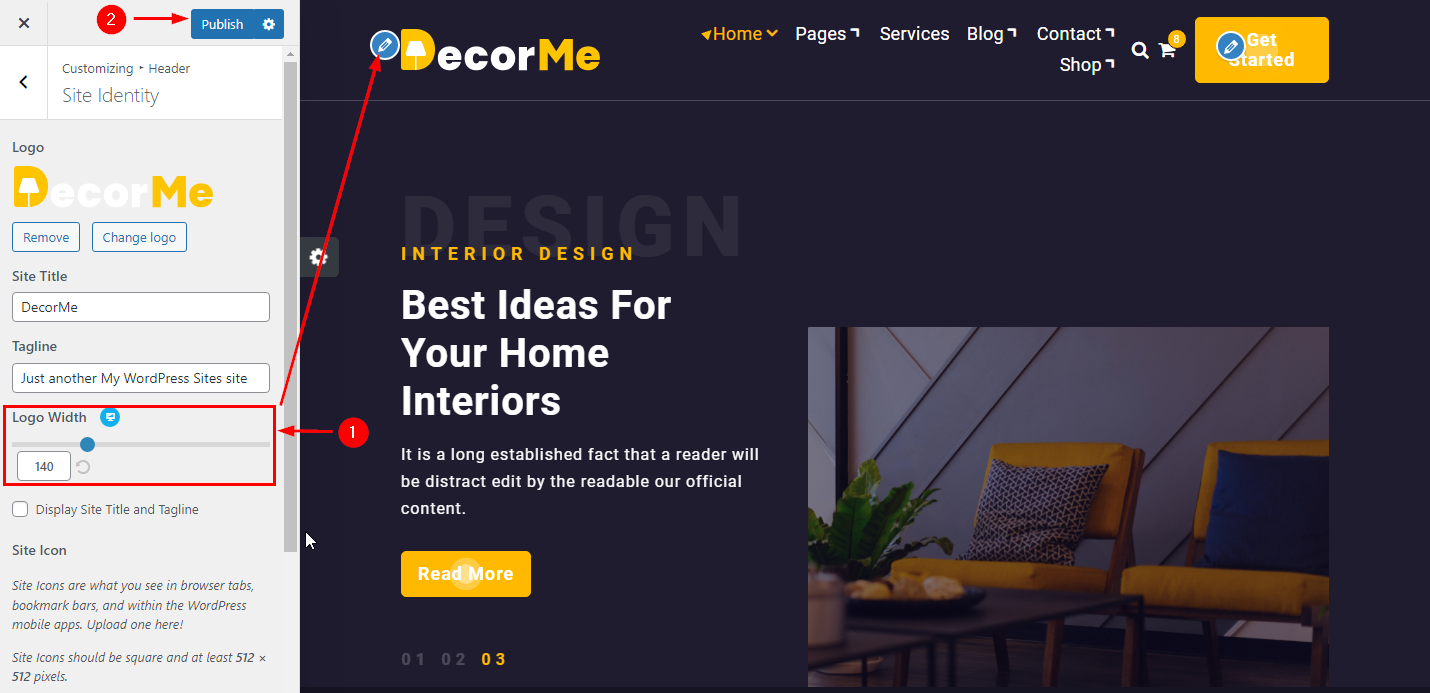
2. How to customize the width of the Site logo
From your dashboard, go to the Appearance > Customize > Header > Site Identity Section
Now Scroll bar use for logo width Customize.
Click on Publish.
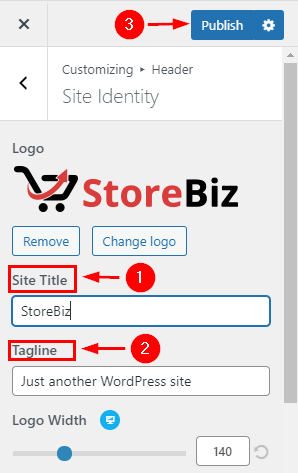
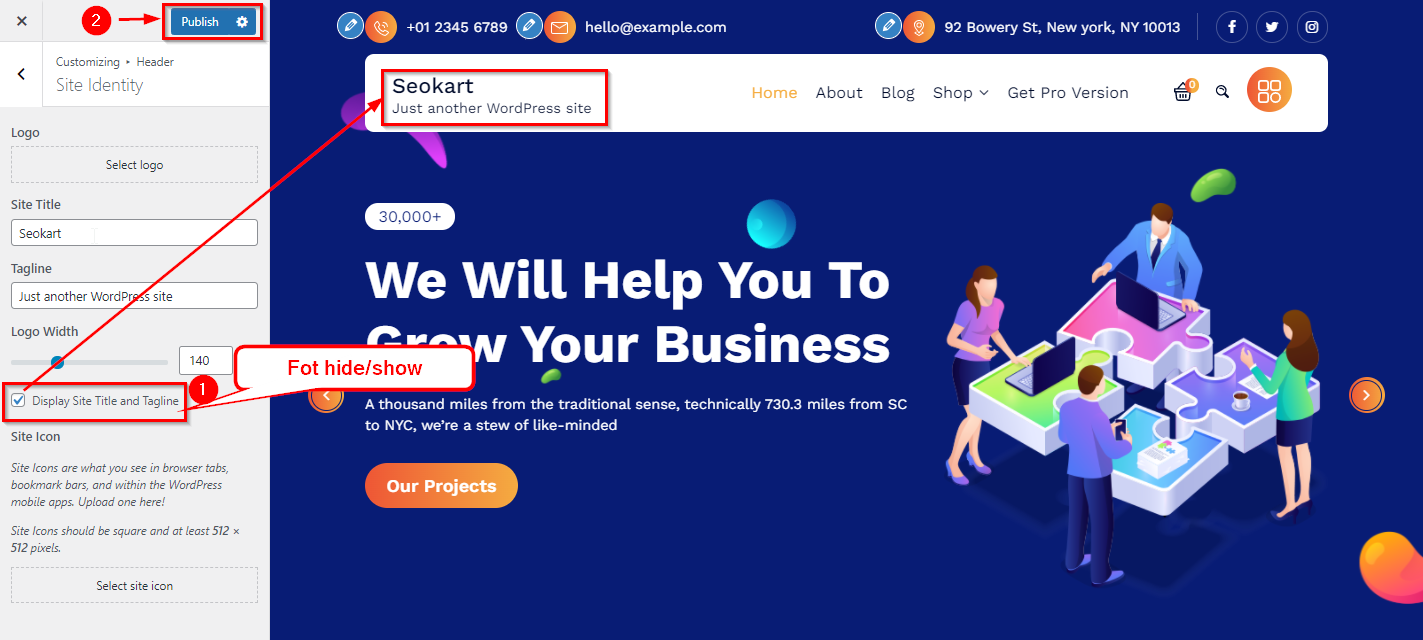
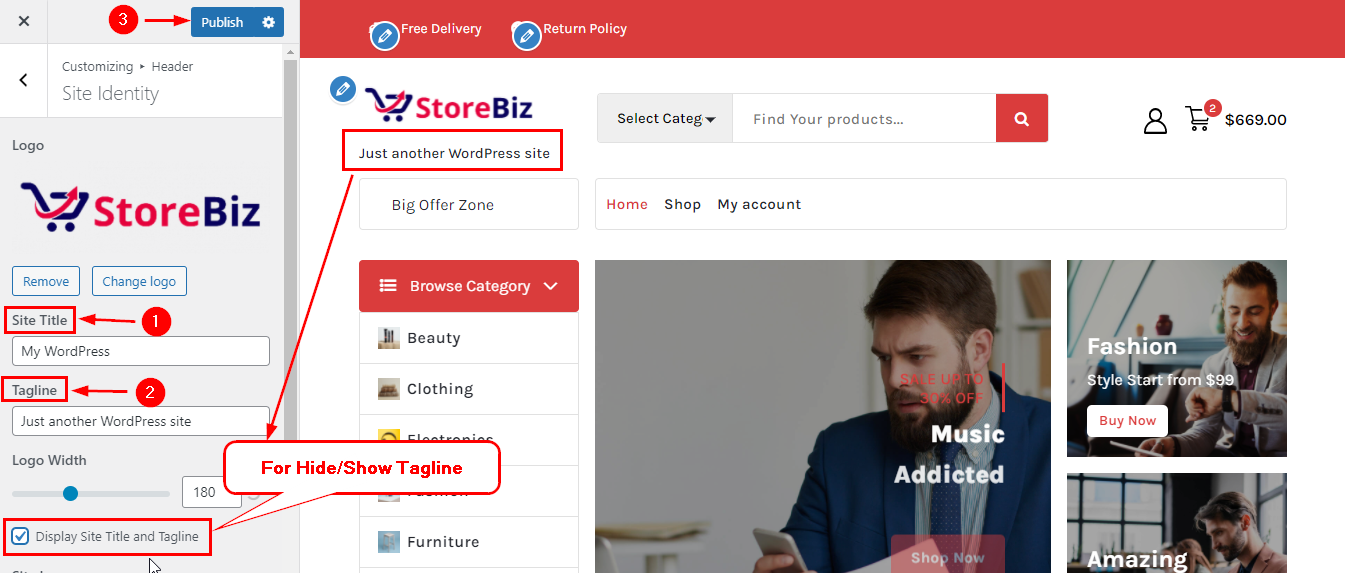
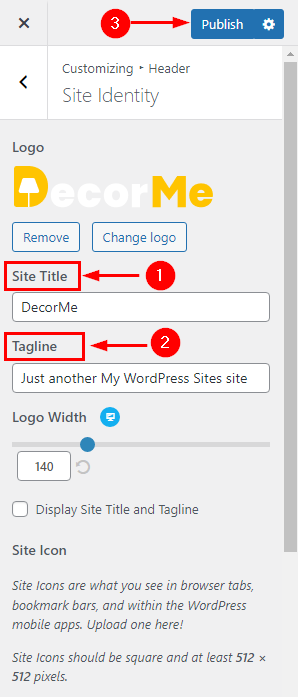
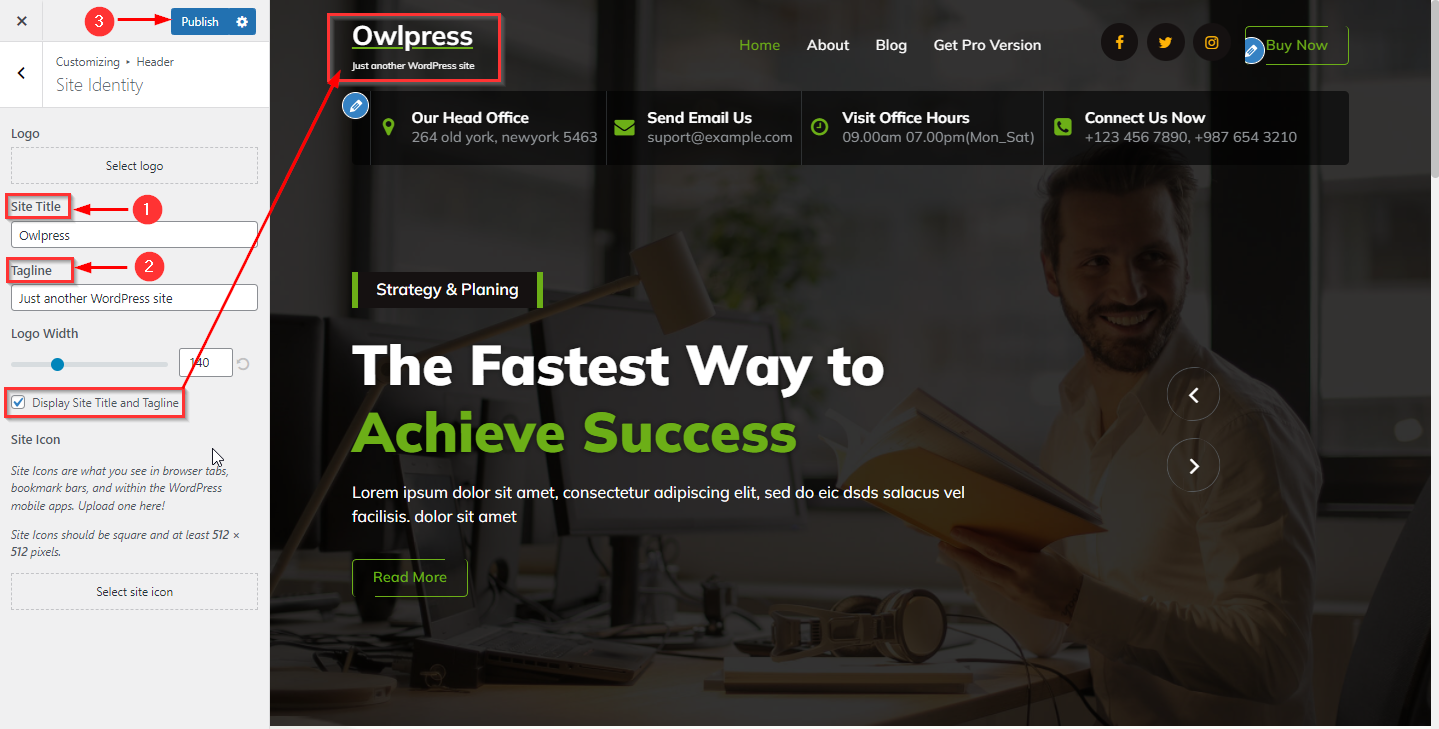
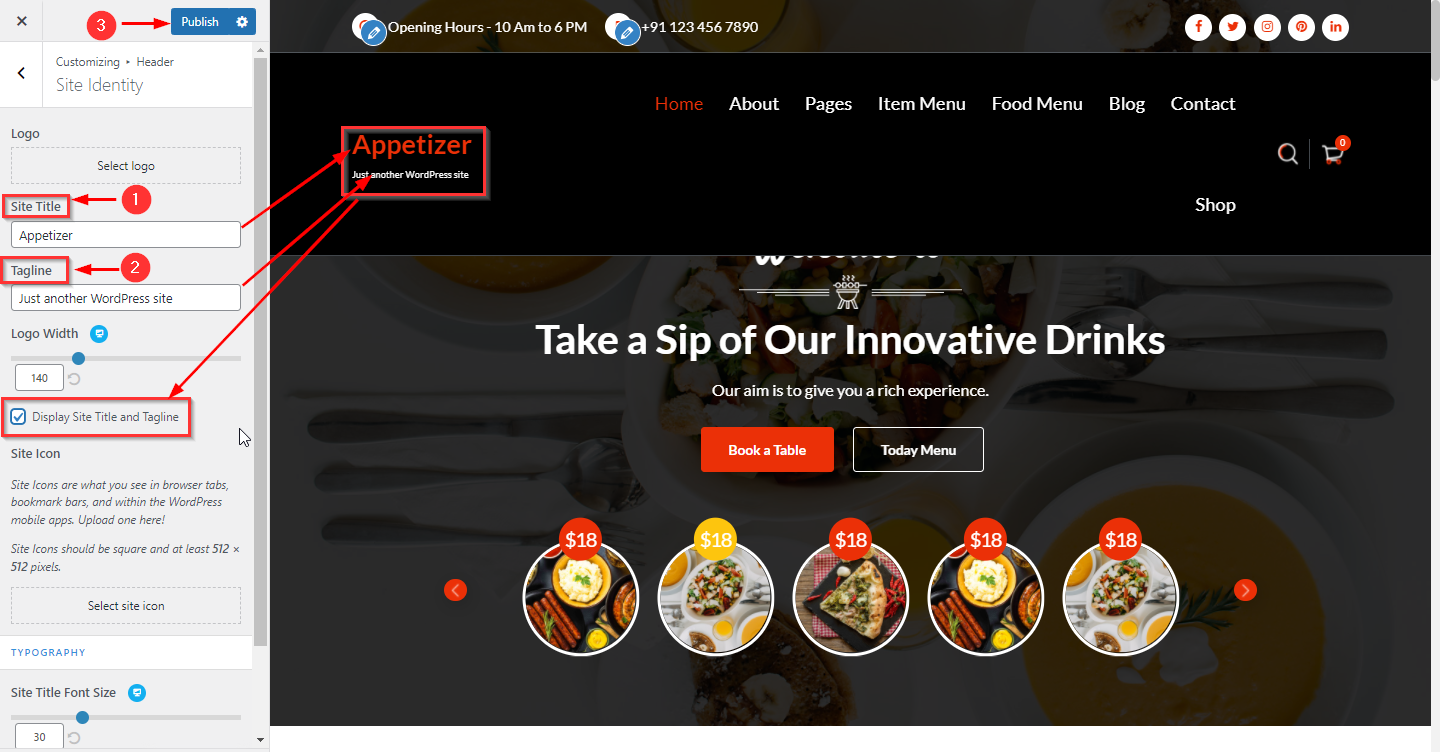
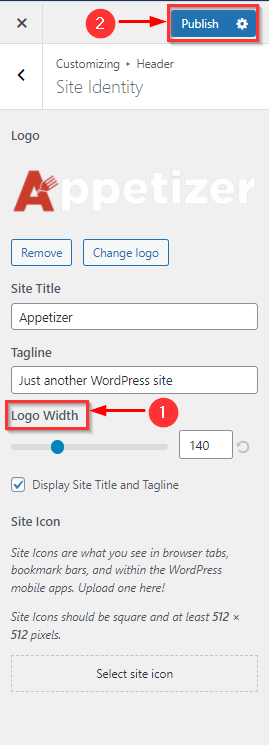
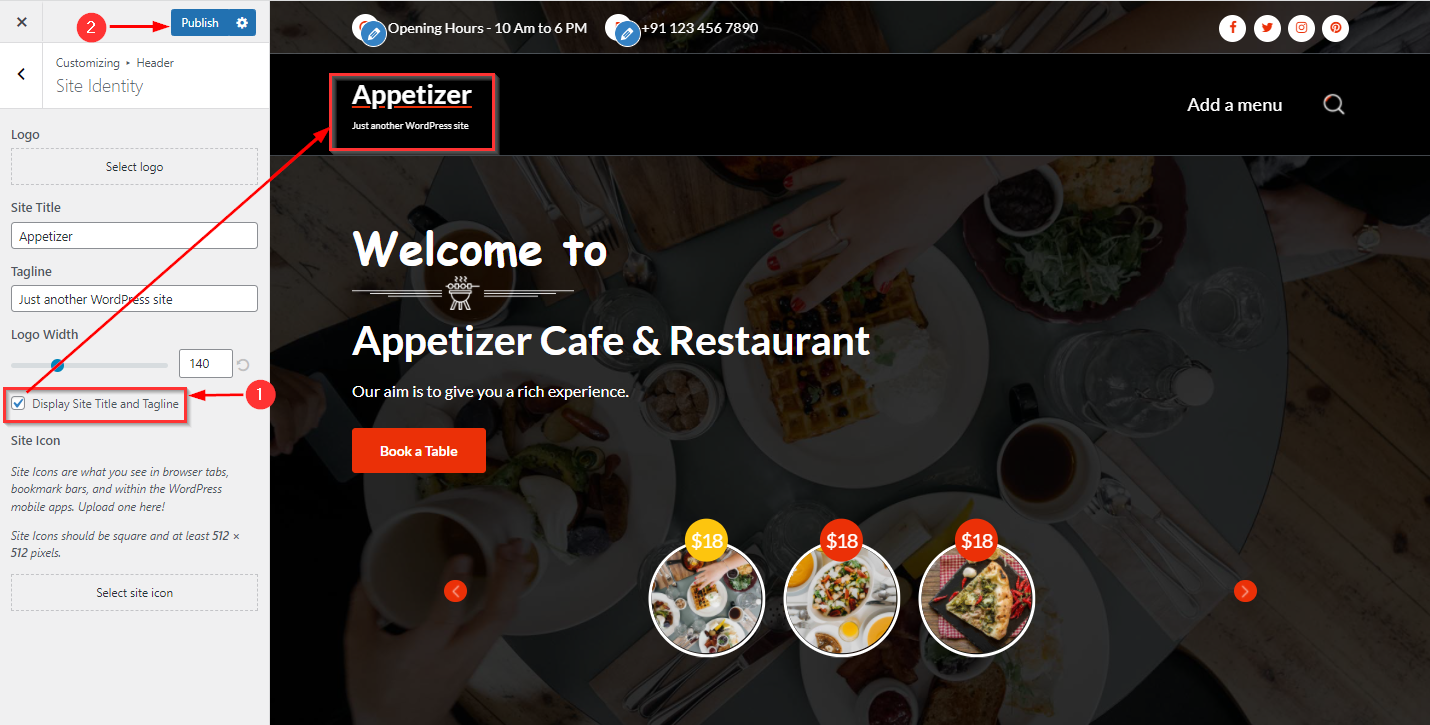
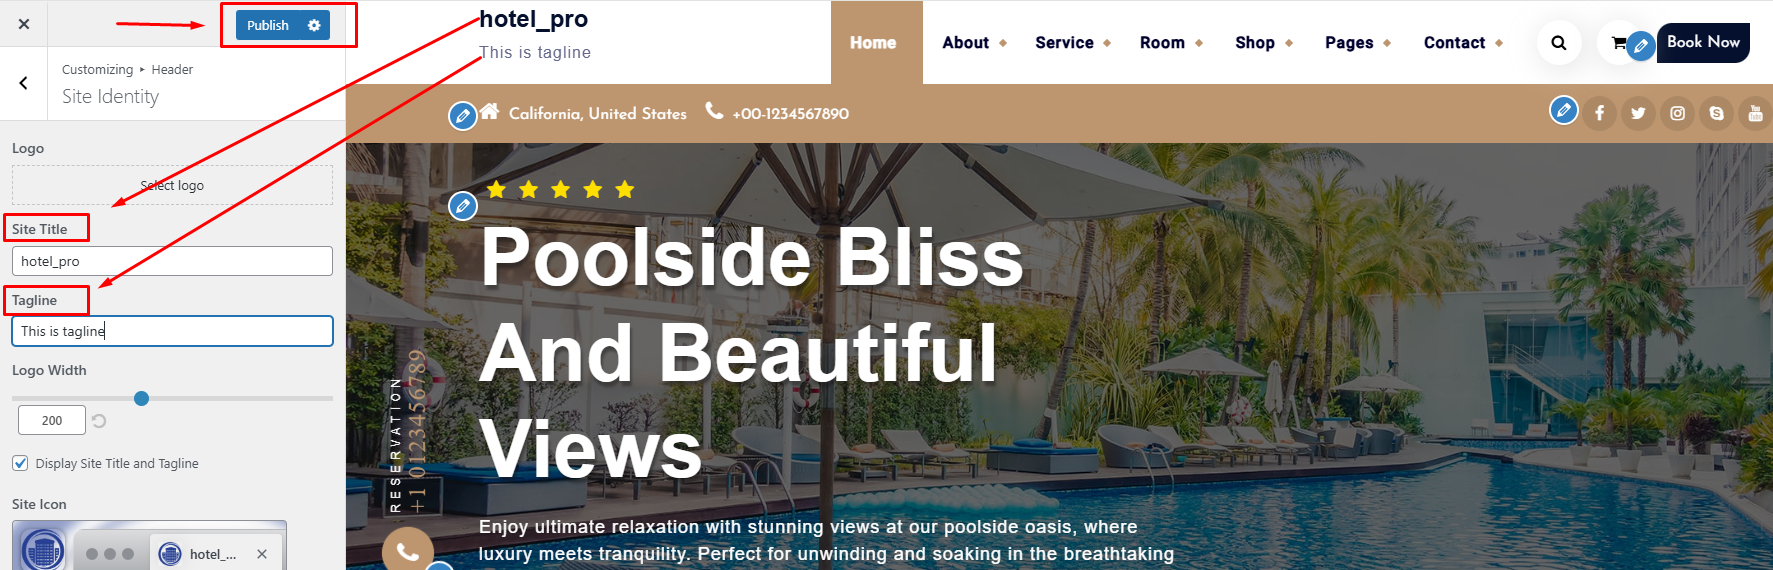
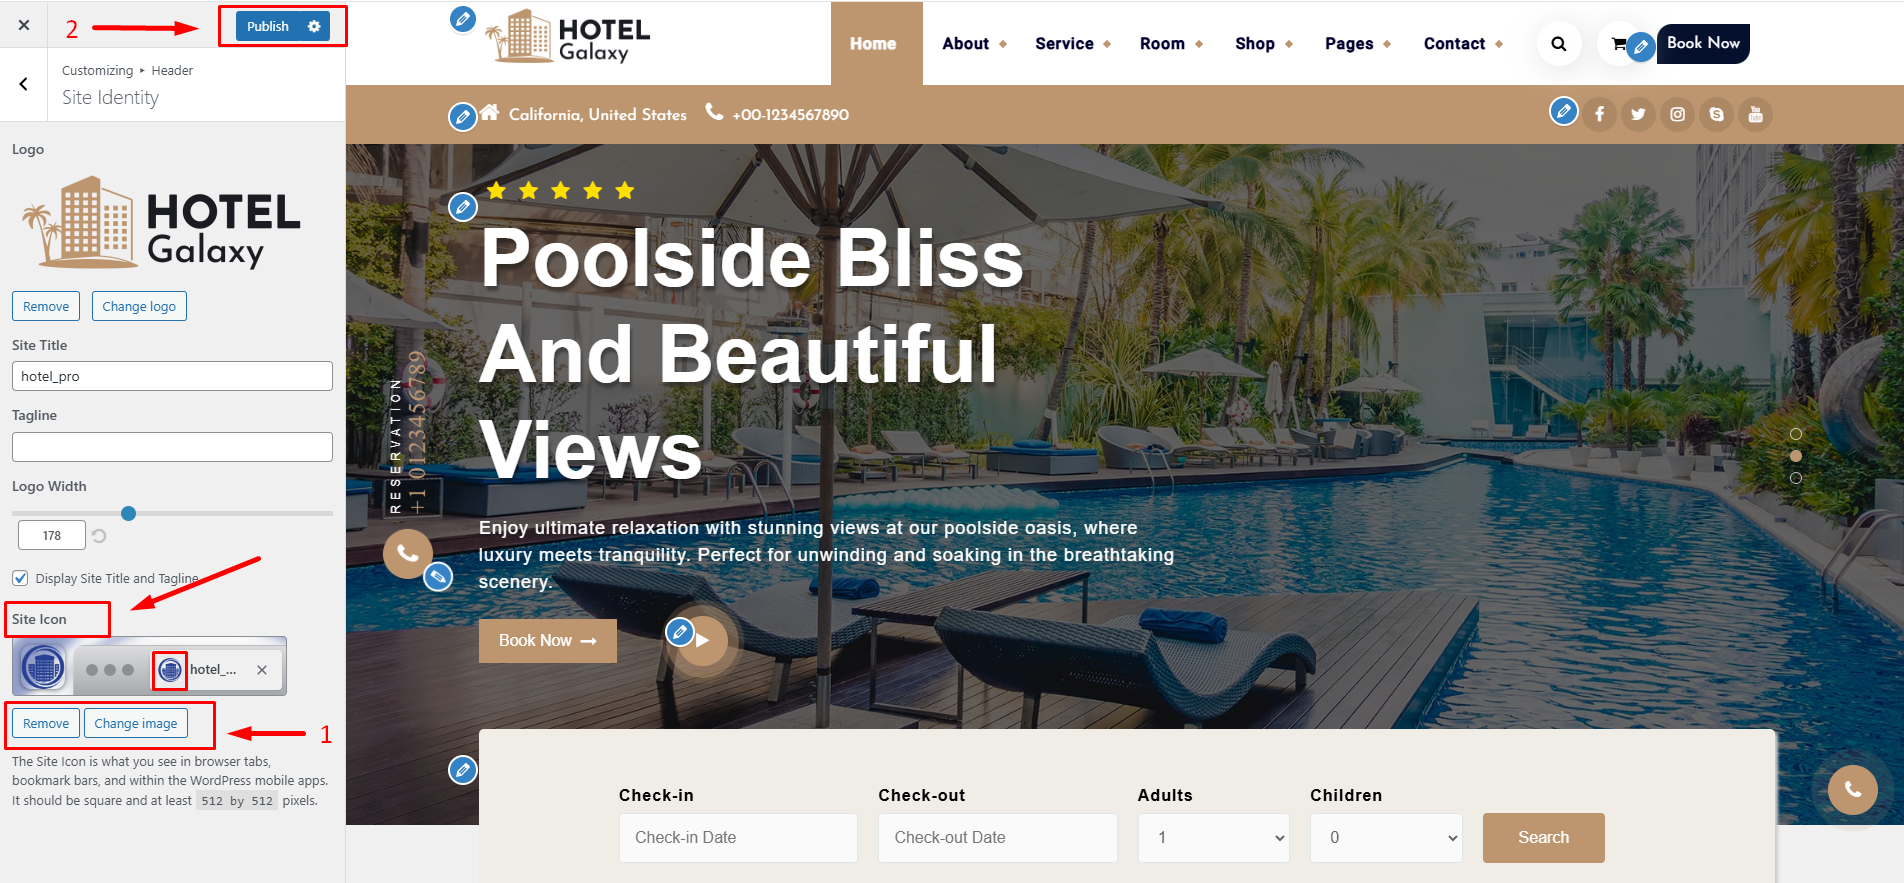
3. How to manage Site Title & Tagline
From your dashboard, go to the Appearance > Customize > Header > Site Identity Section
Now manage site title & tagline as per your choice.
Click on Publish.
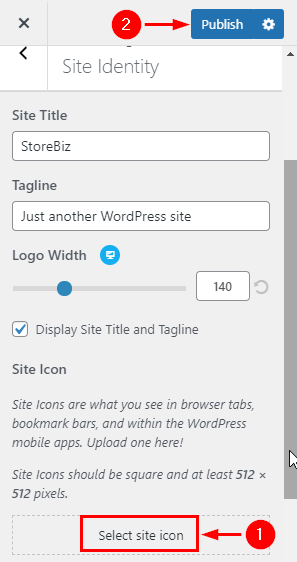
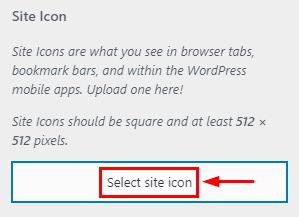
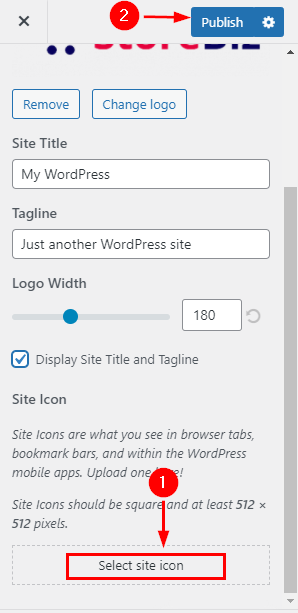
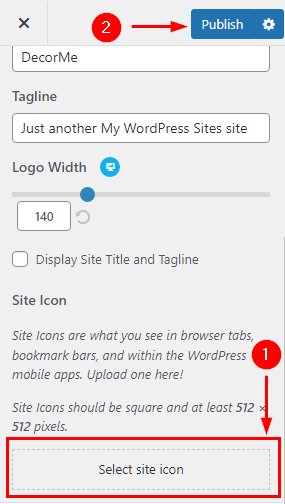
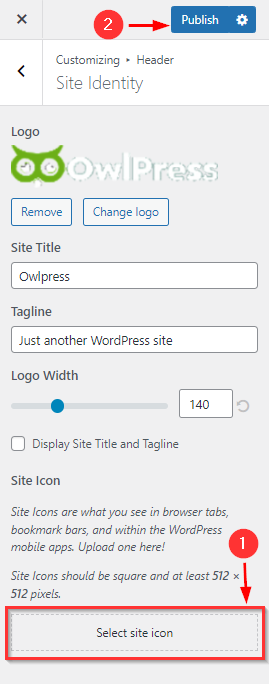
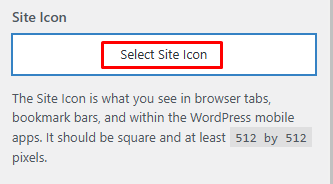
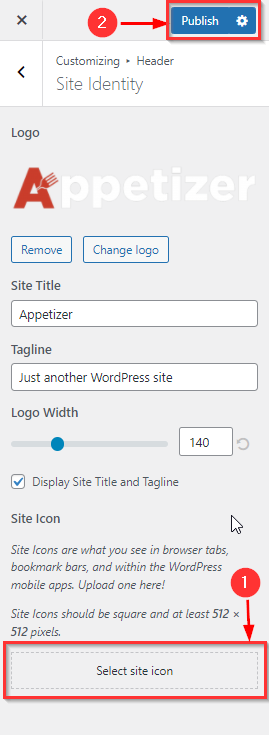
4.How to change the site icon
From your dashboard, go to the Appearance > Customize > Header > Site Identity Section
Now Click on button & select Site icon . ;
You can use site icon size maximum 512 x 512px.
Click on Publish.
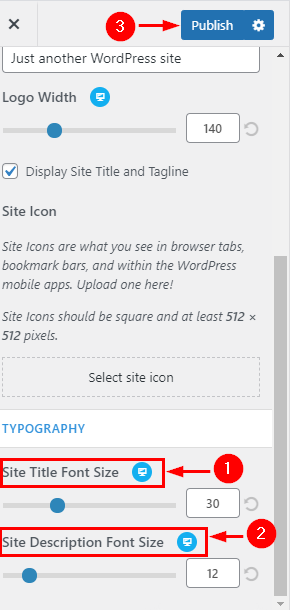
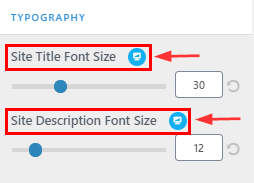
5.How to Customize Site title & description font size
From your dashboard, go to the Appearance > Customize > Header > Site Identity Section
Here you can customize the Site title & description.
Click on Publish.
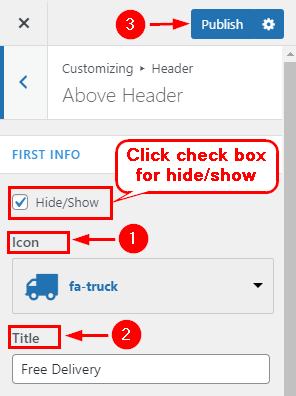
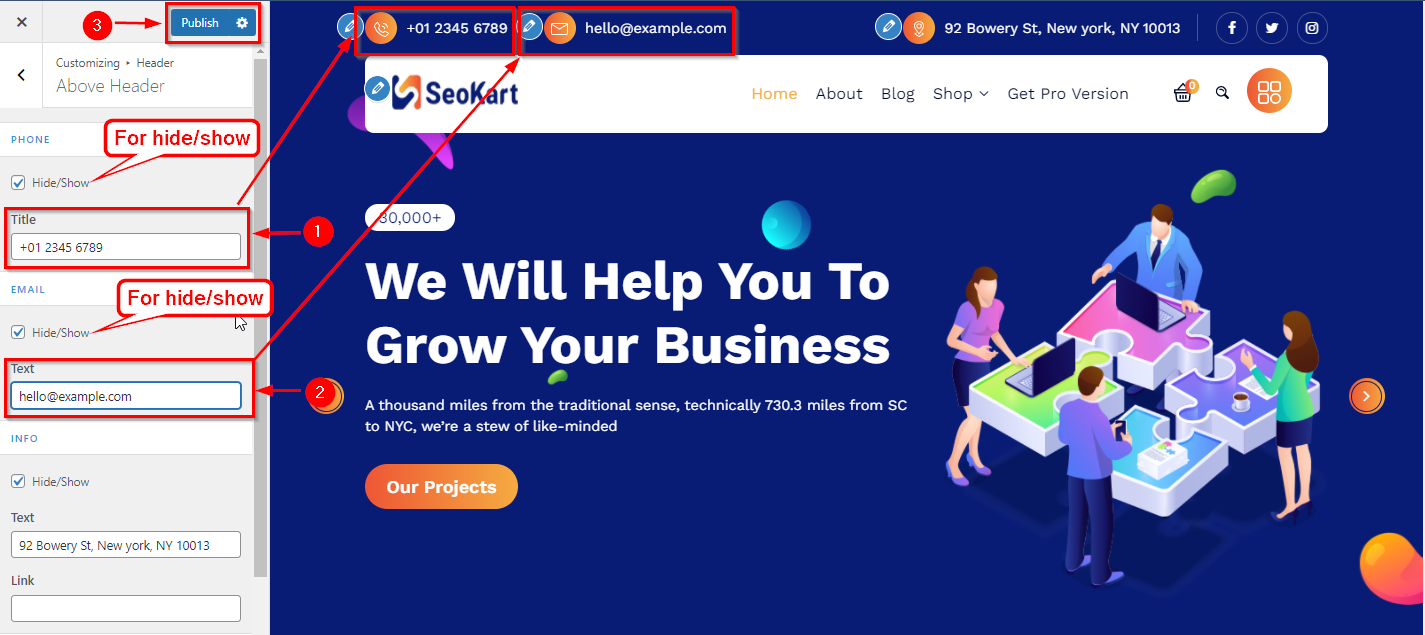
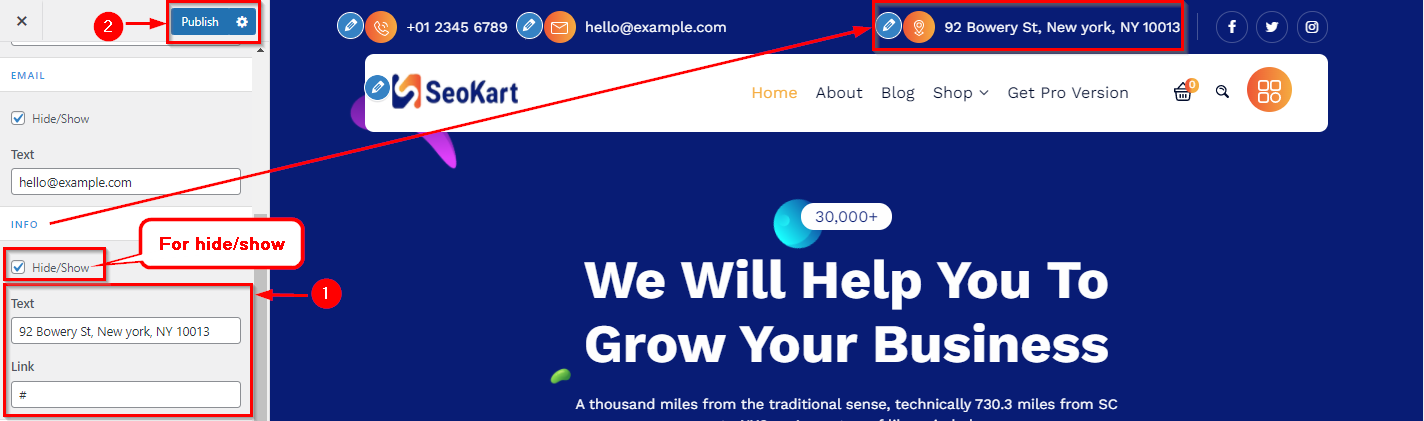
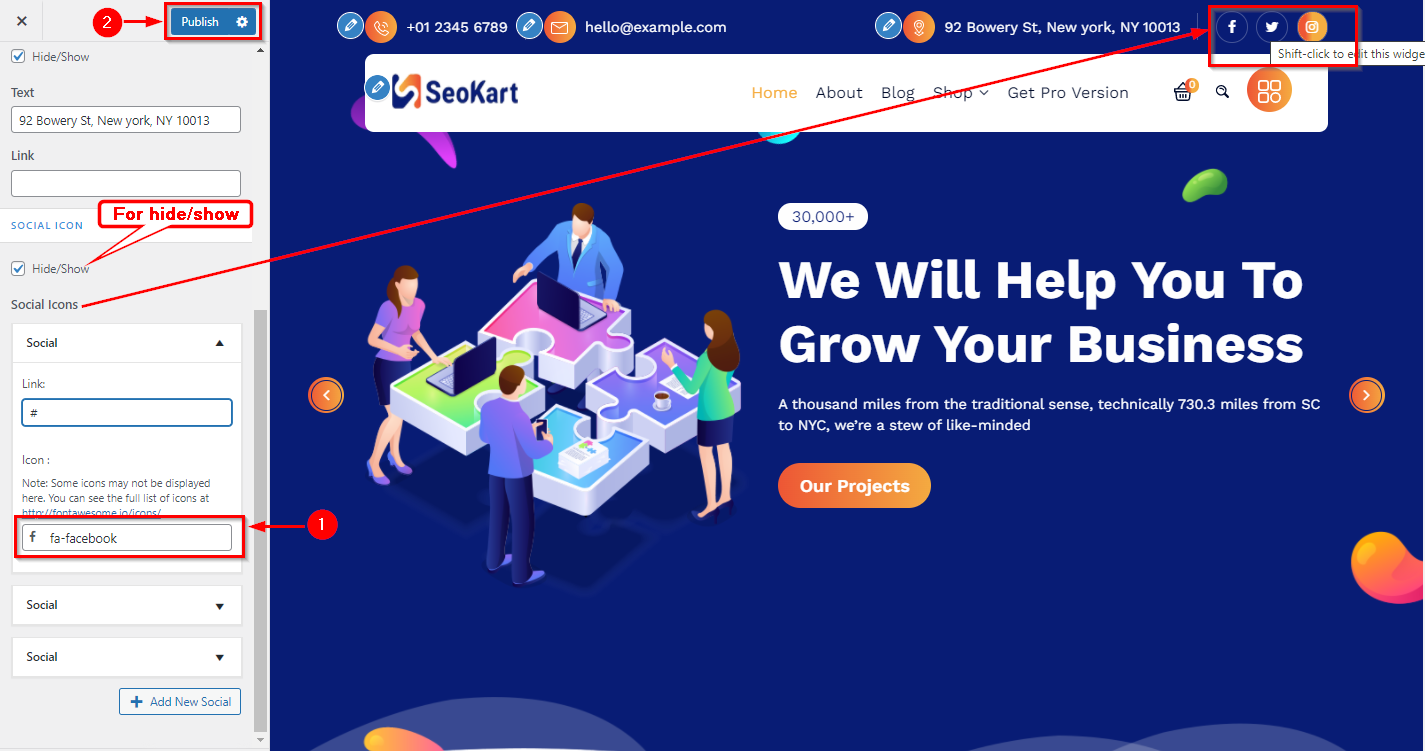
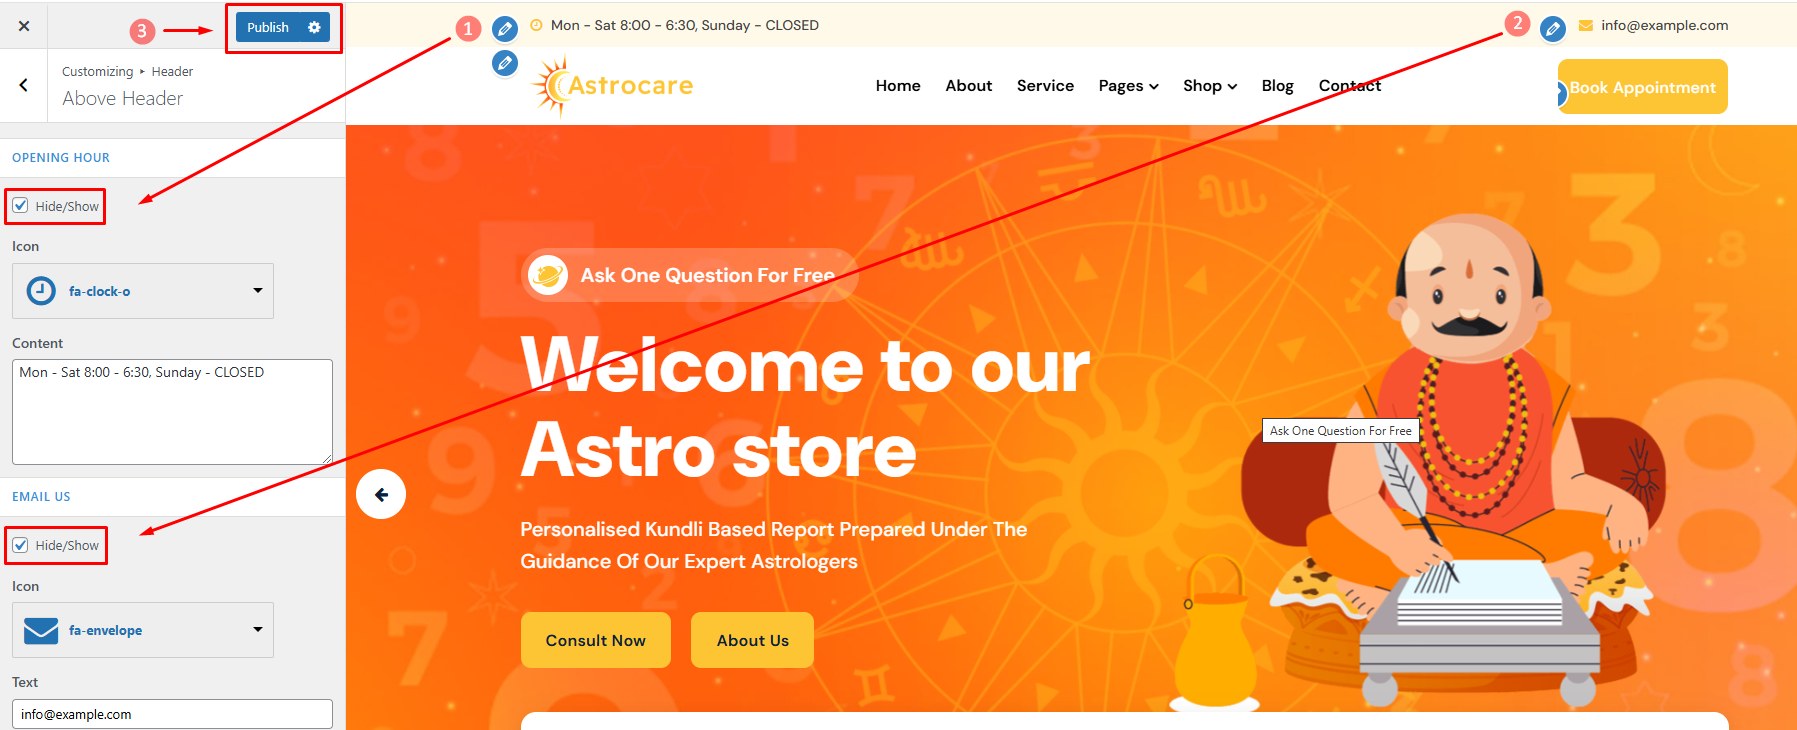
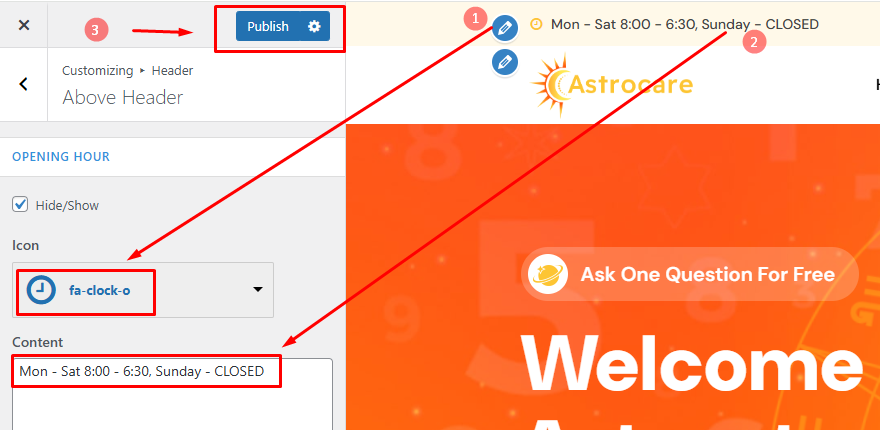
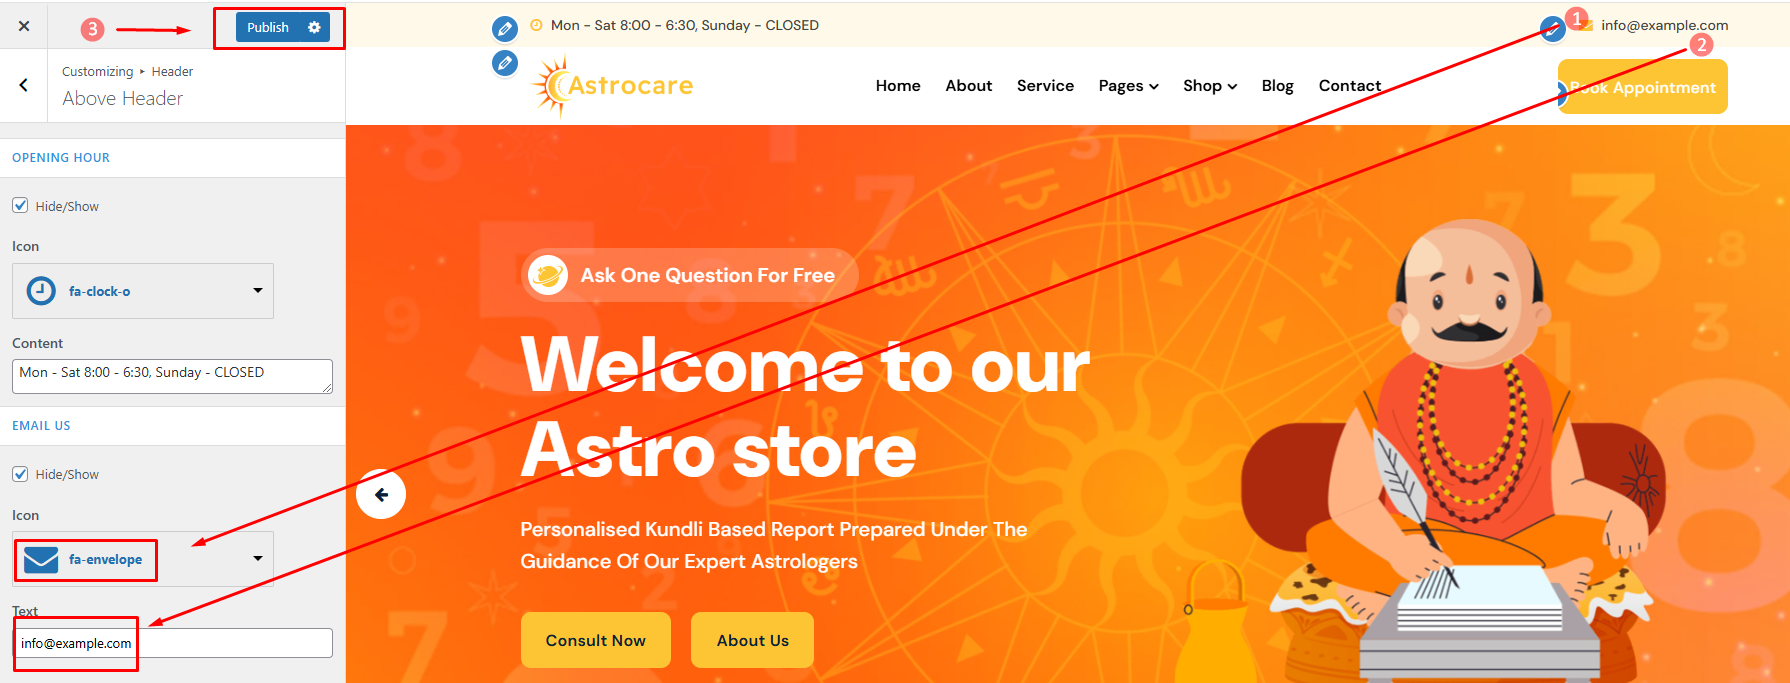
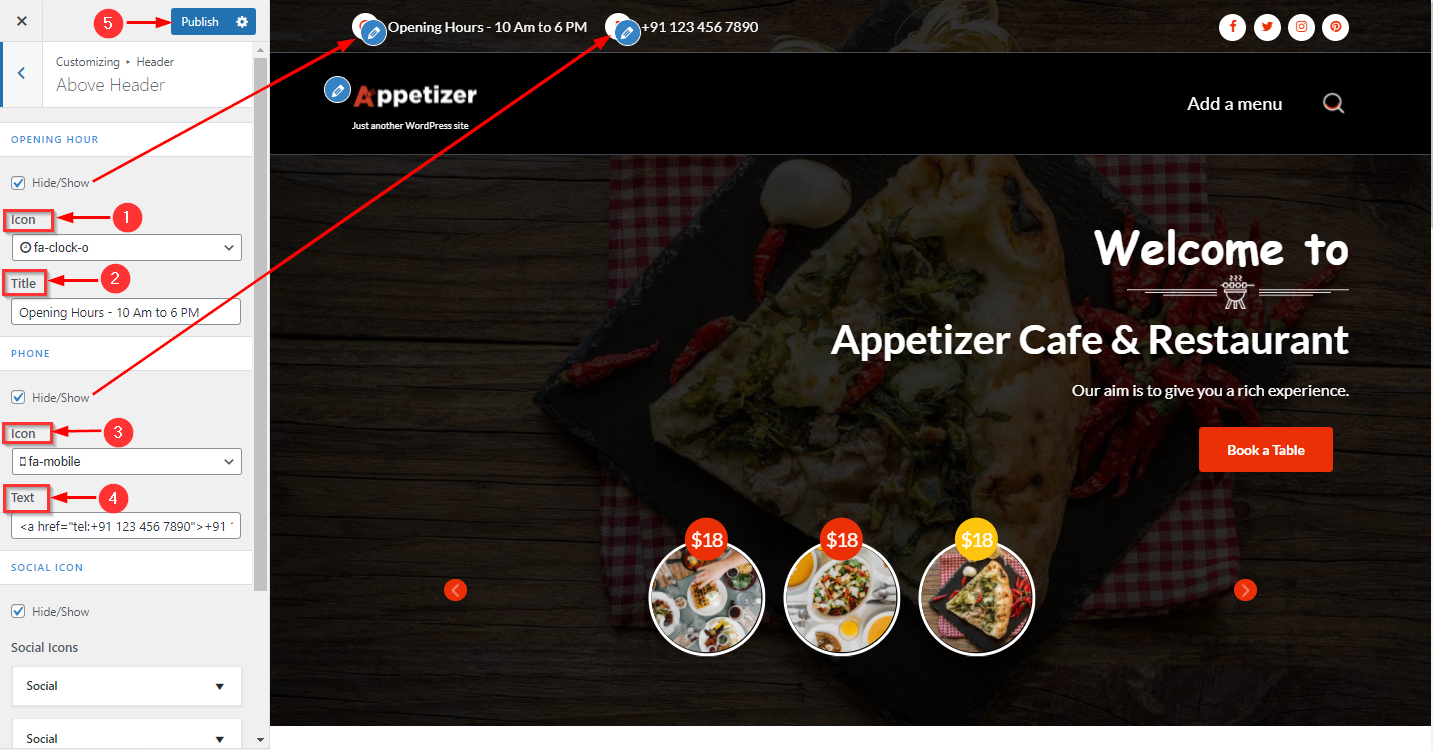
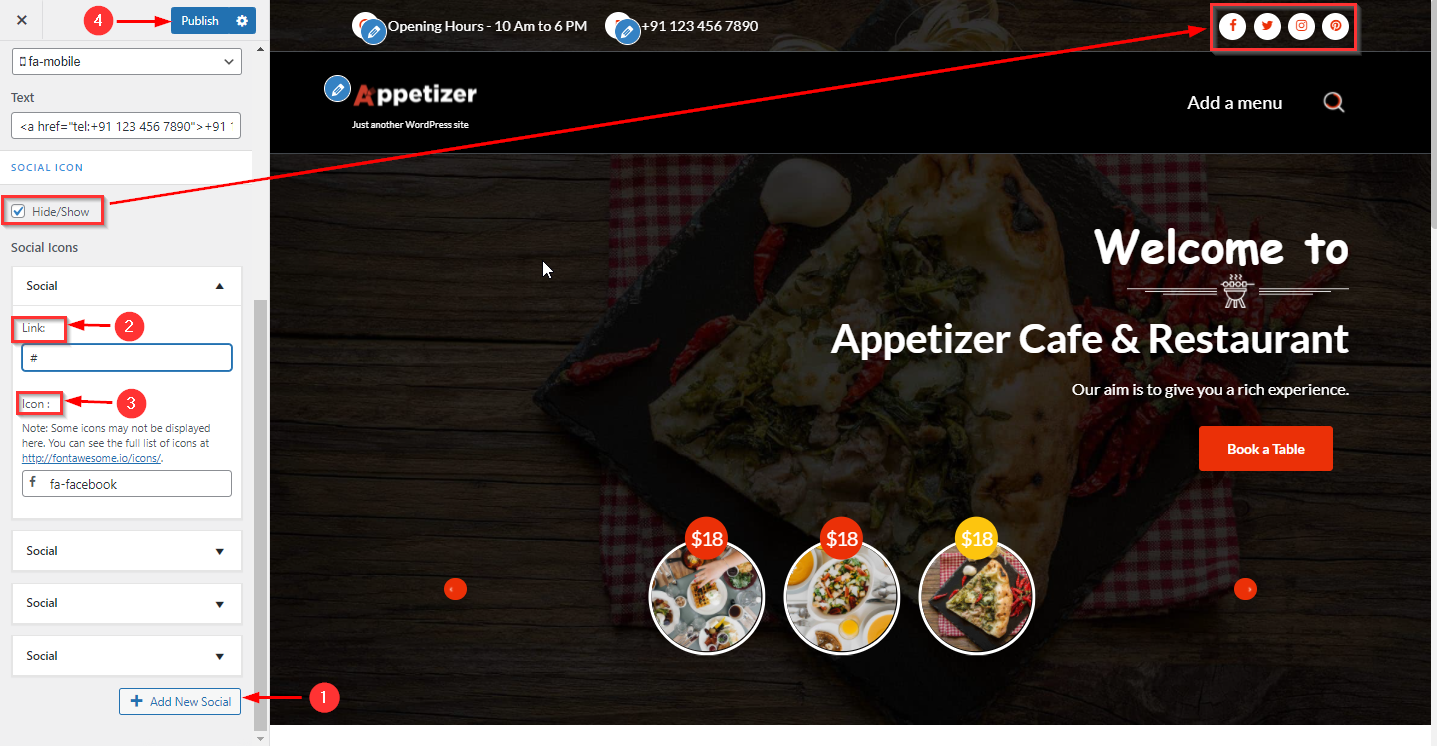
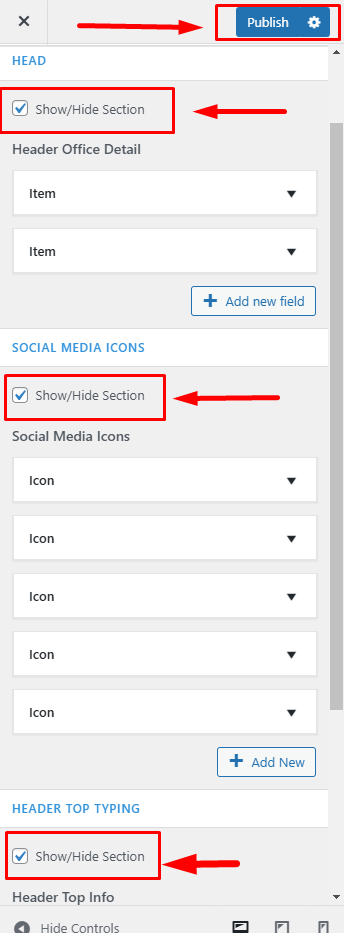
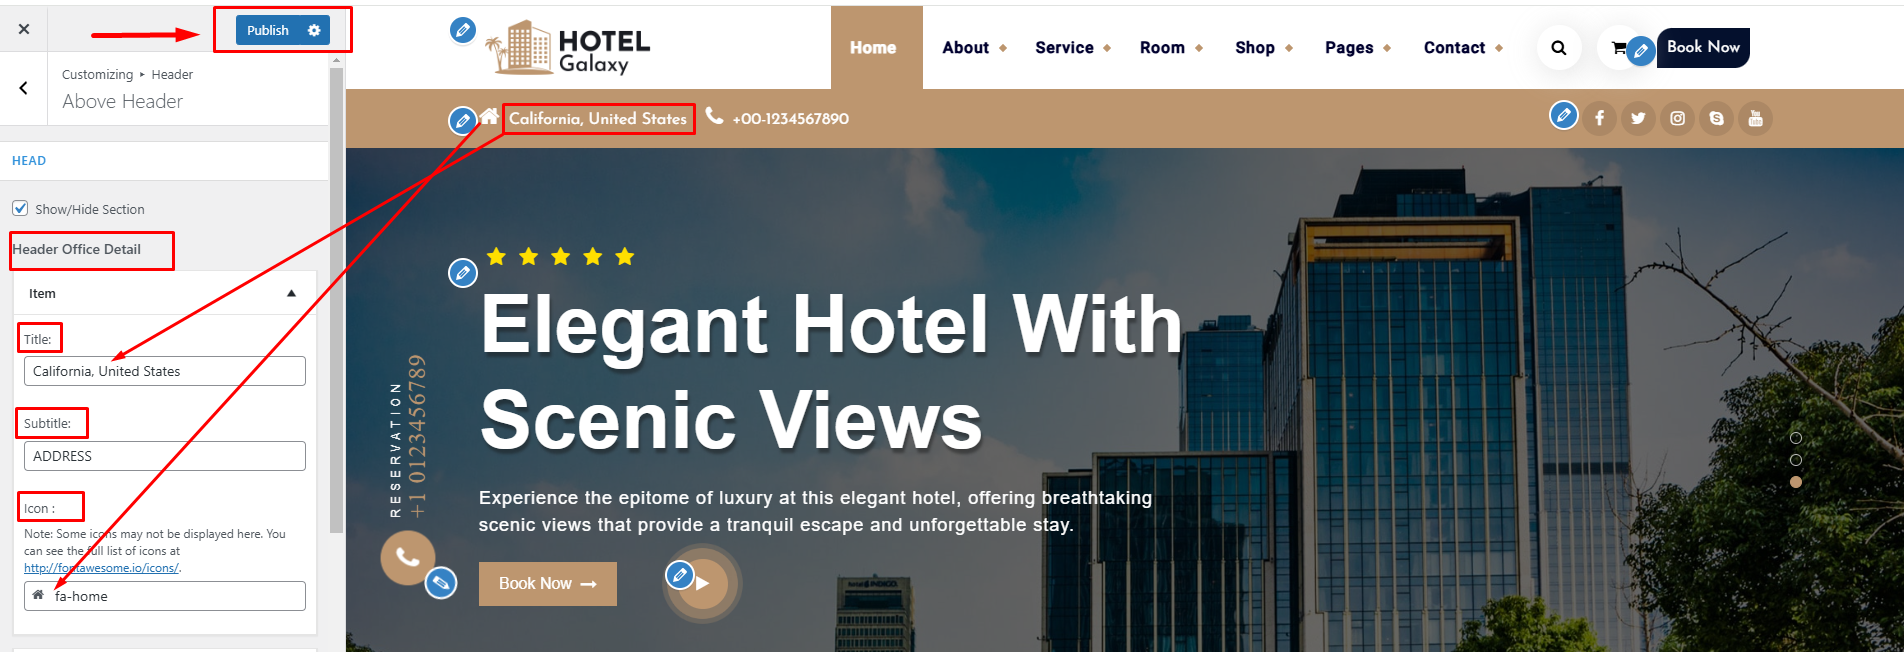
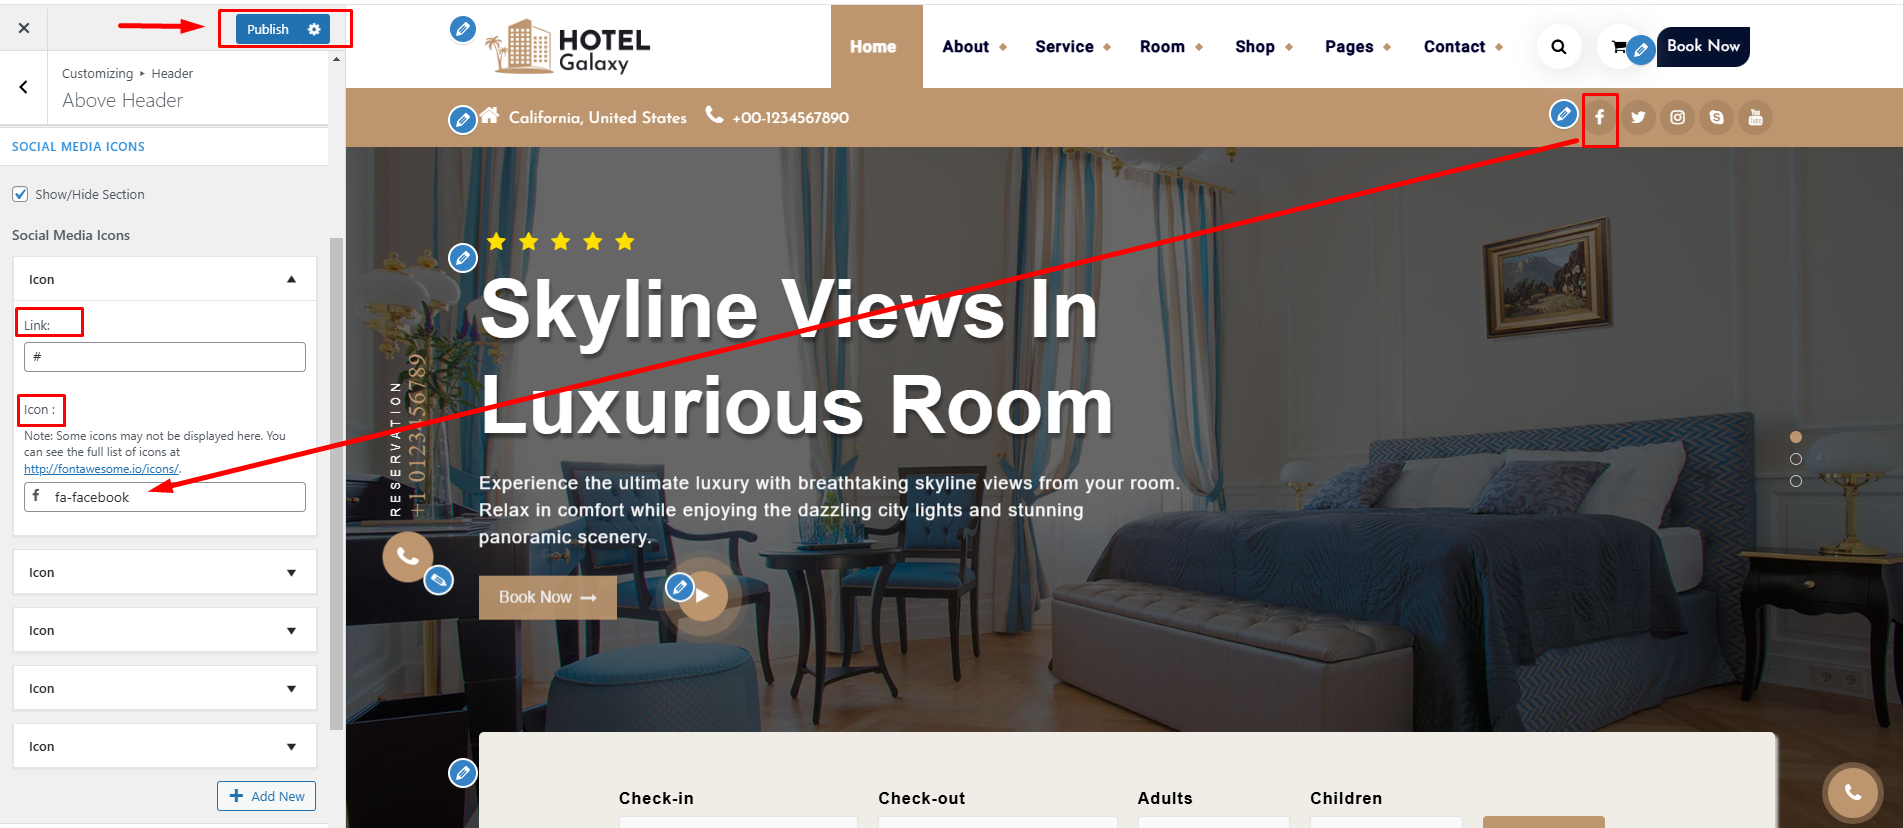
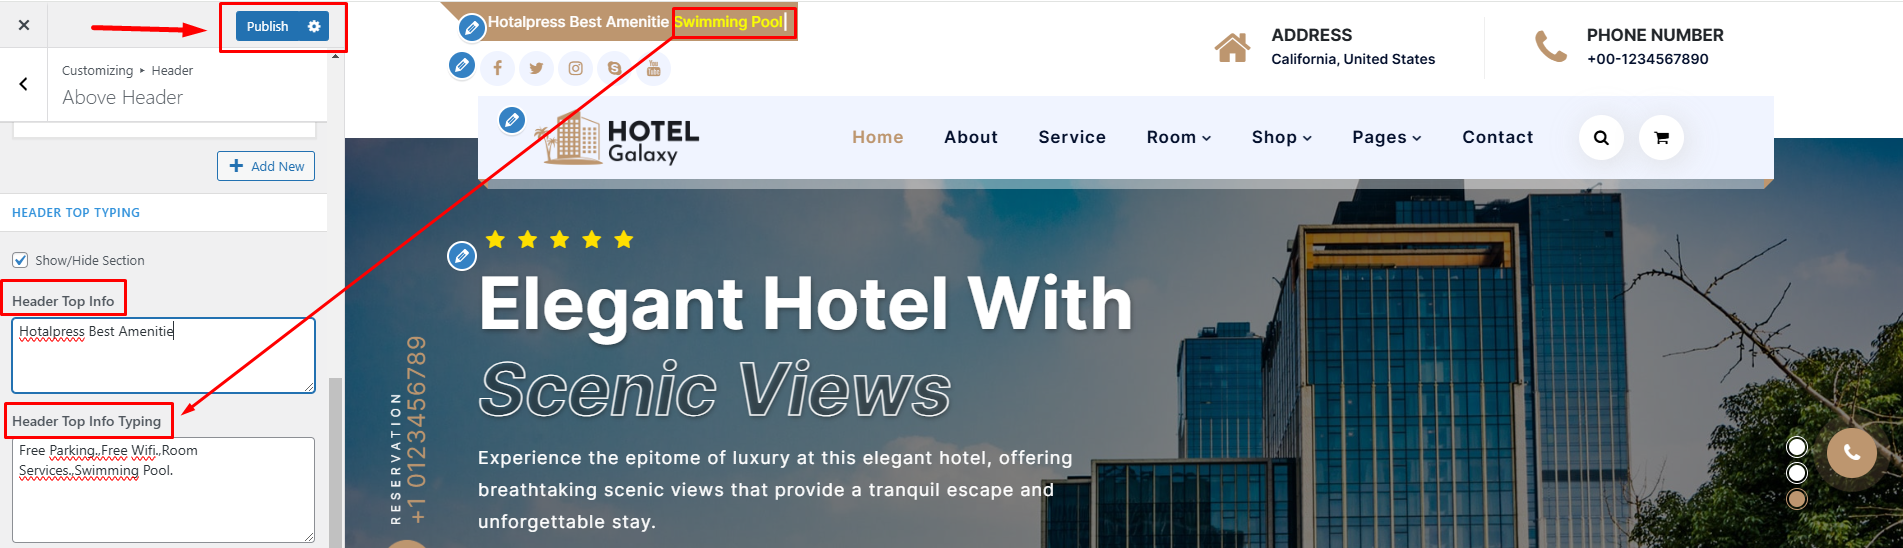
6.How to manage info in the above header
From your dashboard, go to the Appearance > Customize > Header > Above header Section
Here you can manage Info First & Second as per your choice.
Click on Publish.
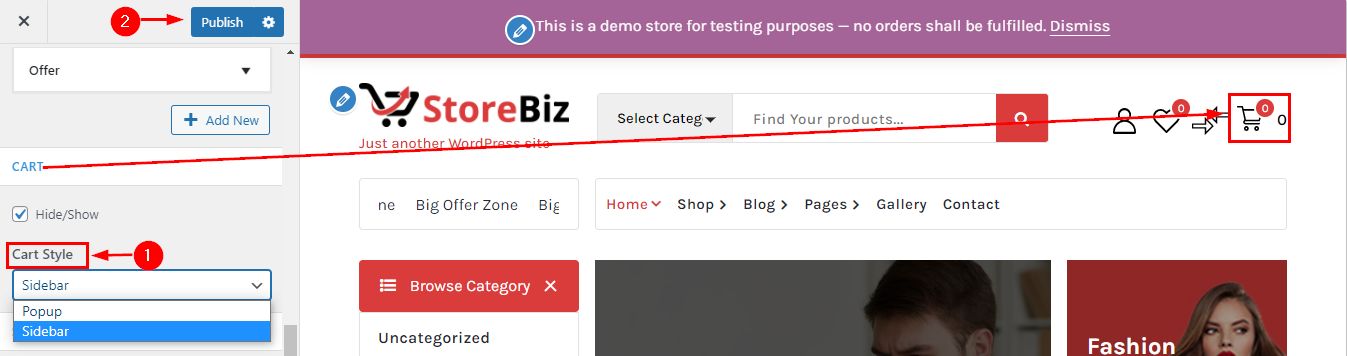
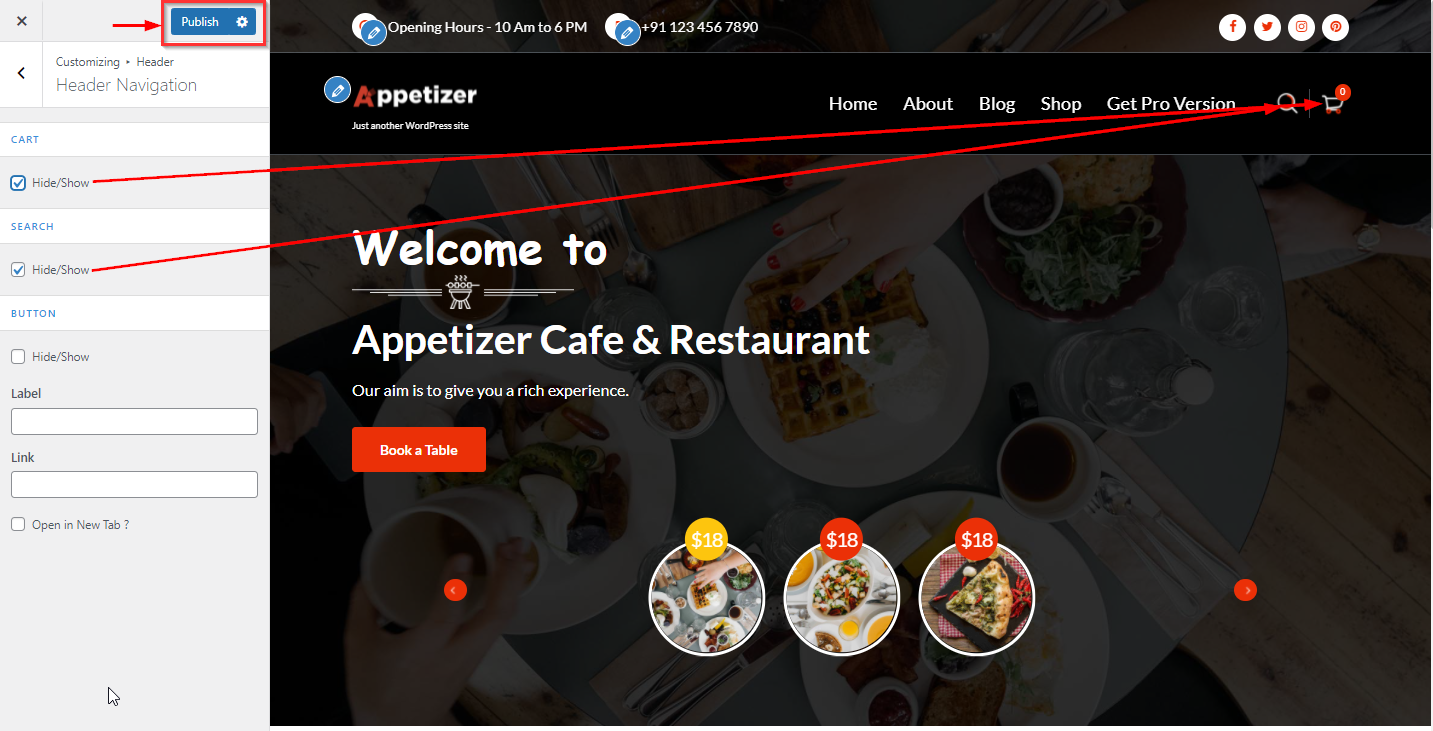
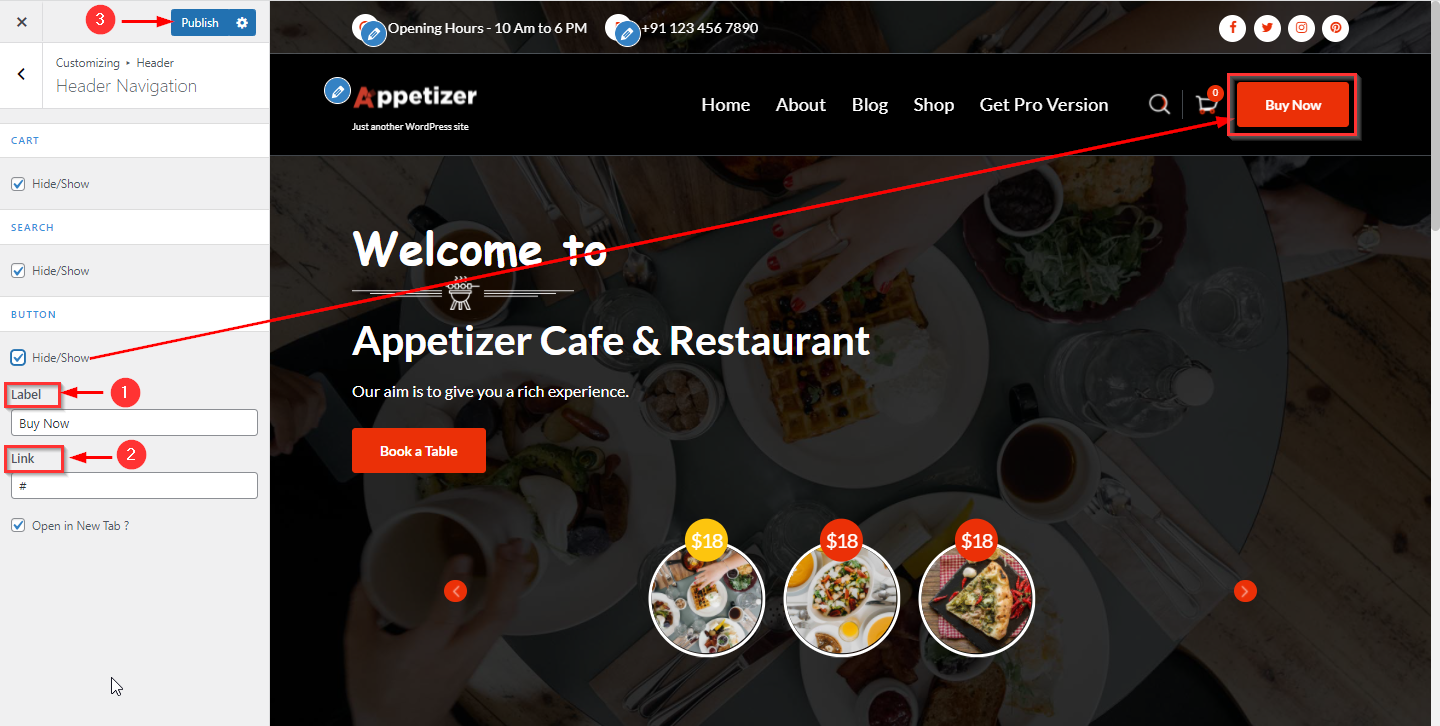
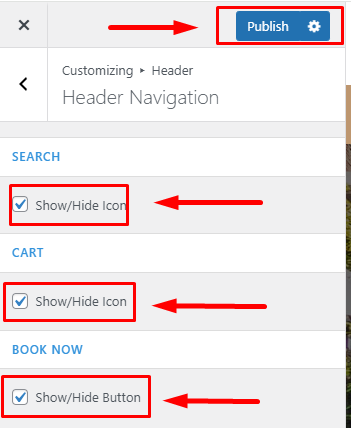
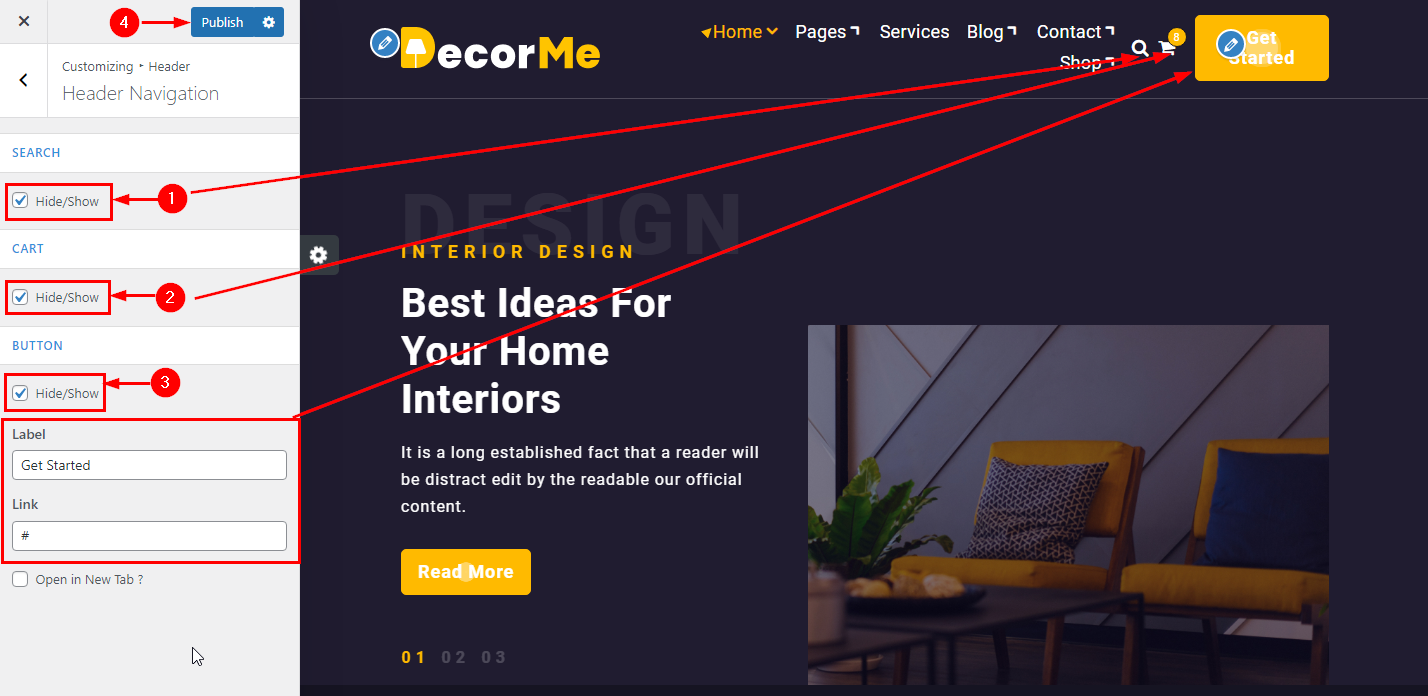
7.Hide/Show Cart icon in Header Navigation
From your dashboard, go to the Appearance > Customize > Header > Header Navigation Section
Now Click on the check box for Hide/Show Cart icon.
Click on Publish.
8.How do I change Cart style in Header Navigation
From your dashboard, go to the Appearance > Customize > Header > Header Navigation Section
Now here you change Cart style.
Click on Publish.
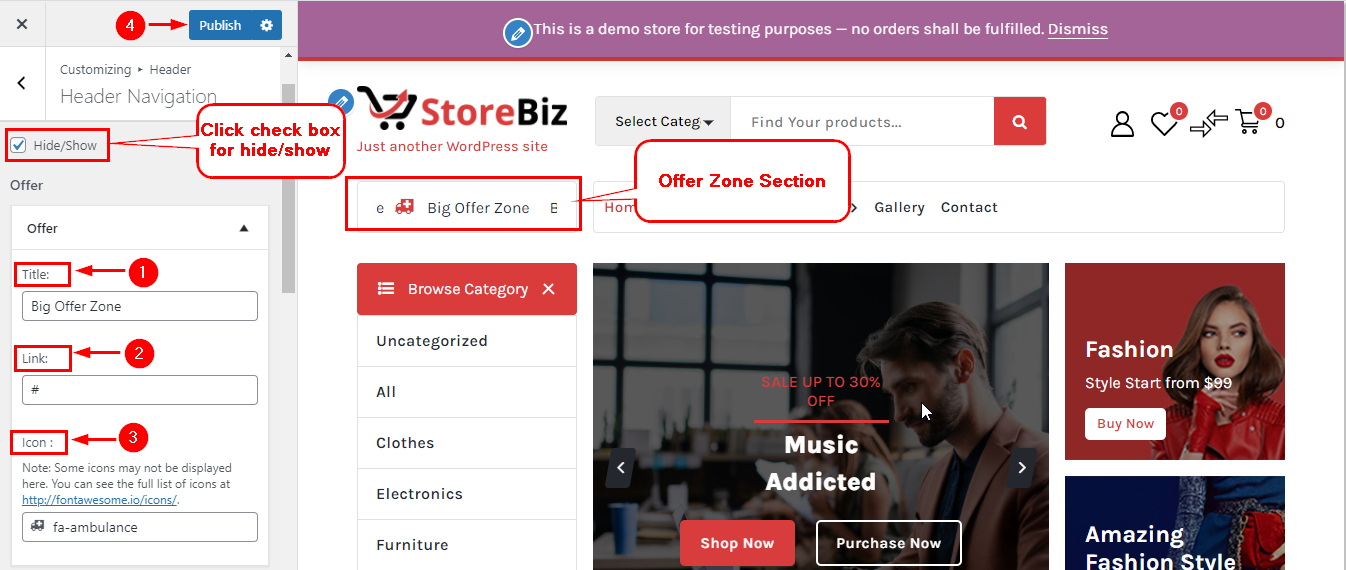
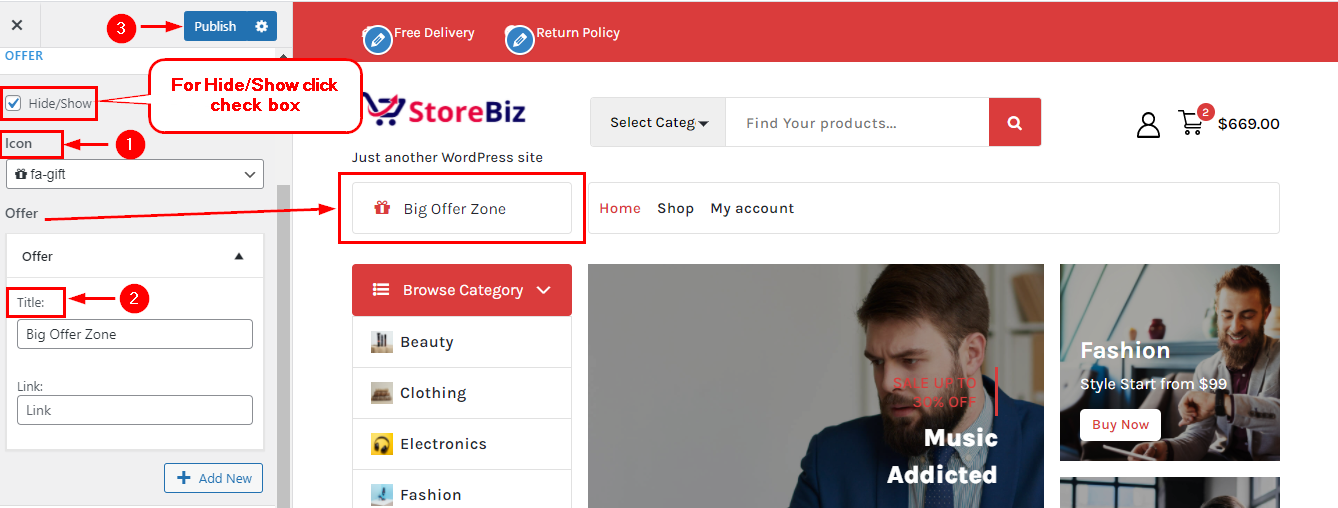
9.Manage Offer Zone Section in Header Navigation
From your dashboard, go to the Appearance > Customize > Header > Header Navigation Section
Now here you can manage Offer Section like icons content & hide/show.
Click on Publish.
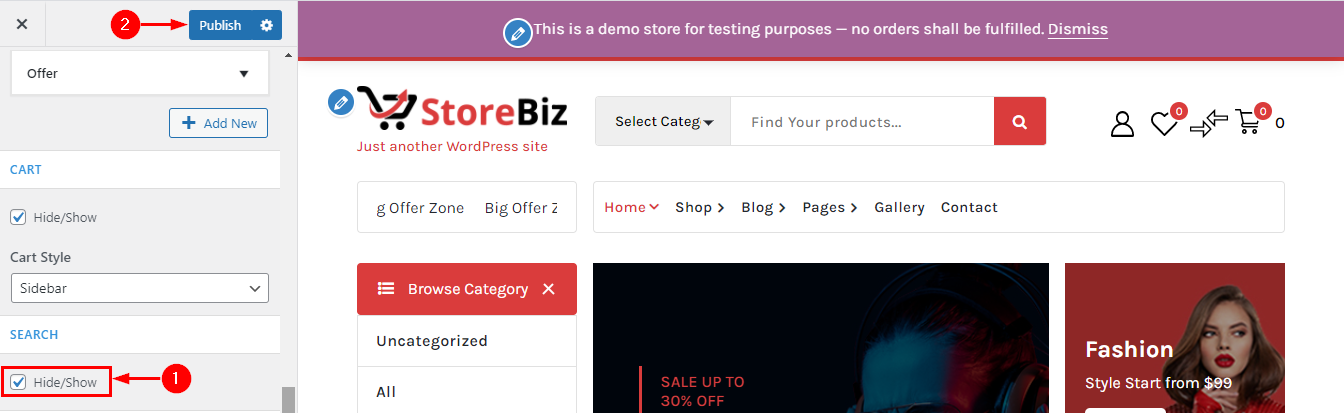
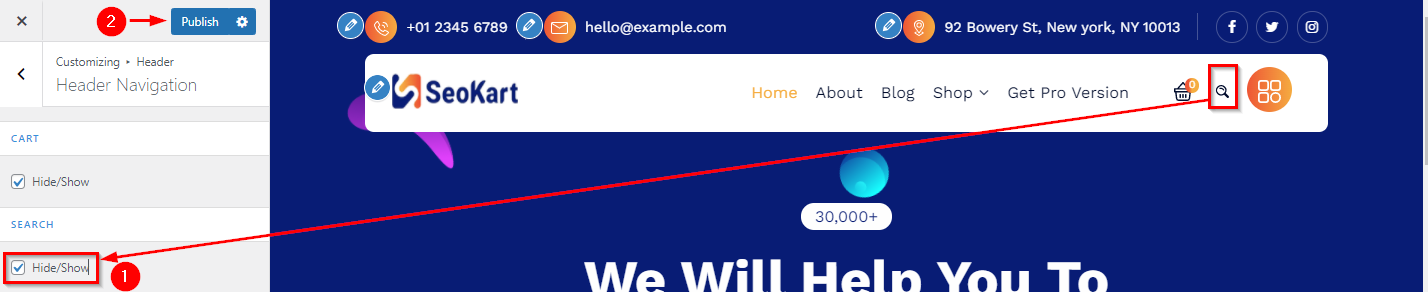
10.Hide/Show Search icon in Header Navigation
From your dashboard, go to the Appearance > Customize > Header > Header Navigation Section
Now Click on the check box for Hide/Show Search icon.
Click on Publish.
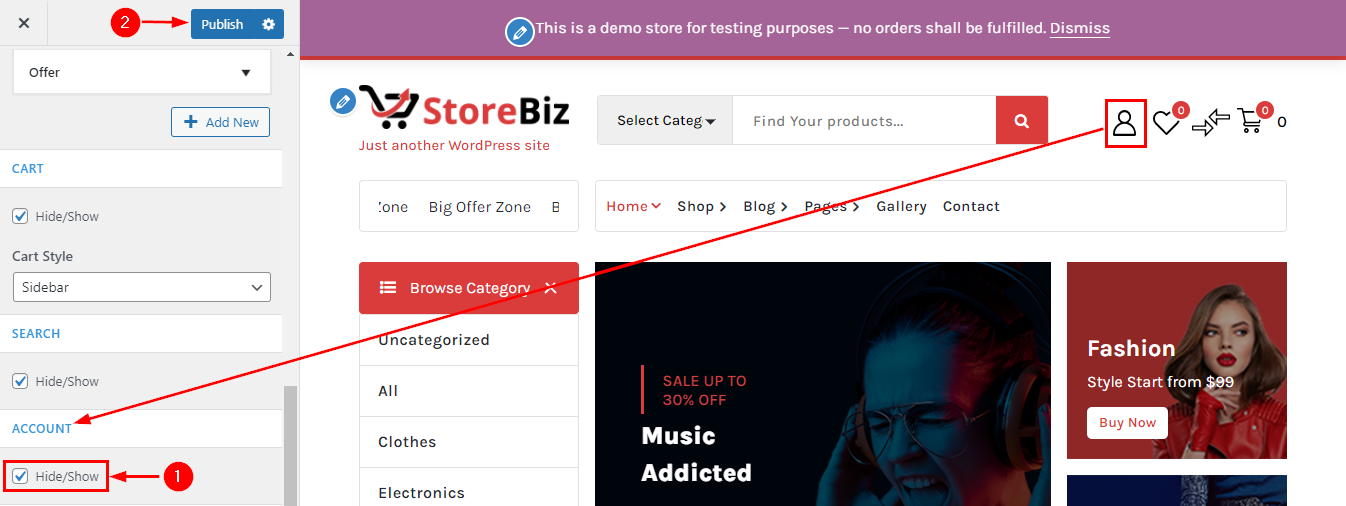
11.Hide/Show Account in Header Navigation
From your dashboard, go to the Appearance > Customize > Header > Header Navigation Section
Now Click on the check box for Hide/Show Account.
Click on Publish.
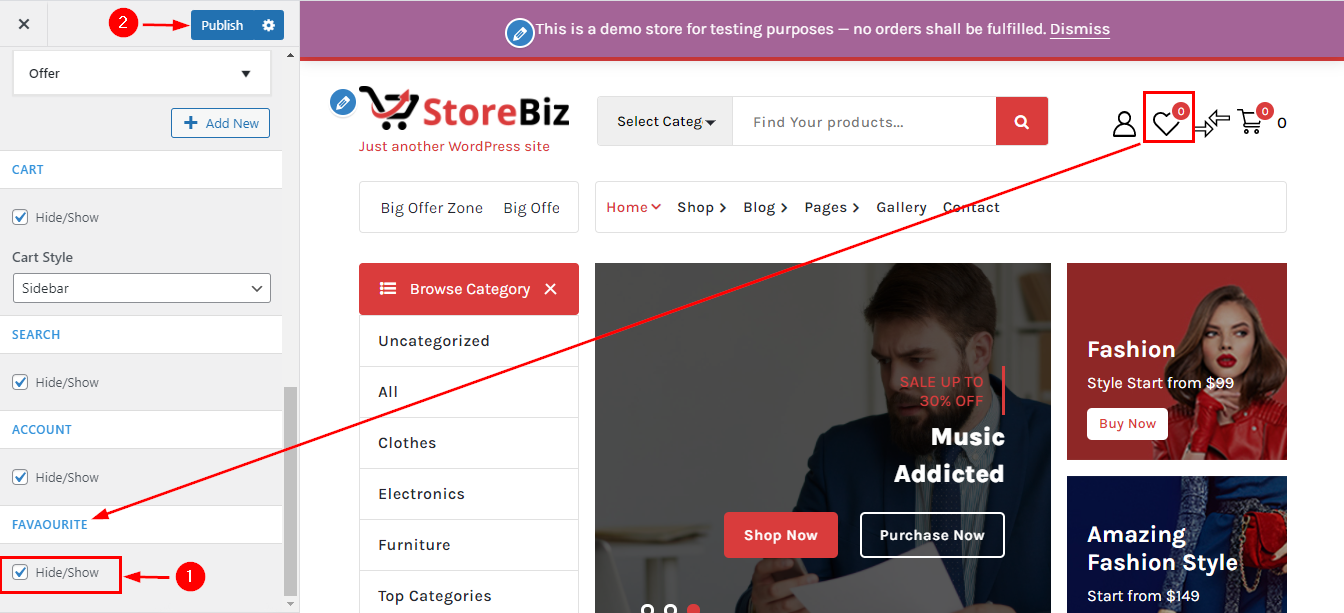
12.Hide/Show Favorite in Header Navigation
From your dashboard, go to the Appearance > Customize > Header > Header Navigation Section
Now Click on the check box for Hide/Show Favorite.
Click on Publish.
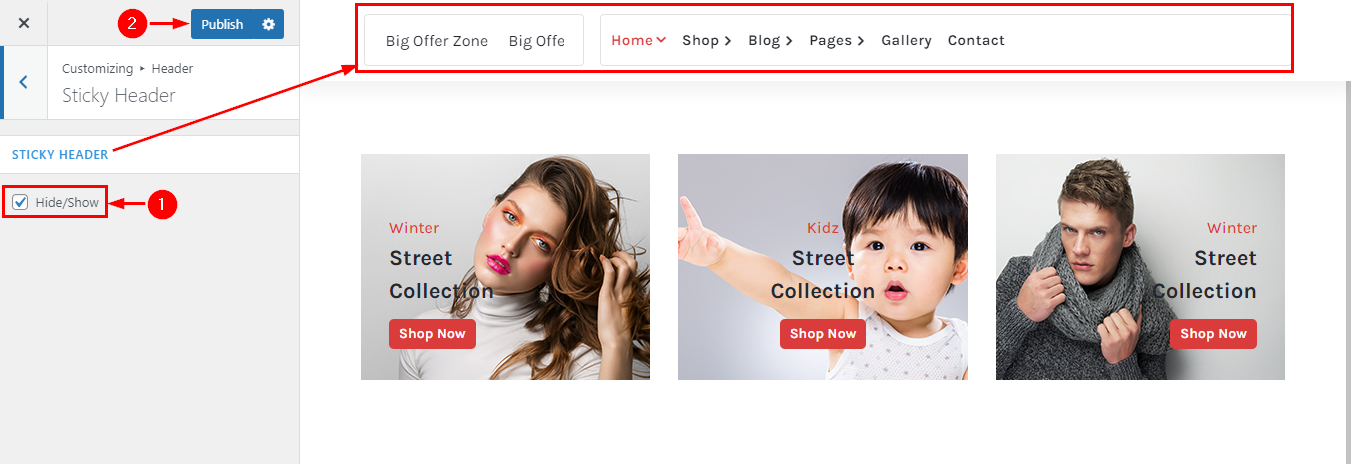
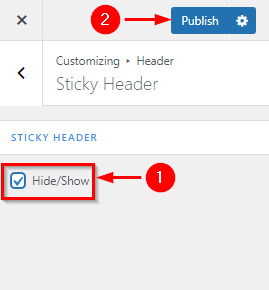
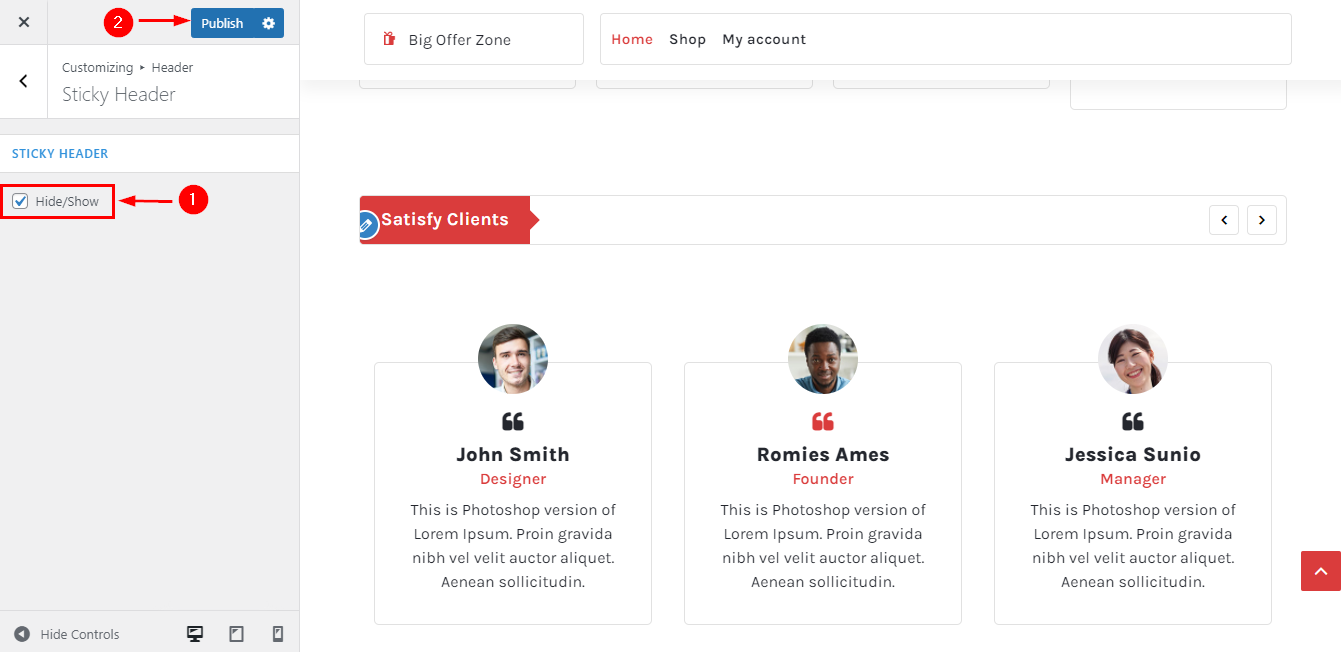
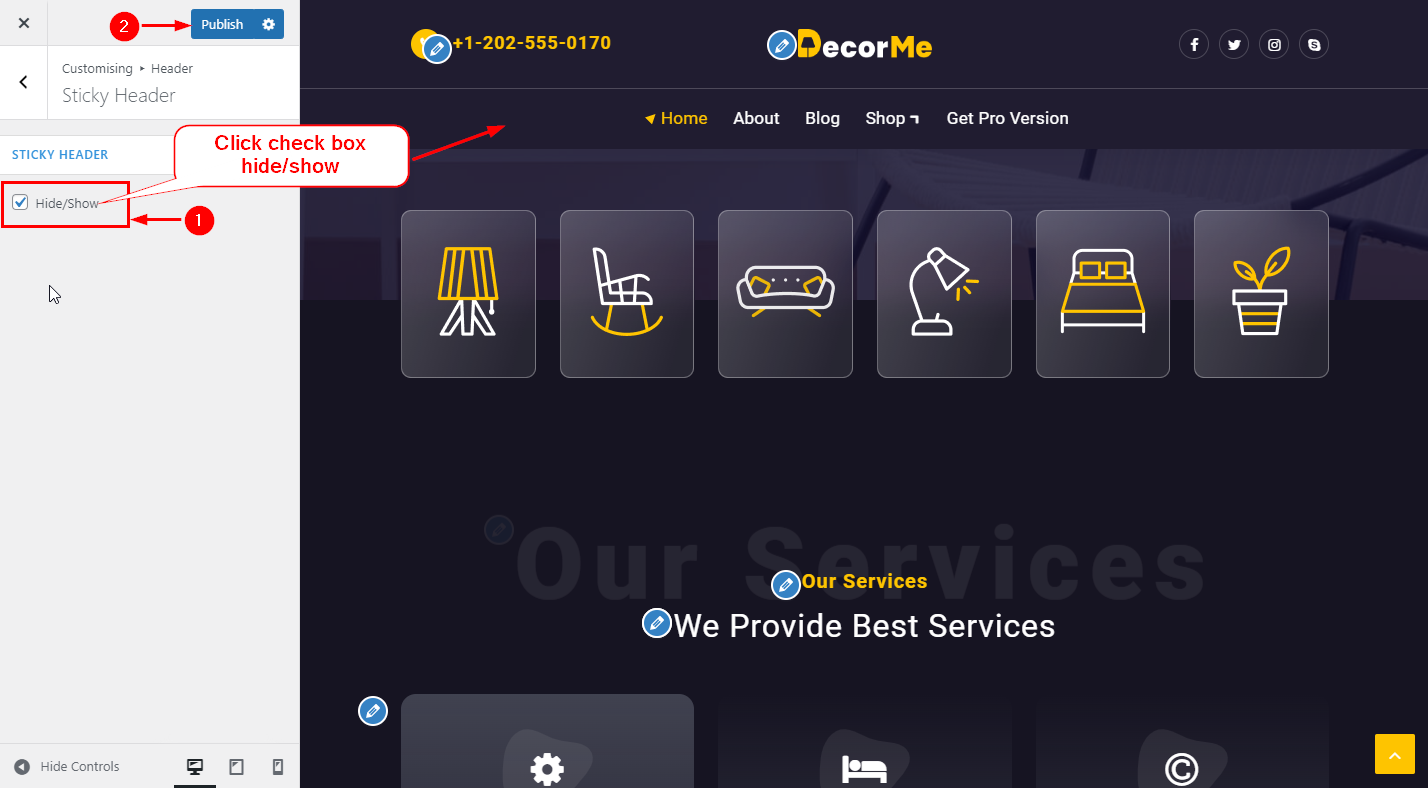
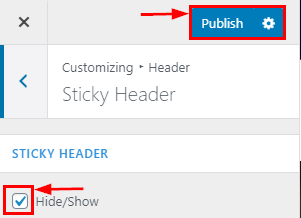
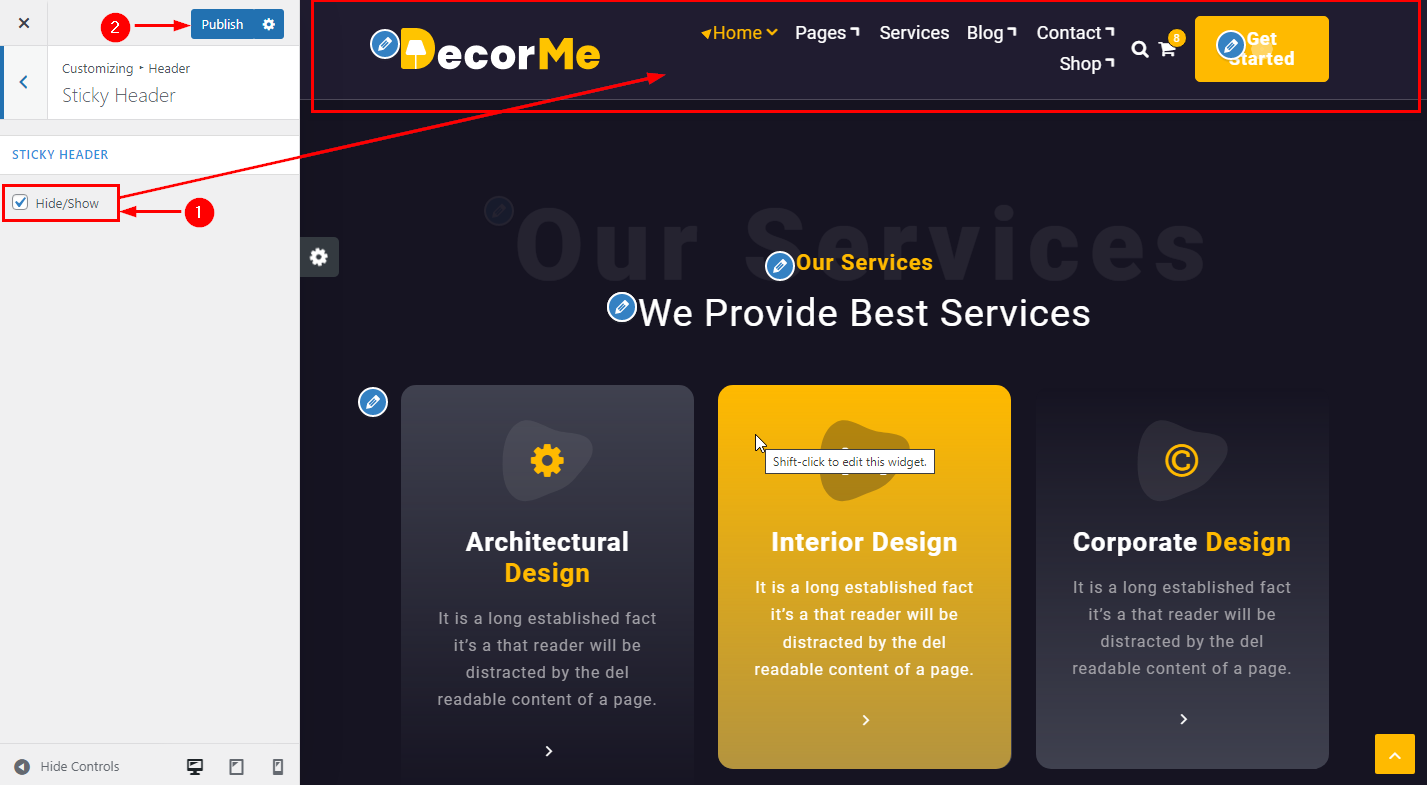
13.Hide/Show Sticky Header
From your dashboard, go to the Appearance > Customize > Header > Sticky Header Section
Now Click on the check box for Hide/Show Sticky header
Click on Publish.
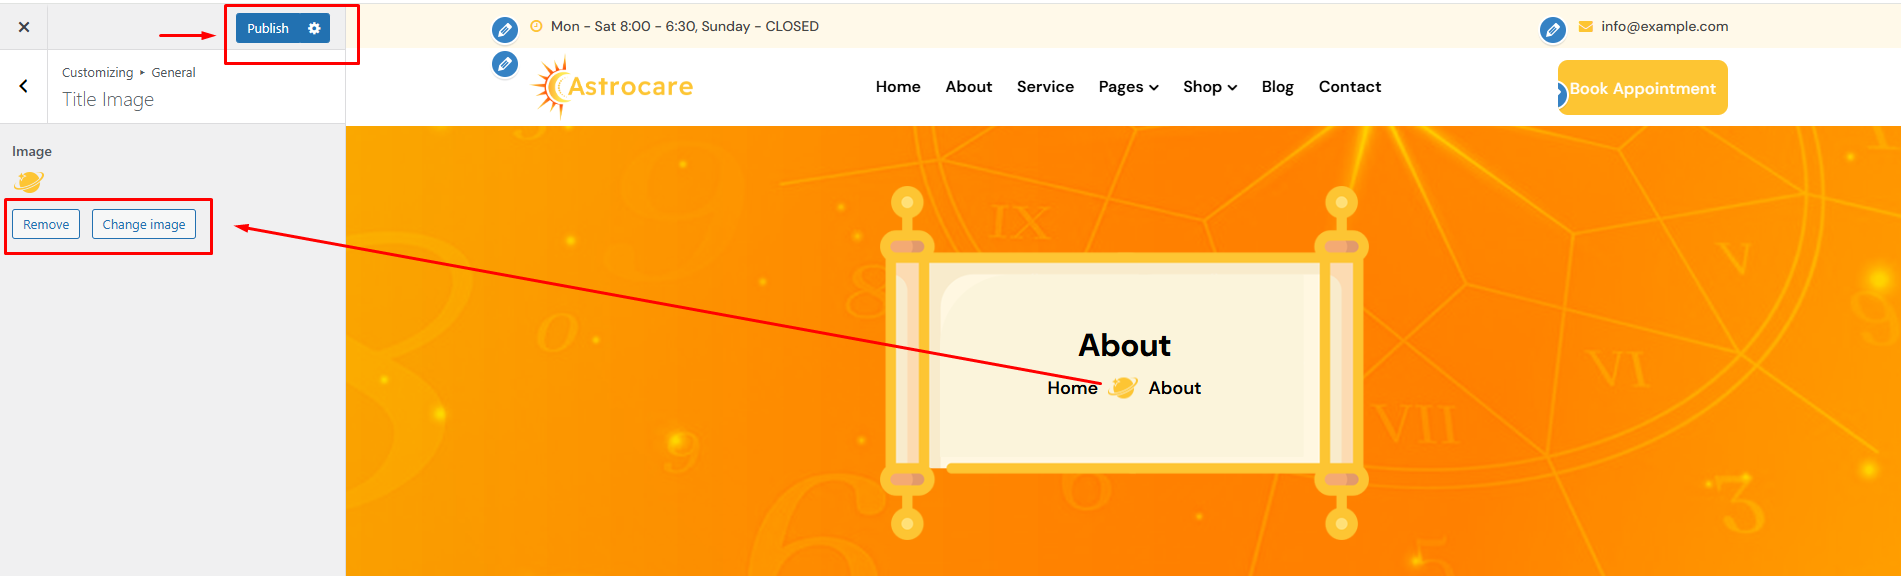
22. How to setup Header image in Appetizer Pro?
1.Setup Header image
From your dashboard, go to the Appearance > Customize > Header image
Here You can set up a header image.
If you change & remove the logo then you can use the buttons below it.
Click on Publish.
23. Additional CSS in CoziPress
1.How to add Additional CSS
From your dashboard , go to the Appearence > Additional CSS >
Here you can to paste your Additional Css
Click on Publish.
24. How to Demo Import for CoziPress pro
Demo Import For CoziPress pro
Install One Click Demo Import plugin in your site
After installing the plugin,
Go to Appearance > Premade Demos
Finally, click Import Demo Data Button
Wait for the import to finish
You are done!!!
25. How to install Seokart Pro Theme
Via WordPress Dashboard install Spintech Pro
Go to the menu Appearance > Themes and click on the Add New button.
Click on the Upload Theme button.
Click on the Browse button and navigate to the unzipped theme package on your computer.
Look for a file called Spintech pro.zip Click on it to select, then click OK.
Click on the Install Now button and wait until the installation is complete.
Click on the Activate link to activate the theme on your WordPress site.
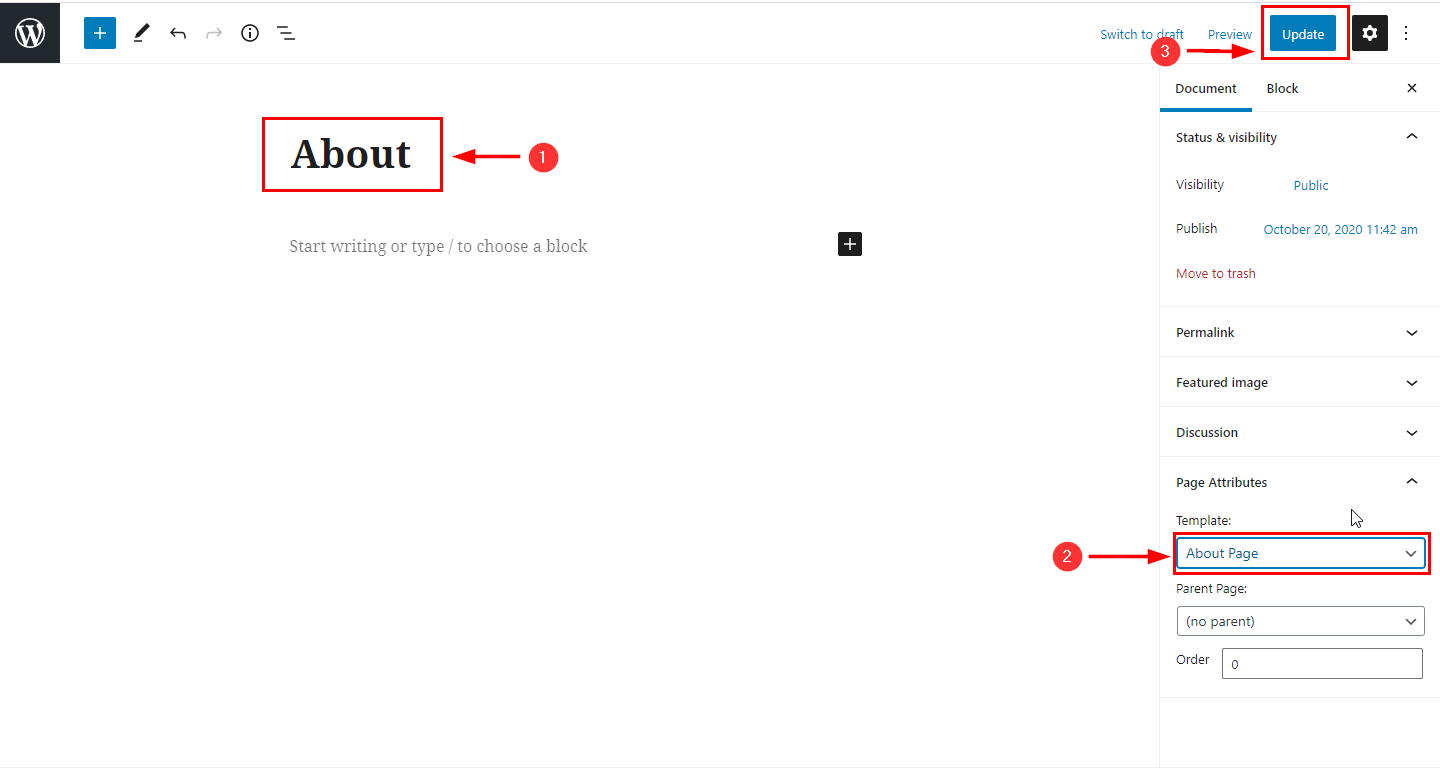
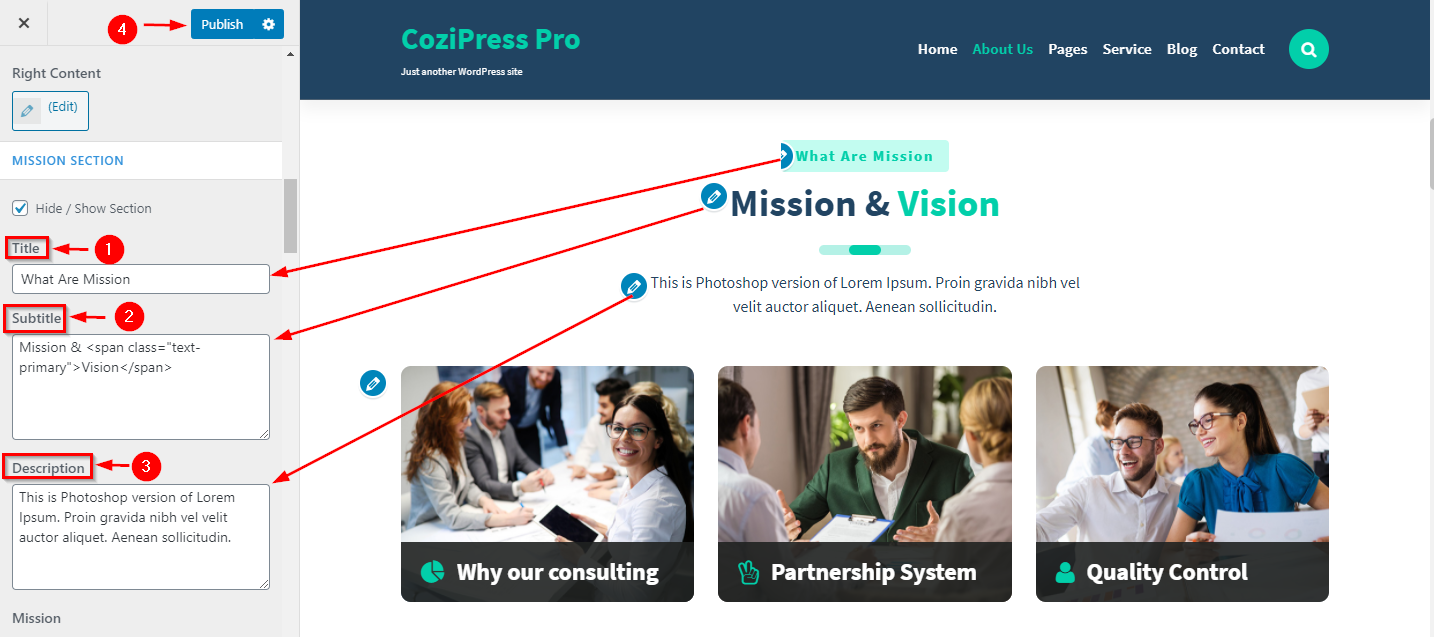
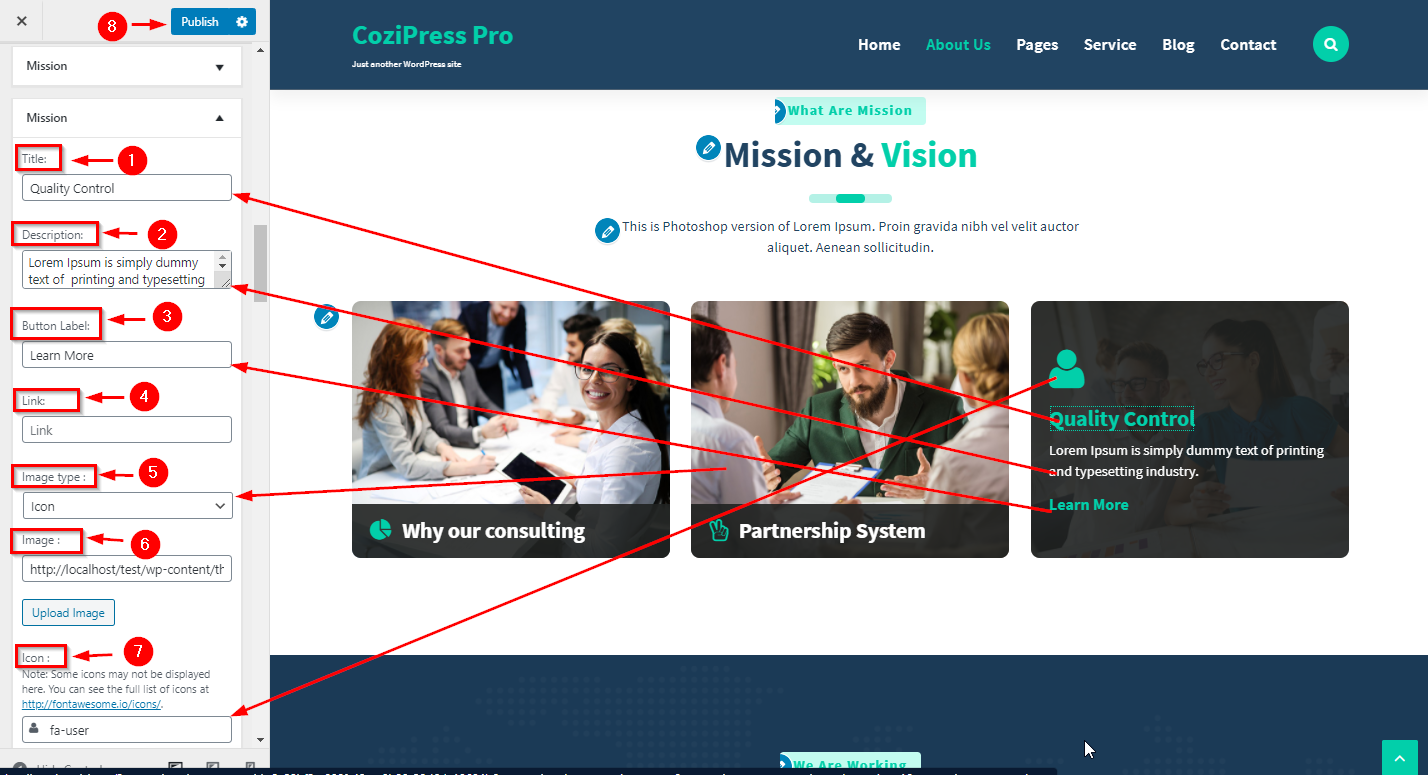
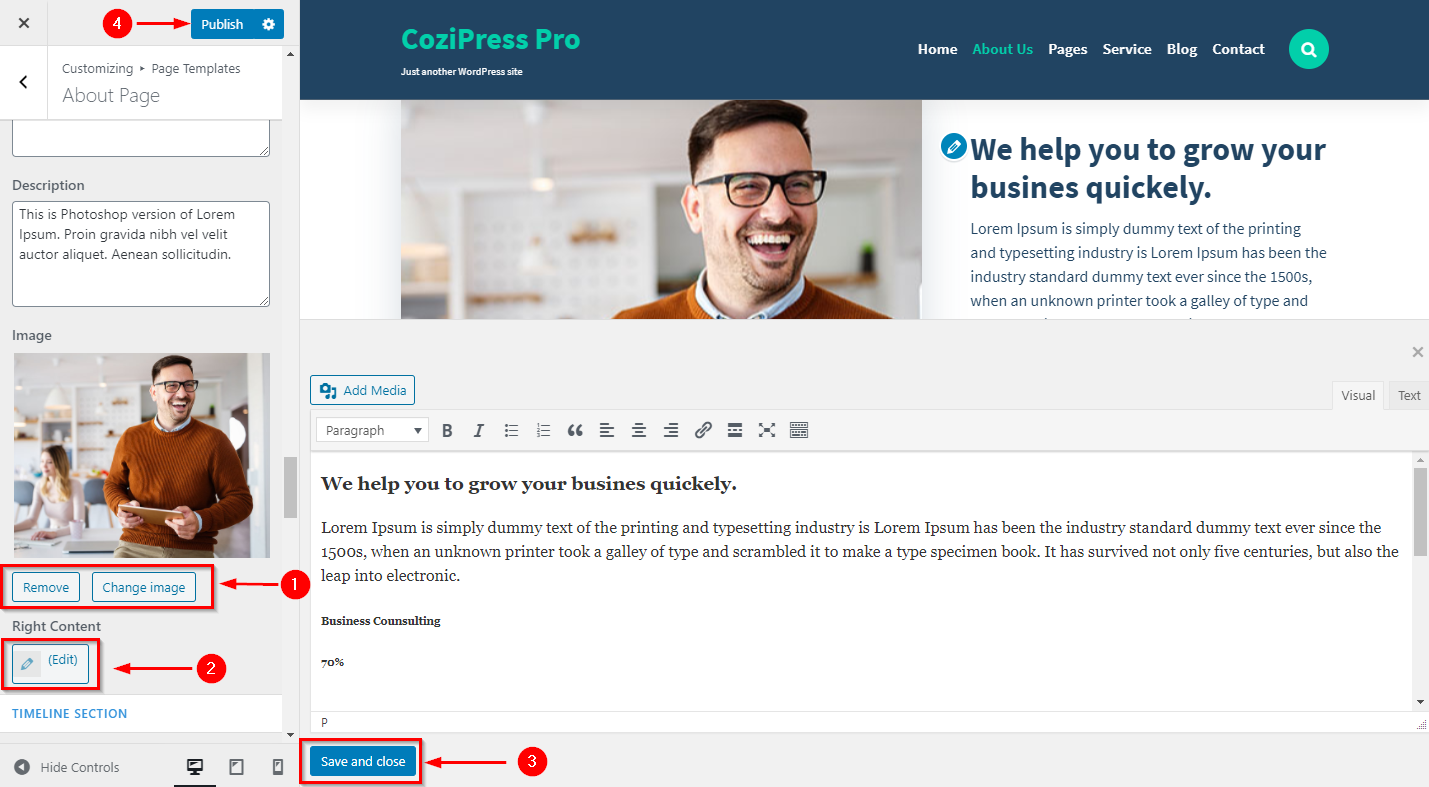
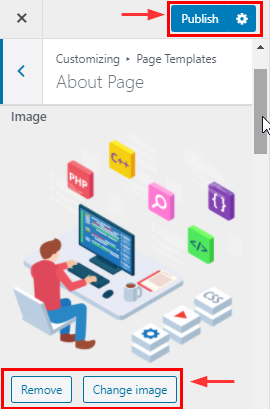
26. How to manage About page in CoziPress
1.Create a Page & Select Template
From your dashboard, go to the Dashboard > Pages > Add New
Now Create a page & Select the Template.
Click on Publish.
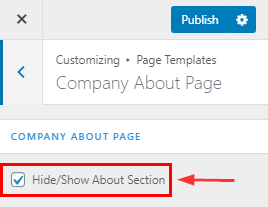
2.Hide/Show About Section
From your dashboard, go to the Appearance > Customize > Page Templates > About Page
Now click on check box for hide/show About section.
Click on Publish.
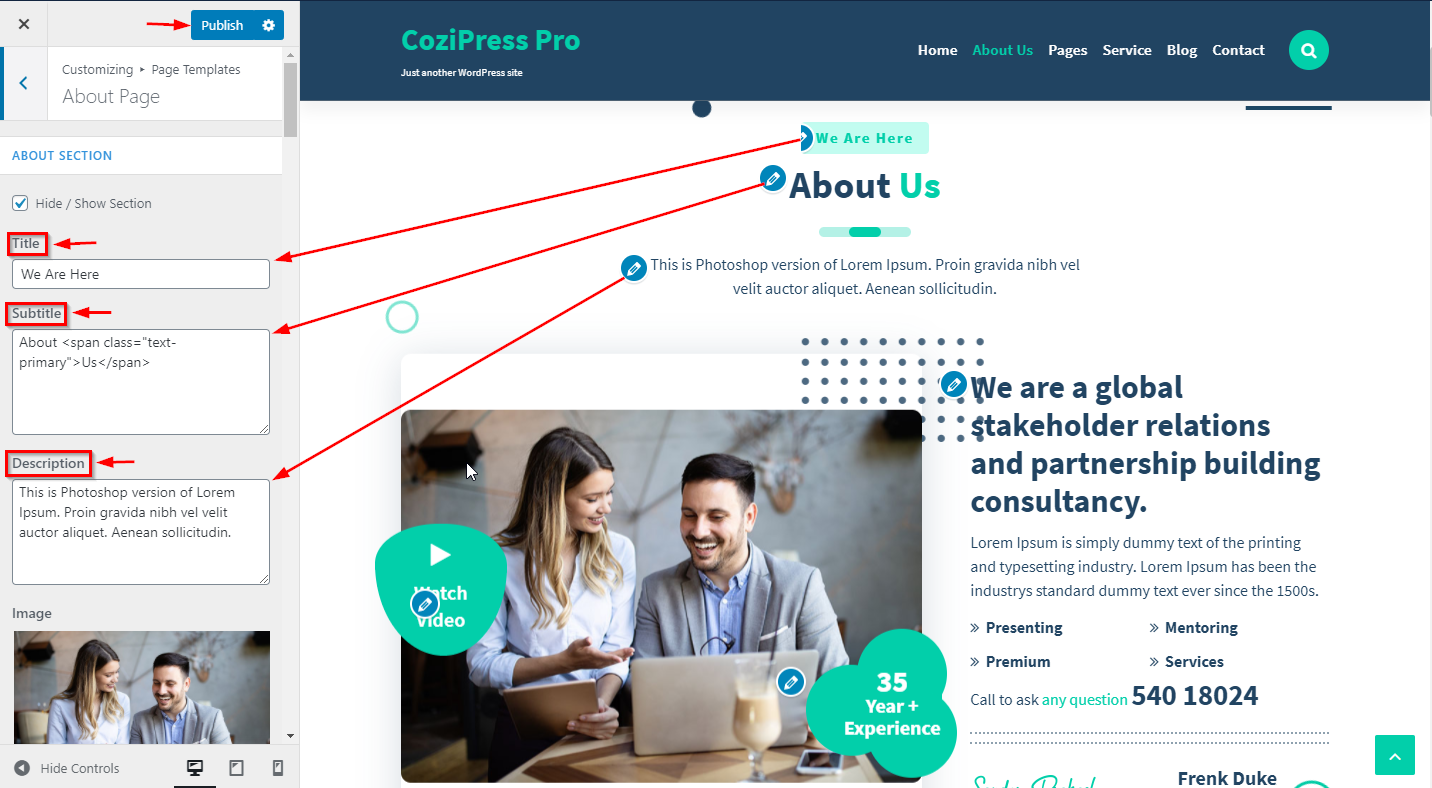
3.How to manage title,subtitle & description
From your dashboard, go to the Appearance > Customize > Page Templates > About Page
Now you can manage title ,subtitle & Description.
Click on Publish.
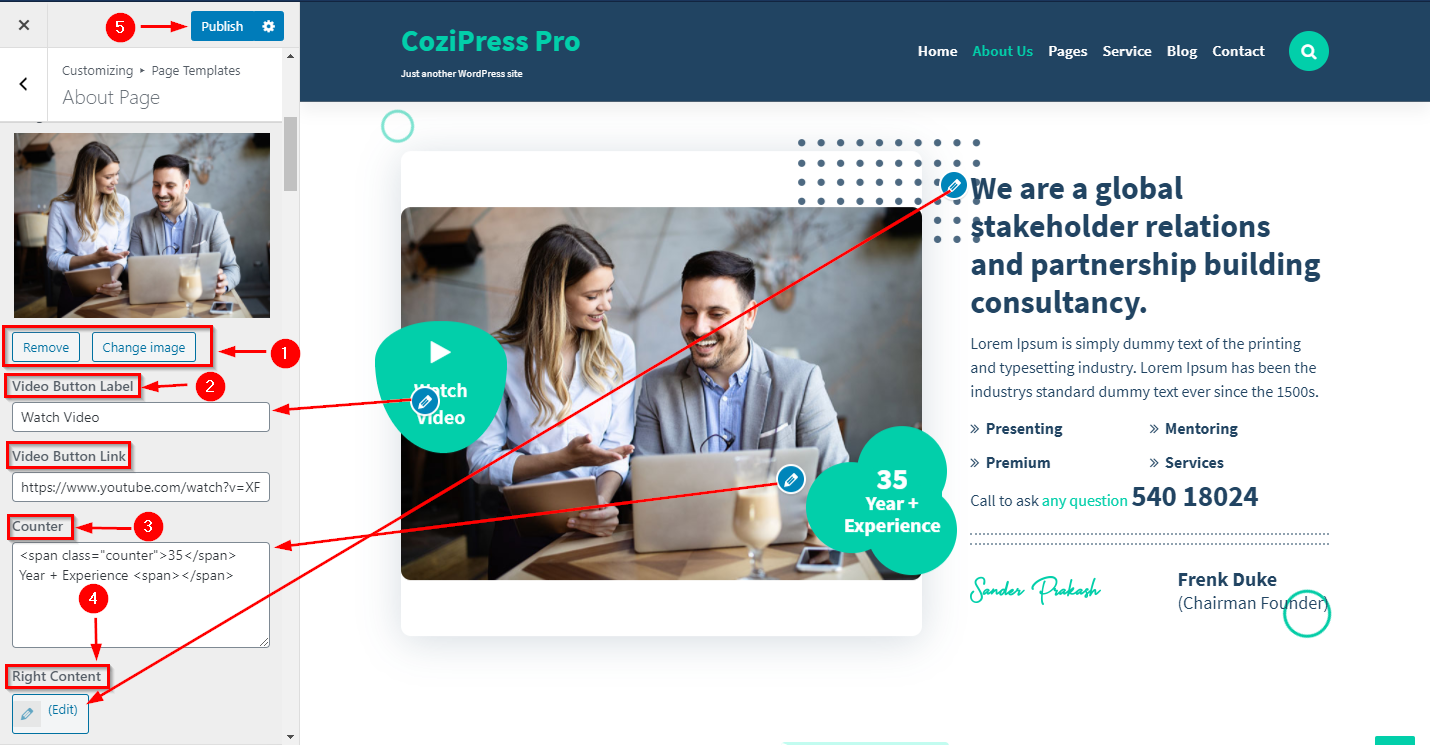
4.How to manage video section in about page
From your dashboard, go to the Appearance > Customize > Page Templates > About Page
Now you can manage video content.
5.Hide/Show Mission Section
From your dashboard, go to the Appearance > Customize > Page Templates > About Page
Now click on check box for hide/show Mission section.
Click on Publish.
6.How to manage title,subtitle & description of mission section
From your dashboard, go to the Appearance > Customize > Page Templates > About Page
Now you can manage title ,subtitle & Description.
Click on Publish.
7.How to manage Content of mission section
From your dashboard, go to the Appearance > Customize > Page Templates > About Page
Now you can manage content here of mission section.
Click on Publish.
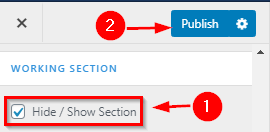
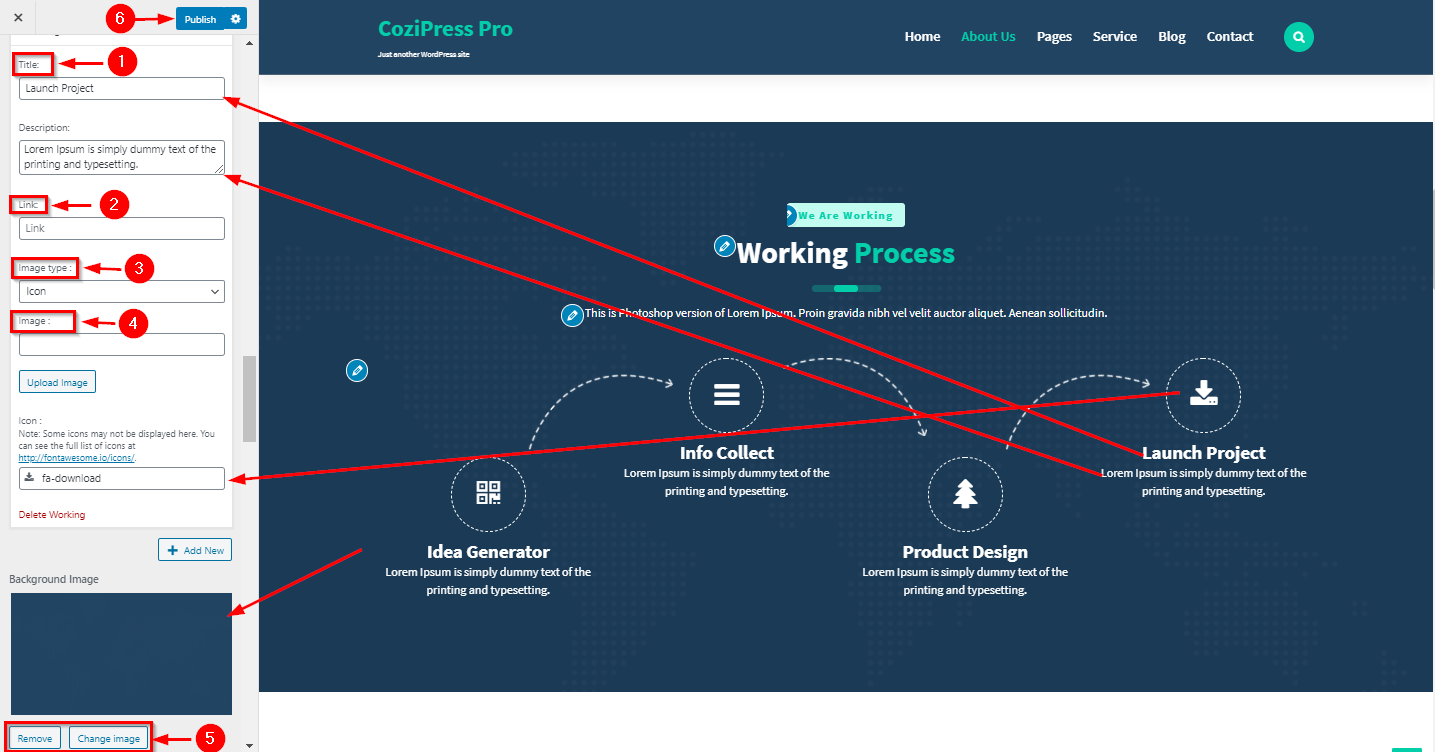
8.Hide/Show Working Section
From your dashboard, go to the Appearance > Customize > Page Templates > About Page
Now click on check box for hide/show working section.
Click on Publish.
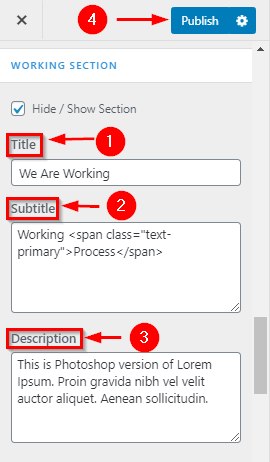
9.How to manage title, subtitle & description of working section
From your dashboard, go to the Appearance > Customize > Page Templates > About Page
Now you can manage title ,subtitle & Description.
Click on Publish.
10.How to manage Content of working section
From your dashboard, go to the Appearance > Customize > Page Templates > About Page
Now you can manage content here of working section.
Click on Publish.
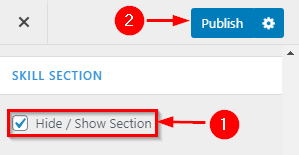
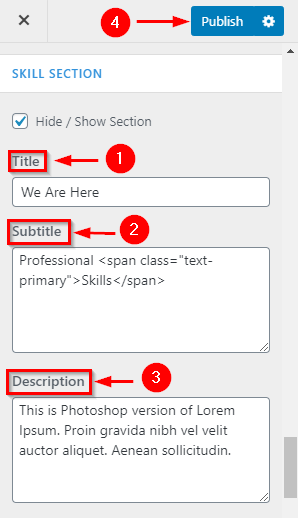
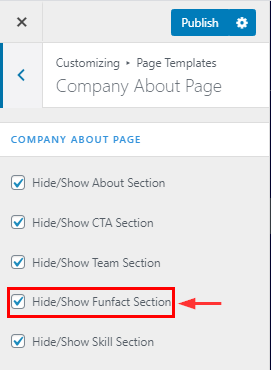
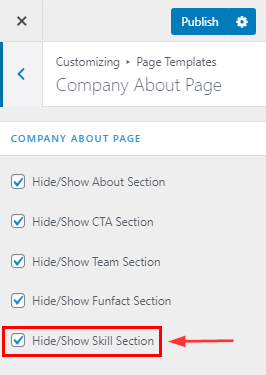
11.Hide/Show Skill Section
From your dashboard, go to the Appearance > Customize > Page Templates > About Page
Now click on check box for hide/show Skill section.
Click on Publish.
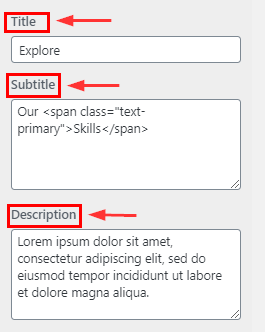
12.How to manage title, subtitle & description of skill section
From your dashboard, go to the Appearance > Customize > Page Templates > About Page
Now you can manage title ,subtitle & Description.
Click on Publish.
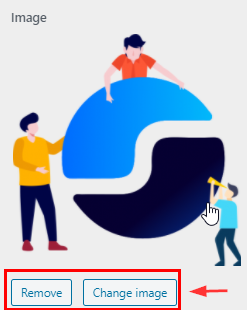
13.How to manage Content of skill section
From your dashboard, go to the Appearance > Customize > Page Templates > About Page
Now you can manage content here of skill section.
Click on Publish.
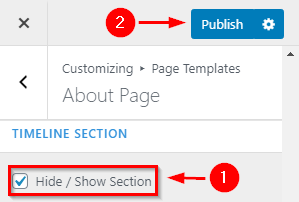
14.Hide/Show Timeline Section
From your dashboard, go to the Appearance > Customize > Page Templates > About Page
Now click on check box for hide/show TimeLine section.
Click on Publish.
15.How to manage title, subtitle & description of timeline section
From your dashboard, go to the Appearance > Customize > Page Templates > About Page
Now you can manage title ,subtitle & Description.
Click on Publish.
16.How to manage Content of timeline section
From your dashboard, go to the Appearance > Customize > Page Templates > About Page
Now you can manage content here of Timeline section.
Click on Publish.
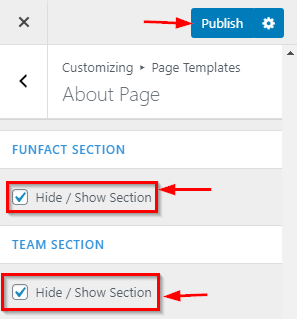
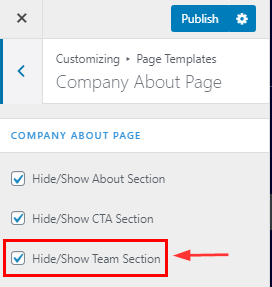
17.Hide/Show Funfact & Team Section in About Page
From your dashboard, go to the Appearance > Customize > Page Templates > About Page
Now click on check box for hide/show Funfact & Team section.
Click on Publish.
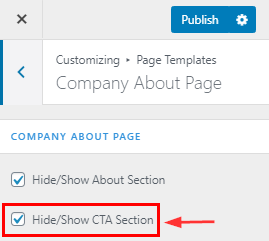
18.How to manage Content of CTA section
From your dashboard, go to the Appearance > Customize > Page Templates > About Page
Now you can manage content here of CTA section.
Click on Publish.
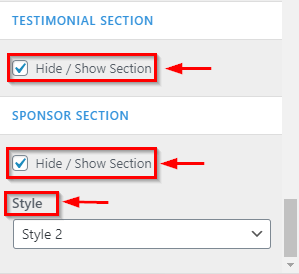
19.Hide/Show Testimonial & Sponsor Section & Style Change in About Page
From your dashboard, go to the Appearance > Customize > Page Templates > About Page
Now click on check box for hide/show Testimonial & Sponsor section.
Click on Publish.
27. How to manage General Section in Owlpress Pro?
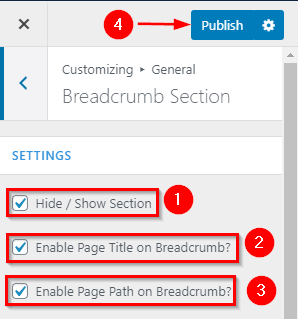
1. Hide/Show Breadcrumb Section, Enable Page Title on Breadcrumb & Enable Page Path on Breadcrumb?
From your dashboard, go to the Appearance > Customize > General > Breadcrumb Section
Now Click on the check box for Hide/Show Breadcrumb Section, Enable Page Title on Breadcrumb & Enable Page Path on Breadcrumb.
Click on Publish.
2. Manage Min Height
From your dashboard, go to the Appearance > Customize > General > Breadcrumb Section
Now you can manage min-height in Breadcrumb.
Click on Publish.
3. Background image related setting
From your dashboard, go to the Appearance > Customize > General > Breadcrumb Section
Now you can manage background image & opacity in Breadcrumb.
Click on Publish.
4. Hide/Show Preloader
From your dashboard, go to the Appearance > Customize > General > Preloader Section
Here you can Hide/Show Preloader in Spintech Pro
Click on Publish.
5. Hide/Show clip art
From your dashboard, go to the Appearance > Customize > General >; clip Art Section
Here you can hide/show clip Art on the theme.
Click on Publish.
6. Hide/Show Top Scroller & Change Icon
From your dashboard, go to the Appearance > Customize > General > Top Scroller Section
Here you can Hide/Show Top Scroller & Change icon
Click on Publish.
28. How to manage Contact Page in Seokart Pro?
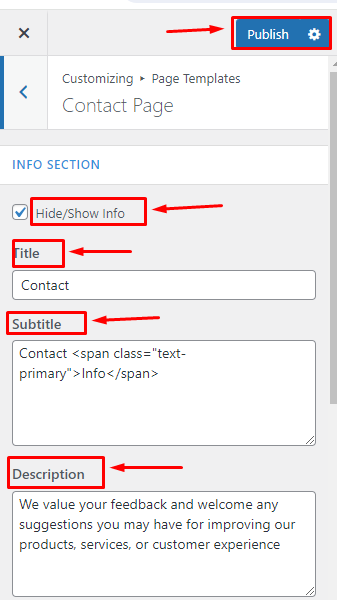
1. How to manage Contact Info Section in the contact page.
From your dashboard, go to the Appearance > Customize > Page Templates > Contact Page
Here you can change the title, Info content, Column & hide/show info section in the Contact info Section.
Click on Publish.
2. How to manage the Contact us Section in the contact page.
From your dashboard, go to the Appearance > Customize > Page Templates > Contact Page
Here you can change the title, Info content, Column & hide/show info section in the Contact info Section.
Click on Publish.
3. How to manage the Contact Form Section in the contact page.
From your dashboard, go to the Appearance > Customize > Page Templates > Contact Page
Here you can change the title, Description, Column & hide/show Contact form section in the Contact form Section. Click on Publish.
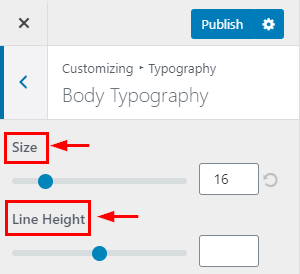
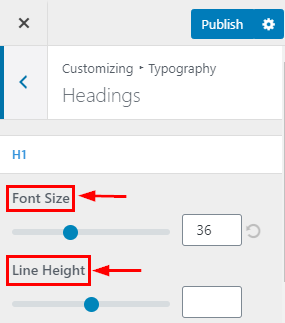
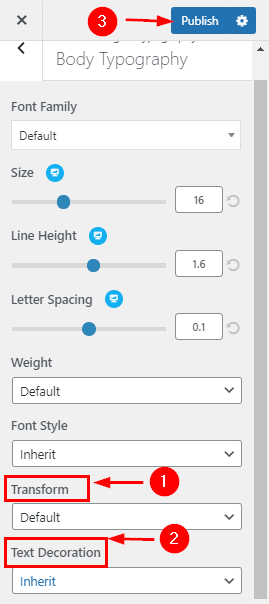
29. How to manage Typography?
1. How to manage Font Size & Line height in Body Typography
From your dashboard , go to the Appearance > Customize > typography > body typography Section
Here You can manage Font Size &; line Height.
Click on Publish.
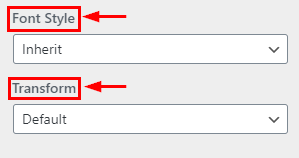
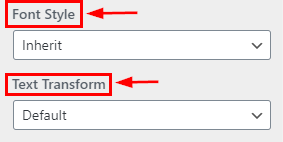
2.How to manage Font Style & Transform in Body Typography
From your dashboard , go to the Appearance > Customize > typography > body typography Section
Here You can manage Font Style & Transform.
Click on Publish.
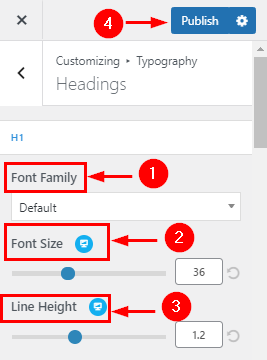
3.How to manage Font Size & Line height H1 to H6 in Headings Typography
From your dashboard, go to the Appearance > Customize > typography > Heading Section
Here You can manage Font Size & line Height.
Click on Publish.
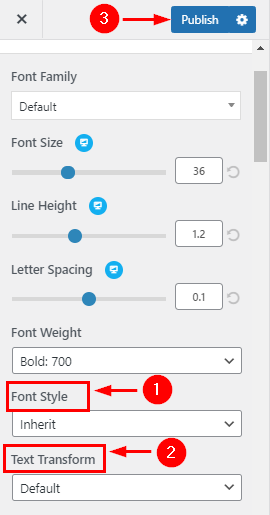
4. How to manage Font Style & Transform H1 to H6 in Headings Typography
From your dashboard, go to the Appearance > Customize > typography > Heading Section
Here You can manage Font Style & Transform.
Click on Publish.
30. How to manage section Reorder in Decorme?
1. How to manage section reorder.
From your dashboard, go to the Appearance > Customize > Section Reorder
Here you can manage section reorder.
Click on Publish.
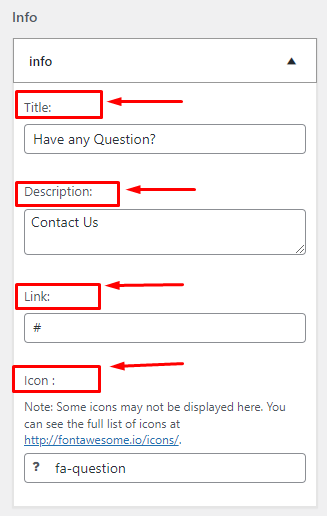
31. How to manage content info?
1.How to Manage Content info-1?
From your dashboard, go to the Appearance > Customize > FrontPage Sections > Info Section
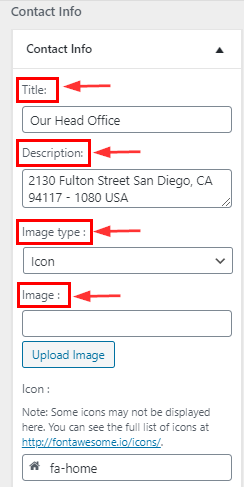
Here you can manage content (Like- Title, Description, Icon, Image) in the info section.
Click on Publish.
2.How to Manage Content info-2?
From your dashboard, go to the Appearance > Customize > FrontPage Sections > Info Section
Here you can manage content (Like- Title, Description, Icon, Image) in the info section.
Click on Publish.
32. Slider Manage of Lingerie Home Page!
1.Lifestyle slider content!
From your dashboard, go to the Appearance > Customize > Lifestyle Home Page > Slider Section
Here you can manage the content of the slider section
Now Click on Publish.
33. How to manage blog Section?
1.How do i hide/Show Blog Section
From your dashboard, go to the Appearance > Customize > FrontPage Sections > Blog Section
Here you can Hide/Show Blog Section
Now Click on Publish.
2.How to manage Title Blog Section
From your dashboard, go to the Appearance > Customize > FrontPage Sections > Blog Section
Here you can manage the title Blog Section
Now Click on Publish.
3.How to manage No.Post of Display
From your dashboard, go to the Appearance > Customize > FrontPage Sections > Blog Section
Here you can manage No. Post of Display
Now Click on Publish.
34. How to manage Company FAQ Page in Owlpress Pro?
1. Create a Page & Select Template
From your dashboard, go to the Dashboard > Pages > Add New
Now Create a page & Select the Template.
Click on Publish.
2. Hide/Show FAQ on the FAQ page
From your dashboard, go to the Appearance > Customize > Page Templates > FAQ Page
Now click on the check box for the hide/show FAQ page.
Click on Publish.
3. Manage title, subtitle & description on the FAQ page
From your dashboard, go to the Appearance > Customize > Page Templates > FAQ Page
Now here you can manage the title, subtitle & description on the FAQ page.
Click on Publish.
4. How to manage content in FAQ Page
From your dashboard, go to the Appearance > Customize > Page Templates > FAQ Page
Now here you can manage content on the FAQ page.
Click on Publish.
5. How to manage the right content on FAQ Page
From your dashboard, go to the Appearance > Customize > Page Templates > FAQ Page
Now here you can manage the right content on the FAQ page.
Click on Publish.
6. How to manage contact section on FAQ Page
From your dashboard, go to the Appearance > Customize > Page Templates > FAQ Page
Now here you can manage the contact section on the FAQ page.
Click on Publish.
35. How to demo import for Owlpress pro?
Demo Import For Owlpress pro
Install One Click Demo Import plugin on your site
After installing the plugin,
Go to Appearance > Premade Demos
Finally, click Import Demo Data Button
Wait for the import to finish
You are done!!!
36. How to Demo Import for Spintech pro
Demo Import For Spintech pro
Install One Click Demo Import plugin in your site
After installing the plugin,
Go to Appearance > Premade Demos
Finally, click Import Demo Data Button
Wait for the import to finish
You are done!!!
37. How to manage Pricing Section in Owlpress Pro?
1. How to manage title, Subtitle & Description
From your dashboard, go to the Appearance > Customize > FrontPage Sections > Pricing Section
Here you can change the title, Subtitle & Description in the Pricing section.
Click on Publish.
2. How to display No. of Pricing
From your dashboard, go to the Appearance > Customize > FrontPage Sections > Pricing Section
Here you can display the No. of pricing in the Pricing section.
Click on Publish.
3. How to manage Pricing Column
From your dashboard, go to the Appearance > Customize > FrontPage Sections > pricing Section
Here you can choose a column layout in the pricing section.
Click on Publish.
38. How to manage About Section in SpaBiz Pro?
1.How to manage content of About-1?
From your dashboard, go to the Appearance > Customize > FrontPage Sections > About Section
Here you can change Left Content (title, image, show/hide) .
Click on Publish.
Here you can change Right Content (title, subtitle, Content ,show/hide) .
Click on Publish.
2.How to manage content of About-2?
From your dashboard, go to the Appearance > Customize > FrontPage Sections > About Section
Here you can change title, Subtitle & Description .
Click on Publish.
Here you can change Left Content & Right Content.
Click on Publish.
39. How to Activate license in Kundoo pro
How to Activate License key in Kundoo pro
Go to your WordPress website dashboard
Go to Appearance > Theme License
Enter your theme license key into the License Key field
Click Activate
40. How to manage colors in StoreBiz?
How to manage Background Color
From your dashboard , go to the Appearance > Customize > Colors > Background Color
Here You can manage background color.
Click on Publish.
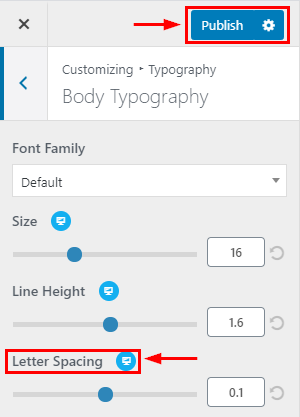
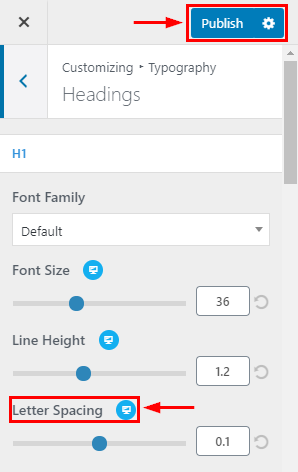
41. How to manage Typography in Owlpress Pro?
1. How to manage Font Size & Line height in Body Typography
From your dashboard , go to the Appearance > Customize > typography > body typography Section
Here You can manage Font Size &; line Height.
Click on Publish.
2. How to manage letter spacing in Body Typography
From your dashboard , go to the Appearance > Customize > typography > body typography Section
Here You can manage letter spacing.
Click on Publish.
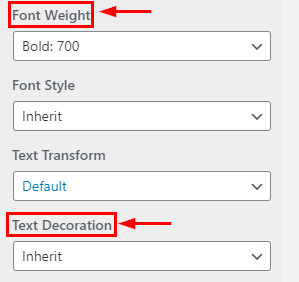
3. How to manage Font Style & Transform in Body Typography
From your dashboard , go to the Appearance > Customize > typography > body typography Section
Here You can manage Font Style & Transform.
Click on Publish.
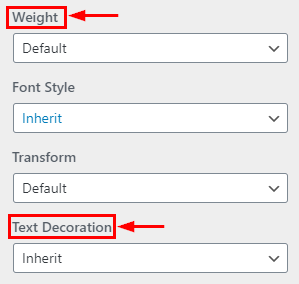
4. How to manage weight & text decoration in Body Typography
From your dashboard , go to the Appearance > Customize > typography > body typography Section
Here You can manage weight & text decoration.
Click on Publish.
5. How to manage Font Size & Line height H1 to H6 in Headings Typography
From your dashboard, go to the Appearance > Customize > typography > Heading Section
Here You can manage Font Size & line Height.
Click on Publish.
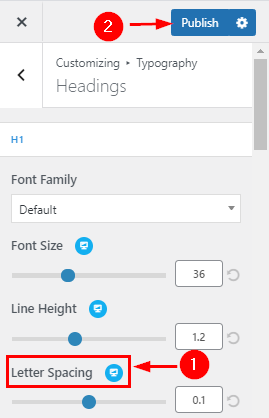
6. How to manage letter spacing in Heading Typography
From your dashboard , go to the Appearance > Customize > typography > body typography Section
Here You can manage letter spacing.
Click on Publish.
7. How to manage Font Style & Transform H1 to H6 in Headings Typography
From your dashboard, go to the Appearance > Customize > typography > Heading Section
Here You can manage Font Style & Transform.
Click on Publish.
8. How to manage weight & text decoration in Heading Typography
From your dashboard , go to the Appearance > Customize > typography > body typography Section
Here You can manage weight & text decoration.
Click on Publish.
42. How to manage content info?
1.How to manage content info
From your dashboard, go to the Appearance > Customize > FrontPage Sections > Info Section
Here you can manage content (Like- Title, Description, Icon, Image) in the info section.
Click on Publish.
43. How to manage Pricing Section in Kundoo
1.How to manage title, Subtitle & Description Pro Features
From your dashboard, go to the Appearance > Customize > FrontPage Sections > Pricing Section
Here you can change title, Subtitle & Description in Pricing section.
Click on Publish.
2.How to create price section Pro Features
From your dashboard, go to the Pricing> Add New > Add New Price Table
Here you can create Pricing Table in Pricing section.
Click on Publish.
3.How to manage Pricing Column Pro Features
From your dashboard, go to the Appearance > Customize > FrontPage Sections > pricing Section
Here you can choose column layout in pricing section.
Click on Publish.
4.How to manage Your Pricing Pro Features
From your dashboard, go to the Appearance > Customize > FrontPage Sections > pricing Section
Here you can Select Your Pricing
Click on Publish.
44. How to manage style configurator in CoziPress
1.How to manage website layout & preset background image.
From your dashboard, go to the Appearance > Customize > Style Configurator > Page Layout
Here you can manage the website layout & preset background image.
Click on Publish.
2.How to manage prebuilt theme color.
From your dashboard, go to the Appearance > Customize > Style Configurator > prebuilt theme color
Here you can manage prebuilt theme color.
Click on Publish.
3.How to enable/disable custom color.
From your dashboard, go to the Appearance > Customize > Style Configurator > custom color
Here you can manage custom colors.
Click on Publish.
4.How to manage custom primary & secondary colors.
From your dashboard, go to the Appearance > Customize > Style Configurator > custom color
Here you can manage custom primary & secondary colors.
Click on Publish.
5.How to enable/disable front pallate.
From your dashboard, go to the Appearance > Customize > Style Configurator > Front Pallate
Here you can enable/disable front pallate.
Click on Publish.
45. How to manage Gallery Page?
1.How to manage Gallery Content
From your dashboard, go to the Appearance > Customize > Page Template > Gallery Page
Here you set up content in the gallery section.
Click on Publish.
2.How to manage column in Gallery page
From your dashboard, go to the Appearance > Customize > Page Template > Gallery Page
Here you set up a column in the gallery section.
Click on Publish.
46. Newsletter Section Manage of Electronics Home Page!
1.Service Section Manage!
From your dashboard, go to the Appearance > Customize > Electronics Home Page Sections > Newsletter Section
Here you can manage the Service section .
Now Click on Publish
2. Banner Section Manage!
From your dashboard, go to the Appearance > Customize > Electronics Home Page Sections > Newsletter Section
Here you can manage the Banner section .
Now Click on Publish
3. Newsletter Section Manage!
From your dashboard, go to the Appearance > Customize > Electronics Home Page Sections > Newsletter Section
Here you can manage the (Form) Newsletter section .
Now Click on Publish
47. Browse Category Section Manage of Lifestyle Home Page!
1.Browse Category Section Manage!
From your dashboard, go to the Appearance > Customize > Lifestyle Home page > Browse Category Section
Here you can manage the Title, Subtitle & Content .
Now Click on Publish.
48. How to manage colors?
1. How to manage Header Text Color
From your dashboard, go to the Appearance > Customize > Colors > Header Text Color
Here You can manage header text color.
Click on Publish.
2. How to manage Background Color
From your dashboard , go to the Appearance > Customize > Colors > Background Color
Here You can manage background color.
Click on Publish.
49. How to manage Team Page in Kundoo
1.Create Team Page & Select Template
From your dashboard, go to the Dashboard > Pages > Add New
Now Create a page & Select the Template.
Click on Publish.
2.How to manage title, Subtitle & Description Pro Features
From your dashboard, go to the Appearance > Customize > Page Templates > Team Page
Here you can change title, Subtitle & Description in Team Page.
Click on Publish.
3.How to manage team content Pro Features
From your dashboard, go to the Appearance > Customize > Page Templates > Team Page
Here you setup content in team Page.
4.How to manage team column Pro Features
From your dashboard, go to the Appearance > Customize > Page Templates > Team Page
Here you can choose column layout in team Page.
50. How to manage Pricing Page in Spintech
1.Create Pricing Filter Page & Select Template
From your dashboard, go to the Dashboard > Pages > Add New
Now Create a page & Select the Template.
Click on Publish.
2.Create Pricing Simple Page & Select Template
From your dashboard, go to the Dashboard > Pages > Add New
Now Create a page & Select the Template.
Click on Publish.
3.How to manage title, Subtitle & Description Pro Features
From your dashboard, go to the Appearance > Customize > Page Templates > Pricing Page
Here you can change title, Subtitle & Description in Pricing section.
Click on Publish.
4.How to display No. of Pricing Pro Features
From your dashboard, go to the Appearance > Customize > Page Template > Pricing Page
Here you can display No. of pricing in Pricing section.
Click on Publish.
5.How to manage Pricing Column Pro Features
From your dashboard, go to the Appearance > Customize > Page Template > Pricing Page
Here you can choose column layout in pricing section.
Click on Publish.
6.How to Hide/Show FAQ section in Pricing Page Pro Features
From your dashboard, go to the Appearance > Customize > Page Template > Pricing Page
Here you can Hide/Show FAQ Section.
Click on Publish.
7.How to manage title, Subtitle & Description in FAQ Pro Features
From your dashboard, go to the Appearance > Customize > Page Templates > Pricing Page
Here you can change title, Subtitle & Description in FAQ section.
Click on Publish.
8.How to manage FAQ Content Pro Features
From your dashboard, go to the Appearance > Customize > Page Templates > Pricing Page
Here you can change title, & Description in FAQ section.
Click on Publish.
51. Slider Manage of Watch Home Page!
1.Watch slider content!
From your dashboard, go to the Appearance > Customize > Watch Home Page > Slider Section
Here you can manage the content of the slider section
Now Click on Publish
52. How to manage Slider 1 in SpaBiz Pro?
1.How do I manage Content in Slider Section 1?
From your dashboard, go to the Appearance > Customize > FrontPage Sections > Slider Section
Here you can manage content of Slider Section
Now Click on Publish.
2.How to manage Opacity, Animation & Slider Speed?
From your dashboard, go to the Appearance > Customize > FrontPage Sections > Slider Section
Here you can manage Opacity, Slider Speed & Animation Effects
53. How to manage footer section in Owlpress Pro?
1. How to manage footer background image related setting in the footer
From your dashboard, go to the Appearance > Customize > Footer > Footer Above
Here you can change the footer background image-related setting.
Click on Publish.
2. How to manage content in Footer Above Section
From your dashboard, go to the Appearance > Customize > Footer > Footer Above
Here you can manage content in Footer Above Section.
Click on Publish.
3. How to manage footer widget layout in footer
From your dashboard, go to the Appearance > Customize > Footer > Footer Above
Here you can manage the footer widget layout.
Click on Publish.
4. How to manage footer bottom in the footer
From your dashboard, go to the Appearance > Customize > Footer > Footer Above
Here you can manage the footer bottom.
Click on Publish.
5. How to manage copyright & Support section in footer.
From your dashboard, go to the Appearance > Customize > Footer > Footer Copyright
Here you can manage the copyright & Support section.
Click on Publish.
6. How to manage the payment icon in the footer.
From your dashboard, go to the Appearance > Customize > Footer > Footer Copyright
Here you can manage the payment icon.
54. How to manage Funfact Section in Owlpress Pro?
1. How to manage Content
From your dashboard, go to the Appearance > Customize > FrontPage Sections > Funfact Section
Here you can manage content in the Funfact section.
Click on Publish.
2. Background image related setting
From your dashboard, go to the Appearance > Customize > General > Breadcrumb Section
Now you can manage background image & opacity in Breadcrumb.
Click on Publish.
55. How to add Additional CSS?
1. How to add Additional CSS
From your dashboard, go to the Appearance > Additional CSS >
Here you can paste your Additional CSS
Click on Publish.
56. How to manage Team Section in Seokart Pro?
1. How to manage title, Subtitle & Description
From your dashboard, go to the Appearance > Customize > FrontPage Sections > Team Section
Here you can change the title, Subtitle & Description in the team section.
Click on Publish.
2. How to manage team content
From your dashboard, go to the Appearance > Customize > FrontPage Sections > Team Section
Here you set up content in the team section.
Click on Publish.
3. How to manage team column
From your dashboard, go to the Appearance > Customize > FrontPage Sections > Team Section
Here you can choose a column layout in the team section.
Click on Publish.
57. How to manage Funfact Section in Seokart Pro?
1. How to manage title, Subtitle & Description
From your dashboard, go to the Appearance > Customize > FrontPage Sections > Funfact Section
Here you can manage content in the Funfact section.
Click on Publish.
2. How to manage Content
From your dashboard, go to the Appearance > Customize > FrontPage Sections > Funfact Section
Here you can manage content in the Funfact section.
Click on Publish.
3. How to manage Funfact Column
From your dashboard, go to the Appearance > Customize > FrontPage Sections > Funfact Section
Here you can choose a column layout in funfact section.
Click on Publish.
58. How to manage Service Section in Owlpress Lite?
1. How to manage title, Subtitle, Description & hide/show?
From your dashboard, go to the Appearance > Customize > FrontPage Sections > Service Section
Here you can change the title, Subtitle & Description in the Service section.
Click on Publish.
2. How to manage content Service Section
From your dashboard, go to the Appearance > Customize > FrontPage Sections > Service Section
Here you can manage content in the Service section.
Click on Publish.
59. How to manage menu setup?
From your dashboard, go to the Appearance > Menus > Select Menu
Here Select Menu according to you
Click on Save Menu.
60. How to Create a Project Page & Select Template
1.Create a Project 2 Column Page & Select Template
From your dashboard, go to the Dashboard > Pages > Add New
Now Create a page & Select the Template in Page Attributes.
Click on Publish.
2.Create a Project 3 Column Page & Select Template
From your dashboard, go to the Dashboard > Pages > Add New
Now Create a page & Select the Template in Page Attributes.
3.Create a Project 4 Column Page & Select Template
From your dashboard, go to the Dashboard > Pages > Add New
Now Create a page & Select the Template in Page Attributes.
61. How to manage Expertise Section in Seokart Pro?
1. How to manage title, Subtitle & Description
From your dashboard, go to the Appearance > Customize > FrontPage Sections > Expertise Section
Here you can change the title, Subtitle & Description in Expertise Section.
Click on Publish.
2. How to manage content Expertise Section
From your dashboard, go to the Appearance > Customize > FrontPage Sections > Expertise Section
Here you can manage content in the Expertise section.
Click on Publish.
62. Testimonial Section Manage of Home Page!
1.Testimonial Section Manage!
From your dashboard, go to the Appearance > Customize > Goggles Home page > Testimonial Section
Here you can manage the Video Link, Title, Subtitle ,Link & image .
Now Click on Publish
63. How to manage Slider Section in Appetizer Lite?
1. How to manage Title, Subtitle & Description
From your dashboard, go to the Appearance > Customize > FrontPage Sections > Slider Section
Here you can manage the content of the slider section
Now Click on Publish
2. How to manage Button label in slider
From your dashboard, go to the Appearance > Customize > FrontPage Sections > Slider Section
Here you can manage button label & Link
Click on Publish.
3. How to change slider image, Alignment & Price
From your dashboard, go to the Appearance > Customize > FrontPage Sections > Slider Section
Here you can change the slider image & set Alignment
Click on Publish
4. Manage Slider opacity
From your dashboard, go to the Appearance > Customize > FrontPage Sections > Slider Section
Here you can manage slider opacity according to your choice.
64. How to manage style configurator in Astrocare Pro
1. How to manage website layout & preset background image.
From your dashboard, go to the Appearance > Customize > Style Configurator > Page Layout
Here you can manage the website layout & preset background image.
Click on Publish.
2. How to manage Prebuilt Theme Color?
From your dashboard, go to the Appearance > Customize > Style Configurator > Prebuilt theme color
Here you can manage prebuilt theme color.
Click on Publish.
3. How to enable/disable custom color.
From your dashboard, go to the Appearance > Customize > Style Configurator > custom color
Here you can manage custom colors.
Click on Publish.
4. How to manage custom primary & secondary colors.
From your dashboard, go to the Appearance > Customize > Style Configurator > custom color
Here you can manage custom primary & secondary colors.
Click on Publish.
5. How to enable/disable Front Pallate.
From your dashboard, go to the Appearance > Customize > Style Configurator > Front Pallate
Here you can enable/disable front Pallate
Click on Publish.
65. How to manage About page in Astrocare
1. Create a Page & Select Template
From your dashboard, go to the Dashboard > Pages > Add New
Now Create a page & Select the Template.
Click on Publish.
2. How to manage title, Subtitle & Description Pro Features
From your dashboard, go to the Appearance > Customize > Page Template > About Page
Here you can change the title, Subtitle & description on the About Us page.
Click on Publish.
3. How to manage About Us Right Content?
From your dashboard, go to the Appearance > Customize > Page Template > About Page
Here you can change theRight content in the About section.
Click on Publish.
4. How to manage About Us Image & Video Link?
From your dashboard, go to the Appearance > Customize > Page Template > About Page
Here you can change & removeImagesin the About section.
Here you can add a video link in the About section.
Click on Publish.
5. How to manage the About Us section?
From your dashboard, go to the Appearance > Customize > Page Template > About Page
Here you can hide/show the About section.
Click on Publish.
6. How do you manage other sections?
From your dashboard, go to the Appearance > Customize > Page Template > About Page
Here you can hide/show other sections.
Click on Publish.
66. How to install StoreBiz?
Go to the menu Appearance > Themes and click on the Add New button.
Click on the Upload Theme button.
Click on the Browse button and navigate to the unzipped theme package on your computer.
Look for a file called StoreBiz.zip Click on it to select, then click OK.
Click on the Install Now button and wait until the installation is complete.
Click on the Activate link to activate the theme on your WordPress site.
67. How to manage Testimnonial Page in SpaBiz Pro?
1.Create a Page & Select Template
From your dashboard, go to the Dashboard > Pages > Add New
Now Create a page & Select the Template.
Click on Publish.
2.How to manage Testimnonial Section?
From your dashboard, go to the Appearance > Customize > Page Templates > Testimnonial Page
Here you can change hide/show, title, Subtitle & Description & content in testimnonial section.
Click on Publish
68. How to manage Service Section?
1. How to manage content Service Section?
From your dashboard, go to the Appearance > Customize > FrontPage Sections > Service Section
Here you can manage content in the Service section.
Click on Publish.
69. How to manage header image?
1. How to the setup Header image
From your dashboard, go to the Appearance > Customize > Header image
Here You can set up a header image.
If you change & remove the logo then you can use the buttons below it.
Click on Publish.
70. How to manage Custom Section in Appetizer pro?
1. How to manage title & description
From your dashboard, go to the Appearance > Customize > FrontPage Sections > Custom Section
Here you can change the title & Description in the Custom section.
Click on Publish.
2. How to manage custom edit section
From your dashboard, go to the Appearance > Customize > FrontPage Sections > Custom Section
Here you can change in the Custom section.
Click on Publish.
71. How to Setup Home Page
01. How do We set the home page in Hotel Galaxy Pro?
Go to Pages > Add New > Create a Page Named Home ( the name could be anything you like). On the Right Side Under the Template, the drop-down Menu is for Choosing the Home Page.
You have to Choose the Template and publish it.
02. How do you assign the home page as a front page?
From your dashboard, go to the Settings> Reading > Home Page Displays
Click on the radio button on your A Static page
Click on Save Changes.
72. How to manage Blog page in Seokart Pro?
1. How to manage title, Subtitle & Description
From your dashboard, go to the Appearance > Customize > Page Templates > Blog Page
Here you can change the title, Subtitle & Description.
Click on Publish.
73. How to manage new products?
1.How to add new product?
From your dashboard, go to the Dashboard > Product > Add New
Here you can create a new product
Now Click on Publish.
2.How to add a Category to the product?
From your dashboard, go to the Dashboard > Product > Add New
Here you can create a new product
Now Click on Publish.
74. How to manage Typography?
1. How to manage Font Size & Line height in Body Typography
From your dashboard , go to the Appearance > Customize > typography > body typography Section
Here You can manage Font Size &; line Height.
Click on Publish.
2. How to manage Font Style & Transform in Body Typography
From your dashboard , go to the Appearance > Customize > typography > body typography Section
Here You can manage Font Style & Transform.
Click on Publish.
3. How to manage Font Size & Line height H1 to H6 in Headings Typography
From your dashboard, go to the Appearance > Customize > typography > Heading Section
Here You can manage Font Size & line Height.
Click on Publish.
4. How to manage Font Style & Transform H1 to H6 in Headings Typography
From your dashboard, go to the Appearance > Customize > typography > Heading Section
Here You can manage Font Style & Transform.
Click on Publish.
75. How to manage Pricing Section in Seokart Pro?
1. How to manage title, Subtitle & Description
From your dashboard, go to the Appearance > Customize > FrontPage Sections > Pricing Section
Here you can change the title, Subtitle & Description in the Pricing section.
Click on Publish.
2. How to display No. of Pricing
From your dashboard, go to the Appearance > Customize > FrontPage Sections > Pricing Section
Here you can display the No. of pricing in the Pricing section.
Click on Publish.
3. How to manage Pricing Column
From your dashboard, go to the Appearance > Customize > FrontPage Sections > pricing Section
Here you can choose a column layout in the pricing section.
Click on Publish.
76. How to manage menu setup in Seokart Pro?
1. Menu Setup in CoziPress
From your dashboard, go to the Appearance > Menus > Select Menu
Here Select Menu according to you
Click on Save Menu.
77. How to manage Design & Development Section in CoziPress
1.How to manage title, Subtitle & Description
From your dashboard, go to the Appearance > Customize > FrontPage Sections > Design & Development Section
Here you can change title, Subtitle & Description in Design & Development section.
Click on Publish.
2.How to manage content Design & Development Section
From your dashboard, go to the Appearance > Customize > FrontPage Sections > Design & Development Section
Here you can manage content in Design & Development section.
Click on Publish.
3.How to Linkable in title Design & Development Section Pro Features
From your dashboard, go to the Appearance > Customize > FrontPage Sections > Design & Development Section
Here you can add link on title in Design & Development section.
Click on Publish.
4.How to select image or icon type Pro Features
From your dashboard, go to the Appearance > Customize > FrontPage Sections > Design & Development Section
Here you can select image/icon in Design & Development section.
Click on Publish.
CoziPress Pro allows you to add even more Design & Development Section.Pro Features
5.How to remove & change image Design & Development section Pro Features
From your dashboard, go to the Appearance > Customize > FrontPage Sections > Design & Development Section
Here you can change & remove image in Design & Development section.
Click on Publish.
78. How to manage Pricing Page in Owlpress Pro?
1. Create Pricing Filter Page & Select Template
From your dashboard, go to the Dashboard > Pages > Add New
Now Create a page & Select the Template.
Click on Publish.
2. How to manage title, Subtitle & Description
From your dashboard, go to the Appearance > Customize > Page Templates > Pricing Page
Here you can change the title, Subtitle & Description in the Pricing Page.
Click on Publish.
3. How to display No. of Pricing
From your dashboard, go to the Appearance > Customize > Page Template > Pricing Page
Here you can display the No. of pricing in the Pricing page.
Click on Publish.
4. How to manage Pricing Column
From your dashboard, go to the Appearance > Customize > Page Template > Pricing Page
Here you can choose a column layout in the pricing page.
Click on Publish.
79. How to manage Testimonial Section in Spintech
1.How to manage title, Subtitle & Description Pro Features
From your dashboard, go to the Appearance > Customize > FrontPage Sections > Testimonial Section
Here you can change title, Subtitle & Description in Testimonial section.
Click on Publish.
2.How to manage Testimonial Content Pro Features
From your dashboard, go to the Appearance > Customize > FrontPage Sections > Testimonial Section
Here you setup content in testimonial section.
Click on Publish.
3.How to manage testimonial Column Pro Features
From your dashboard, go to the Appearance > Customize > FrontPage Sections > Testimonial Section
Here you can choose column layout in testimonial section.
Click on Publish.
80. How to manage Astro Form Section
1. How to manage Astro Form Section
From your dashboard, go to Appearance > Customize > FrontPage Sections > Astro Form Section
Here you can manage content (Like- Title and Shortcode) in the info section.
Click on Publish.
Note:- To use Astro Forms, please install the VedicAstroAPI Plugin.
2. How to generate The API key?
First, create your Account:-
Verify Your Account:-
Copy the API key:-
Paste here the API key:-
You can copy the shortcode of the form you require from here:-
81. How to manage Team Section in Decorme?
1.How to manage title, Subtitle & Description?
From your dashboard, go to the Appearance > Customize > FrontPage Sections > Team Section
Here you can change title, Subtitle & Description in team section.
Click on Publish.
2.How to manage team content?
From your dashboard, go to the Appearance > Customize > FrontPage Sections > Team Section
Here you setup content in team section.
Click on Publish.
82. How to manage General Section in Owlpress Lite?
1. Hide/Show Breadcrumb Section
From your dashboard, go to the Appearance > Customize > General > Breadcrumb Section
Now Click on the check box for Hide/Show Breadcrumb Section.
Click on Publish.
2. Manage Min Height
From your dashboard, go to the Appearance > Customize > General > Breadcrumb Section
Now you can manage min-height in Breadcrumb.
Click on Publish.
3. Background image related setting
From your dashboard, go to the Appearance > Customize > General > Breadcrumb Section
Now you can manage background image & opacity in Breadcrumb.
Click on Publish.
83. How to manage Company Page in Spintech
1.Create a Page & Select Template
From your dashboard, go to the Dashboard > Pages > Add New
Now Create a page & Select the Template.
Click on Publish.
2.Hide/Show Step Section in company page
From your dashboard, go to the Appearance > Customize > Page Templates > Company Page
Now click on the check box for the hide/show step section.
Click on Publish.
3.Hide/Show Journey Section in company page
From your dashboard, go to the Appearance > Customize > Page Templates > Company Page
Now click on the check box for the hide/show Journey section.
Click on Publish.
4.Hide/Show Testimonial Section in company page
From your dashboard, go to the Appearance > Customize > Page Templates > Company Page
Now click on the check box for the hide/show Testimonial section.
Click on Publish.
5.Hide/Show CTA Section in company page
From your dashboard, go to the Appearance > Customize > Page Templates > Company Page
Now click on the check box for the hide/show CTA section.
Click on Publish.
84. How to manage menu setup?
From your dashboard, go to the Appearance > Menus > Select Menu
Here Select Menu according to you
Click on Save Menu.
85. How to manage Video Section in SpaBiz Pro?
1.How to manage Video section?
From your dashboard, go to the Appearance > Customize > FrontPage Sections > Video Section
Here you can change video in Video section.
Click on Publish.
86. How to install Seokart Lite?
Go to the menu Appearance > Themes and click on the Add New button.
Click on the Upload Theme button.
Click on the Browse button and navigate to the unzipped theme package on your computer.
Look for a file called Seokart.zip Click on it to select, then click OK.
Click on the Install Now button and wait until the installation is complete.
Click on the Activate link to activate the theme on your WordPress site.
87. How to manage header image in Owlpress Lite?
1. How to the setup Header image
From your dashboard, go to the Appearance > Customize > Header image
Here You can set up a header image.
If you change & remove the logo then you can use the buttons below it.
Click on Publish.
88. How to manage section Reorder in Owlpress Pro?
1. How to manage section reorder.
From your dashboard, go to the Appearance > Customize > Section Reorder
Here you can manage section reorder.
Click on Publish.
89. Custom Section Manage of Electronics Home Page!
1. Manage Custom Section!
From your dashboard, go to the Appearance > Customize > Electronics Home Page > Custom Section
Here you can manage the title & content Blog Section
Now Click on Publish.
90. How to manage Panchang page in Astrocare Pro
1. Create a Page & Select Template
From your dashboard, go to the Dashboard > Pages > Add New
Now Create a page & Select the Template.
Click on Publish.
91. How to manage CTA Section in Kundoo
1.How to manage title, Subtitle & Description
From your dashboard, go to the Appearance > Customize > FrontPage Sections > CTA Section
Here you can change title, Subtitle & Description in CTA section.
Click on Publish.
2.How to manage CTA Button, Image & Opacity
From your dashboard, go to the Appearance > Customize > FrontPage Sections > CTA Section
Here you can change CTA section button, image & opacity.
Click on Publish.
92. How to setup Home Page?
1.How to create a Homepage
Go to Pages > Add New > Create a Page Named Home ( the name could be anything you like). On the Right Side Under the Template, the drop-down Menu is for Choosing the Home Page.
You have to Choose the Template and publish it.
2. How to Assign Home Page as a FrontPage?
From your dashboard, go to the Setting > Reading > Home Page Displays
Click on the radio button of your A Static page
Click on Save Changes.
93. How to Activate a license in Hotel Galaxy Pro
How do We activate the license key in Hotel Galaxy Pro?
Go to your WordPress website dashboard
Go to dashboard > Appearance > Theme License
Enter your theme license key into the License Key field
Click Activate
94. How to manage footer section in Seokart Lite?
1. How to manage footer background image related setting in the footer
From your dashboard, go to the Appearance > Customize > Footer > Footer Background
Here you can change the footer background image-related setting.
Click on Publish.
2. How to manage content in Footer Above Section
From your dashboard, go to the Appearance > Customize > Footer > Footer Above
Here you can manage content in Footer Above Section.
Click on Publish.
2. How to manage the Copyright footer bottom in the footer.
From your dashboard, go to the Appearance > Customize > Footer > Footer Background
Here you can change the Copyright Text.
Click on Publish.
95. Blog Section Manage of Goggles Home Page!
1. Title & Category Blog Section!
From your dashboard, go to the Appearance > Customize > FrontPage Sections > Blog Section
Here you can manage the title & content Blog Section
Now Click on Publish.
2.Blog Column & No. of post display in Blog Section!
From your dashboard, go to the Appearance > Customize > FrontPage Sections > Blog Section
Here you can manage the blog column & no. of post display in blog Section
Now Click on Publish.
96. How to manage Blog Section in Owlpress Pro?
1. How to manage title, Subtitle & Description
From your dashboard, go to the Appearance > Customize > FrontPage Sections > Blog Section
Here you can change the title, Subtitle & Description in the Blog section.
Click on Publish.
2. How to select a category for the blog section
From your dashboard, go to the Appearance > Customize > FrontPage Sections > Blog Section
Here you can select a category for the blog section.
Click on Publish.
3. How to manage blog Column
From your dashboard, go to the Appearance > Customize > FrontPage Sections > Blog Section
Here you can choose a column layout in the blog section.
Click on Publish.
4. How to manage no of posts displayed in FrontPage
From your dashboard, go to the Appearance > Customize > FrontPage Sections > Blog Section
Here you can manage no of posts displayed on Blog in FrontPage.
Click on Publish.
97. How to manage Company Career Page in Spintech
1.Create a Page & Select Template
From your dashboard, go to the Dashboard > Pages > Add New
Now Create a page & Select the Template.
Click on Publish.
2.Hide/Show Our Career Section in company Career page
From your dashboard, go to the Appearance > Customize > Page Templates > Company Careers Page
Now click on the check box for the hide/show company careers section.
Click on Publish.
3.How to manage title, Subtitle & Description
From your dashboard, go to the Appearance > Customize > Page Templates > Company Careers page
Here you can change the title, Subtitle & Description in Our Careers Section.
Click on Publish.
4.How to Change & Remove image in our careers section
From your dashboard, go to the Appearance > Customize > Page Templates > Company Careers page
Here you can change & remove images in our careers section.
Click on Publish.
5.Hide/Show current opening in company Career page
From your dashboard, go to the Appearance > Customize > Page Templates > Company Careers Page
Now click on the check box for hide/show the current opening section.
Click on Publish.
6.How to manage title, Subtitle & Description in the current opening section.
From your dashboard, go to the Appearance > Customize > Page Templates > Company Careers page
Here you can change the title, Subtitle & Description in Our current opening section.
Click on Publish.
7.How to manage content in the current opening section.
From your dashboard, go to the Appearance > Customize > Page Templates > Company Careers page
Here you can manage content in Our current opening section.
Click on Publish.
8.Hide/Show benefit section in company Career page
From your dashboard, go to the Appearance > Customize > Page Templates > Company Careers Page
Now click on the check box for the hide/show benefit section.
Click on Publish.
9.How to manage title, Subtitle & Description in benefit section.
From your dashboard, go to the Appearance > Customize > Page Templates > Company Careers page
Here you can change the title, Subtitle & Description in the benefit section.
Click on Publish.
10.How to manage content in benefit section.
From your dashboard, go to the Appearance > Customize > Page Templates > Company Careers page
Here you can manage content in benefit section.
Click on Publish.
98. How to manage Testimonial Section in Owlpress Pro?
1. How to manage title, Subtitle & Description
From your dashboard, go to the Appearance > Customize > FrontPage Sections > Testimonial Section
Here you can change the title, Subtitle & Description in the Testimonial section.
Click on Publish.
2. How to manage Testimonial Content
From your dashboard, go to the Appearance > Customize > FrontPage Sections > Testimonial Section
Here you set up content in the testimonial section.
Click on Publish.
99. Slider Manage of Electronics Home Page!
1.Electronics slider content!
From your dashboard, go to the Appearance > Customize > FrontPage Sections > Slider Section
Here you can manage the content of the slider section
Now Click on Publish
100. How to manage About page in SpaBiz Pro?
1.Create a Page & Select Template
From your dashboard, go to the Dashboard > Pages > Add New
Now Create a page & Select the Template.
Click on Publish.
2.Hide/Show About Section
From your dashboard, go to the Appearance > Customize > Page Templates > About Page
Now click on check box for hide/show About section.
Click on Publish.
3.How to manage left content?
From your dashboard, go to the Appearance > Customize > Page Templates > About Page
Here you can change left content in About section.
Click on Publish.
4.How to manage right content?
From your dashboard, go to the Appearance > Customize > Page Templates > About Page
Here you can change Right content in About section.
Click on Publish.
5.How to manage Funfact section?
From your dashboard, go to the Appearance > Customize > Page Templates > About Page
Here you can manage Funfact section in About Page.
Click on Publish.
6.How to manage Testimonial section?
From your dashboard, go to the Appearance > Customize > Page Templates > About Page
Here you can manage testimonial section in About Page.
Click on Publish.
7.How to manage Team section?
From your dashboard, go to the Appearance > Customize > Page Templates > About Page
Here you can manage team section in About Page.
Click on Publish.
8.How to manage CTA section?
From your dashboard, go to the Appearance > Customize > Page Templates > About Page
Here you can change hide/show, title, Subtitle, button label, button link & Description (content , image ETC) in CTA section.
Click on Publish
9.How to manage Sponsor section?
From your dashboard, go to the Appearance > Customize > Page Templates > About Page
Here you can manage sponsor section in About Page.
Click on Publish.
101. How to manage FAQ Page?
1.How to manage the content of FAQ Page.
From your dashboard, go to the Appearance > Customize > Page Templates > FAQ Page
Here you can change the content in FAQ Page.
Click on Publish.
102. How to manage content info section?
1.How to Manage Content info section?
From your dashboard, go to the Appearance > Customize > Front Page Sections > Info Section
Here you can manage info section.
Click on Publish.
103. How to manage Gallery page?
1.How to manage title, Subtitle & Description?
From your dashboard, go to the Appearance > Customize > Page Template > Gallery Page
Here you can change title, Subtitle & Description in Gallery section.
Click on Publish.
2.How to manage Gallery Content?
From your dashboard, go to the Appearance > Customize > Page Template > Gallery Page
Here you setup content in gallery page.
Click on Publish.
104. How to create blog post of CoziPress
1. How to create a blog post
From your dashboard, go to the Appearance > post > add a new post
From your dashboard, go to the Appearance > Customize > watch Home page > Video Section
Here you can manage the Video Link, Title, Subtitle & Change Background image .
Now Click on Publish
107. Home Page Setup in CoziPress
How to Setup Home Page?
Go to Pages > Add New > Create a Page Named Home ( the name could be anything you like). At the Right Side Under the Template drop-down Menu is for Choosing the Home Page.
You have to Choose the Template and publish it.
2.How to Assign Home Page as a Front Page?
From your dashboard , go to the Setting > Reading > Home Page Displays
Click on radio button of your A Static page
Click on Save Changes.
108. How to manage Team Section in Crowl Lite?
1. How to manage title, Subtitle & Description & Hide/Show?
From your dashboard, go to the Appearance > Customize > FrontPage Sections > Team Section
Here you can change the title, Subtitle & Description.
ion in the team section.
Click on Publish.
2. How to manage team content
From your dashboard, go to the Appearance > Customize > FrontPage Sections > Team Section
Here you set up content in the team section.
Click on Publish.
109. How to manage About page in Kundoo
1.Create a Page & Select Template
From your dashboard, go to the Dashboard > Pages > Add New
Now Create a page & Select the Template.
Click on Publish.
2.Hide/Show About Sections
From your dashboard, go to the Appearance > Customize > Page Templates > About Page
Now click on check box for hide/show Design, Feature, Team, Funfact, CTA 2, Testimonial, Sponsor, Working sections.
Click on Publish.
110. How to manage Horoscope section in Astrocare
1. How to manage titles & Subtitles in the Horoscope Section?
From your dashboard, go to the Appearance > Customize > FrontPage Sections >Horoscope Section
Here you can manage content (Like- Title and Subtitle) in the Horoscope section.
Click on Publish.
111. How to manage Pricing Page in CoziPress
1.Create Pricing Filter Page & Select Template
From your dashboard, go to the Dashboard > Pages > Add New
Now Create a page & Select the Template.
Click on Publish.
2.Create Pricing Simple Page & Select Template
From your dashboard, go to the Dashboard > Pages > Add New
Now Create a page & Select the Template.
Click on Publish.
3.How to manage title, Subtitle & Description Pro Features
From your dashboard, go to the Appearance > Customize > Page Templates > Pricing Page
Here you can change title, Subtitle & Description in Pricing section.
Click on Publish.
4.How to display No. of Pricing Pro Features
From your dashboard, go to the Appearance > Customize > Page Template > Pricing Page
Here you can display No. of pricing in Pricing section.
Click on Publish.
5.How to manage Pricing Column Pro Features
From your dashboard, go to the Appearance > Customize > Page Template > Pricing Page
Here you can choose column layout in pricing section.
Click on Publish.
112. How to manage General Section in Kundoo
1.Hide/Show Breadcrumb Section
From your dashboard, go to the Appearance > Customize > General > Breadcrumb Section
Now Click on check box for Hide/Show Breadcrumb Section.
Click on Publish.
2.How to Remove & Change Image in Breadcrumb Section
From your dashboard, go to the Appearance > Customize > General > Breadcrumb Section
Here you can Remove & Change image in Breadcrumb Section.
Click on Publish.
3.How to Manage Min Height
From your dashboard, go to the Appearance > Customize > General > Breadcrumb Section
Here you can manage min height in Breadcrumb Section.
Click on Publish.
4.How to manage Background Attachment image
From your dashboard, go to the Appearance > Customize > General > Breadcrumb Section
Here you can set breadcrumb image according to you.
Click on Publish.
5.How to manage opacity of Breadcrumb
From your dashboard, go to the Appearance > Customize > General > Breadcrumb Section
Here you can manage opacity
Click on Publish.
6.Hide/Show Preloader
From your dashboard, go to the Appearance > Customize > General > Preloader Section
Here you can Hide/Show Preloader in Kundoo Pro
Click on Publish.
7.Hide/Show Top Scroller Pro Features
From your dashboard, go to the Appearance > Customize > General > Top Scroller Section
Here you can Hide/Show Top Scroller in Kundoo Pro
Click on Publish.
8.How to change Scroller Icon Pro Features
From your dashboard, go to the Appearance > Customize > General > Top Scroller Section
Here you can change Scroller icon in library
Click on Publish.
113. How to manage Slider Section in Kundoo
1.How to manage Title, Subtitle & Description
From your dashboard, go to the Appearance > Customize > FrontPage Sections > Slider Section
Here you can manage content of slider section
Now Click on Publish.
2.How to manage Button label in slider
From your dashboard, go to the Appearance > Customize > FrontPage Sections > Slider Section
Here you can manage button label & Link
Click on Publish.
3.How to change slider image
From your dashboard, go to the Appearance > Customize > FrontPage Sections > Slider Section
Here you can change slider image
Click on Publish
Kundoo Pro allows you to add even more Sliders.Pro Features
4.How to manage Animation effects Pro Features
From your dashboard, go to the Appearance > Customize > FrontPage Sections > Slider Section
Here you can manage Animation Effects
Click on Publish
5.How to manage Slider Speed Pro Features
From your dashboard, go to the Appearance > Customize > FrontPage Sections > Slider Section
Here you can manage Slider Speed
Click on Publish
114. How to manage sections Reorder in SpaBiz Pro?
1. How to manage sections reorder.
From your dashboard, go to the Appearance > Customize > Sections Reorder
Here you can manage section reorder.
Click on Publish.
115. How to manage footer section Setto Pro?
1. Manage Footer Type
From your dashboard, go to the Appearance > Customize > Footer > Footer Type
Here you can manage footer content in the above Section.
Click on Publish.
2.Manage footer widget layout in footer
From your dashboard, go to the Appearance > Customize > Footer > Footer Widget Area
Here you can manage the footer widget layout.
Click on Publish.
3.How to manage footer bottom
From your dashboard, go to the Appearance > Customize > Footer > Footer Bottom
Here you can manage the footer bottom.
Click on Publish.
4.How to manage copyright section
From your dashboard, go to the Appearance > Customize > Footer > Footer Copyright
Here you can manage the footer Copyright.
Click on Publish.
116. Demo Import For StoreBiz?
Install One Click Demo Import plugin on your site
After installing the plugin,
Go to Appearance > Premade Demos
Finally, click Import Demo Data Button
Wait for the import to finish
You are done!!!
117. How to manage kundli page in Astrocare
1. Create a Page & Select Template
From your dashboard, go to the Dashboard > Pages > Add New
Now Create a page & Select the Template.
Click on Publish.
2. How to manage titles, descriptions & Images?
From your dashboard, go to the Appearance > Customize > Page Templates > Kundli Page
Now you can manage the title, description & image.
Click on Publish.
3. How do you manage other sections?
From your dashboard, go to the Appearance > Customize > Page Template > Kundli Page
Here you can hide/show other sections.
Click on Publish.
118. How to manage menu setup in Astrocare
1. Menu Setup in Astrocare
From your dashboard, go to the Appearance > Menus > Select Menu
Here Select the Menu according to what you.
Click on Save Menu.
119. How to setup Header image in Astrocare
1. How to set up the Header image?
From your dashboard, go to the Appearance > Customize > Header image
Here You can set up the header image.
If you are change & remove the logo then you can use the buttons below it.
Click on Publish.
120. How to manage Slider Section in Seokart?
1. How to manage Title, Subtitle & Description
From your dashboard, go to the Appearance > Customize > FrontPage Sections > Slider Section
Here you can manage the content of the slider section
Now Click on Publish
.
2. How to manage Button label in slider
From your dashboard, go to the Appearance > Customize > FrontPage Sections > Slider Section
Here you can manage button label & Link
Click on Publish.
3. How to change slider image & Alignment
From your dashboard, go to the Appearance > Customize > FrontPage Sections > Slider Section
Here you can change the slider image & set Alignment
Click on Publish
121. Demo Import For Decorme?
Install One Click Demo Import plugin on your site
After installing the plugin,
Go to Appearance > Premade Demos
Finally, click Import Demo Data Button
Wait for the import to finish
You are done!!!
122. How to manage Custom Section in Spintech
1.How to manage title, Subtitle & Description Pro Features
From your dashboard, go to the Appearance > Customize > FrontPage Sections > Custom Section
Here you can change title, Subtitle & Description in Custom section.
Click on Publish.
1.How to change content edit Pro Features
From your dashboard, go to the Appearance > Customize > FrontPage Sections > Custom Section
Now click edit button
Here you can editable section content in Custom section.
Click on Publish.
123. How to manage blog Page in Appetizer?
1. How to manage Content Blog Section
From your dashboard, go to the Appearance > Customize > FrontPage Sections > Blog Section
Here you can manage content Blog Section
Now Click on Publish.
124. How to manage footer-3 in SpaBiz Pro?
1.How to manage footer bottom
From your dashboard, go to the Appearance > Customize > Footer > Footer Bottom
Here you can manage the footer bottom.
Click on Publish.
125. How to manage widget footer?
1. How to setup Footer Widget in Footer Widget Area
From your dashboard, go to the Appearance > Widgets > Footer Widget Area
Here You can click on add a widget.
Now Select widgets from the list & fill the title according to you.
Click on Publish.
126. How to manage Coming Soon Page in CoziPress
1.Create a Page & Select Template
From your dashboard, go to the Dashboard > Pages > Add New
Now Create a page & Select the Template in Page Attributes.
Click on Publish.
2.Enable/Disable coming soon page
From your dashboard, go to the Appearance > Customize > Page Templates > Coming soon Page
Now click on check box for enable/disable coming soon page.
Click on Publish.
3.Enable/Disable form & social icons
From your dashboard, go to the Appearance > Customize > Page Templates > Coming soon Page
Now click on check box for enable/disable form & social icons.
Click on Publish.
3.How to manage Time & Shortcode in Comingsoon Page
From your dashboard, go to the Appearance > Customize > Page Templates > Coming soon Page
Here You Can Manage time & Shortcode.
Click on Publish.
3.How to manage social icon & background image in Coming soon Page
From your dashboard, go to the Appearance > Customize > Page Templates > Coming soon Page
Here You Can Manage time & Shortcode.
Click on Publish.
127. How to manage Title Feature Product Section
1.How to manage Title Feature Product Section
From your dashboard, go to the Appearance > Customize > FrontPage Sections > Feature Product Section
Here you can manage the title Feature Product Section
Now Click on Publish.
128. How to manage Pricing Page in SpaBiz Pro?
1.Create Pricing Page & Select Template
From your dashboard, go to the Dashboard > Pages > Add New
Now Create a page & Select the Template.
Click on Publish.
2.How to manage content & Column?
From your dashboard, go to the Appearance > Customize > Page Templates > Pricing Page
Here you can change title, Subtitle & Description & Column in Pricing section.
Click on Publish.
129. How to Demo Import for Appetizer pro?
Demo Import For Appetizer pro
Install One Click Demo Import plugin on your site
After installing the plugin,
Go to Appearance > Premade Demos
Finally, click Import Demo Data Button
Wait for the import to finish
You are done!!!
130. How to manage header section in Seokart Lite?
1. How to change the Site logo
From your dashboard, go to the Appearance > Customize > Header > Site Identity Section
Now Click on the select logo and choose a logo for your site.
If you change & remove the logo then you can use the buttons below it.
Click on Publish.
2. How to customize the width of the Site logo
From your dashboard, go to the Appearance > Customize > Header > Site Identity Section
Now Scroll bar used for logo width Customize.
Click on Publish.
3. How to manage site title & tagline
From your dashboard, go to the Appearance > Customize > Header > Site Identity Section
Now manage site title & tagline as per your choice.
Click on Publish.
4. How to change the site icon
From your dashboard, go to the Appearance > Customize > Header > Site Identity Section
Now Click on button & select Site icon . ;
You can use site icon size maximum 512 x 512px.
Click on Publish.
5. How to manage phone & email in the above header
From your dashboard, go to the Appearance > Customize > Header > Above header Section
Here you can manage phone & email.
Click on Publish.
6. How to manage info in the above header
From your dashboard, go to the Appearance > Customize > Header > Above header Section
Here you can manage Info First & Second as per your choice.
Click on Publish.
7. How to manage social icons in the above header
From your dashboard, go to the Appearance > Customize > Header > Above header Section
Here you can manage social icons as per your choice.
Click on Publish.
8. Hide/Show Cart icon in Header Navigation
From your dashboard, go to the Appearance > Customize > Header > Header Navigation Section
Now Click on the check box for Hide/Show Cart icon.
Click on Publish.
9. Hide/Show Search icon in Header Navigation
From your dashboard, go to the Appearance > Customize > Header > Header Navigation Section
Now Click on the check box for Hide/Show Search icon.
Click on Publish.
10. Manage Toggle section in Header Navigation
From your dashboard, go to the Appearance > Customize > Header > Header Navigation Section
here you can manage toggle content
Now Click on the check box for Hide/Show toggle.
Click on Publish.
8. Hide/Show Sticky Header
From your dashboard, go to the Appearance > Customize > Header > Sticky Header Section
Now Click on the check box for Hide/Show Sticky header
Click on Publish.
131. How to manage Page Right Sidebar page in Astrocare Pro
1. Create a Page & Select Template
From your dashboard, go to the Dashboard > Pages > Add New
Now Create a Page & Select the Template.
Click on Publish.
132. How to manage Slider Section in Setto Lite?
1. How to manage slider content?
From your dashboard, go to the Appearance > Customize > FrontPage Sections > Slider Section
Here you can manage the content of the slider section
Now Click on Publish
2. How to Hide/Show Slider?
From your dashboard, go to the Appearance > Customize > FrontPage Sections > Slider Section
Here you can Hide/Show slider.
133. How to manage colors in Decorme Pro?
1. How to manage Color?
From your dashboard , go to the Appearance > Customize > Colors > Color
Here You can manage background color.
134. How to manage header section in Seokart Pro?
1. How to change the Site logo
From your dashboard, go to the Appearance > Customize > Header > Site Identity Section
Now Click on the select logo and choose a logo for your site.
If you change & remove the logo then you can use the buttons below it.
Click on Publish.
2. How to customize the width of the Site logo
From your dashboard, go to the Appearance > Customize > Header > Site Identity Section
Now Scroll bar is used for logo width Customize.
Click on Publish.
3. How to manage Site Title & Tagline
From your dashboard, go to the Appearance > Customize > Header > Site Identity Section
Now manage site title & tagline as per your choice.
Click on Publish.
4. How to change the site icon
From your dashboard, go to the Appearance > Customize > Header > Site Identity Section
Now Click on button & select Site icon . ;
You can use site icon size maximum 512 x 512px.
Click on Publish.
5. How to Customize Site title & description font size
From your dashboard, go to the Appearance > Customize > Header > Site Identity Section
Here you can customize the Site title & description.
Click on Publish.
6. How to manage phone & email in the above header
From your dashboard, go to the Appearance > Customize > Header > Above header Section
Here you can manage phone & email.
Click on Publish.
7. How to manage info in the above header
From your dashboard, go to the Appearance > Customize > Header > Above header Section
Here you can manage Info First & Second as per your choice.
Click on Publish.
8. How to manage social icons in the above header
From your dashboard, go to the Appearance > Customize > Header > Above header Section
Here you can manage social icons as per your choice.
Click on Publish.
9. Hide/Show Cart icon in Header Navigation
From your dashboard, go to the Appearance > Customize > Header > Header Navigation Section
Now Click on the check box for Hide/Show Cart icon.
Click on Publish.
10. Hide/Show Search icon in Header Navigation
From your dashboard, go to the Appearance > Customize > Header > Header Navigation Section
Now Click on the check box for Hide/Show Search icon.
Click on Publish.
11. Manage Toggle section in Header Navigation
From your dashboard, go to the Appearance > Customize > Header > Header Navigation Section
here you can manage toggle content
Now Click on the check box for Hide/Show toggle.
Click on Publish.
12. Hide/Show Sticky Header
From your dashboard, go to the Appearance > Customize > Header > Sticky Header Section
Now Click on the check box for Hide/Show Sticky header
Click on Publish.
135. How to manage Kundli Section in Astrocare
1. How can we manage the title & subtitle?
From your dashboard, go to the Appearance > Customize > FrontPage Sections > Kundli Section
Here you can change the title & subtitle in the Kundli section.
Click on Publish.
2. How can we manage the content?
From your dashboard, go to the Appearance > Customize > FrontPage Sections > Kundli Section
Here you can change the content in the Kundli section.
Click on Publish.
3. How can we Hide/Show Clip Art?
From your dashboard, go to the Appearance > Customize > FrontPage Sections > Kundli Section
Here you can Hide/Show the Clip Art in the Kundli section.
Click on Publish.
136. Manage 404 Page StoreBiz?
1.How to manage Content in 404 Page
From your dashboard, go to the Appearance > Customize > Page Templates > 404 Page
Here You Can Manage Content (Logo, Title & Button Label) on the 404 page.
Click on Publish.
137. How to manage colors in Setto Lite?
1. How to manage Background Color
From your dashboard , go to the Appearance > Customize > Colors > Background Color
Here You can manage background color.
Click on Publish.
138. How to setup Header image in Seokart Pro?
1. Setup Header image
From your dashboard, go to the Appearance > Customize > Header image
Here You can set up a header image.
If you change & remove the logo then you can use the buttons below it.
Click on Publish.
139. How to manage colors Decorme?
1. How to manage Color?
From your dashboard , go to the Appearance > Customize > Colors > Color
Here You can manage background color.
140. How to Activate license in Spintech pro
How to Activate License key in Spintech pro
Go to your WordPress website dashboard
Go to Appearance > Theme License
Enter your theme license key into the License Key field
Click Activate
141. How to manage Slider Section in Astrocare Pro
1. How do I hide/Show the Title Image & Zodiac Wheel and Stop/Run Zodiac Wheel Animation in the Slider Section?
From your dashboard, go to the Appearance > Customize > FrontPage Sections > Slider Section.
Here you can Hide/Show & Stop/Run the Slider Section.
Now Click on Publish.
2. Astrocare Pro allows you to add even more Sliders.
3. How to manage Animation effects?
From your dashboard, go to the Appearance > Customize > FrontPage Sections > Slider Section.
Here you can manage Animation Effects.
Click on Publish
4. How to manage Slider Speed?
From your dashboard, go to the Appearance > Customize > FrontPage Sections > Slider Section.
Here you can manage Slider Speed.
Click on Publish
5. How to manage Title, Subtitle & Description?
From your dashboard, go to the Appearance > Customize > FrontPage Sections > Slider Section.
Here you can manage the content of the slider section.
Now Click on Publish.
6. How can you manage the Button label in the slider?
From your dashboard, go to the Appearance > Customize > FrontPage Sections > Slider Section
Here you can manage button labels & Link
Click on Publish.
142. How to manage Deal Products Section
1.How to manage Deal Products Section
From your dashboard, go to the Appearance > Customize > FrontPage Sections > Deals Product Section
Here you can manage the Deals Product Section
Now Click on Publish.
143. How to manage Term & Condition page in Setto Pro?
1.Manage Term & Condition content!
From your dashboard, go to the Dashboard > Page template > Payment Page.
Here you can manage Title & Content.
Click on Publish.
144. How to manage footer section?
1. How to manage content in Footer Above Section
From your dashboard, go to the Appearance > Customize > Footer > Footer Above
Here you can manage content in Footer Above Section.
Click on Publish.
2. How to manage footer background image related setting in the footer
From your dashboard, go to the Appearance > Customize > Footer > Footer Background
Here you can change the footer background image-related setting.
Click on Publish.
3. How to manage copyright & Support section footer bottom.
From your dashboard, go to the Appearance > Customize >; Footer > Footer Background
Here you can change the copyright & Support section.
Click on Publish.
4. How to manage payment icon section footer bottom.
From your dashboard, go to the Appearance > Customize >; Footer > Footer Background
Here you can change the payment icons section.
Click on Publish.
145. How to create new project of Kundoo
1.How to create new project of Kundoo
From your dashboard, go to the Appearance > project > add new project
Here you can create new project.
Click on Publish.
146. How to manage footer section in CoziPress
1.How to manage footer background image related setting in footer
From your dashboard, go to the Appearance > Customize > Footer > Footer Above
Here you can change footer background image related setting.
Click on Publish.
2.How to manage footer widget layout in footer
From your dashboard, go to the Appearance > Customize > Footer > Footer Above
Here you can manage footer widget layout.
Click on Publish.
3.How to manage footer bottom (LIke :- Style , Icon & Copyright) in footer
From your dashboard, go to the Appearance > Customize > Footer > Footer Above
Here you can manage footer bottom .
Click on Publish.
147. How to add Additional CSS?
1. How to add Additional CSS
From your dashboard, go to the Appearance > Additional CSS
Here you can paste your Additional CSS
Click on Publish.
148. How to manage header section in Setto Lite?
1. How to change the Site logo?
From your dashboard, go to the Appearance > Customize > Header > Site Identity Section
Now Click on the select logo and choose a logo for your site.
If you change & remove the logo then you can use the buttons below it.
Click on Publish.
2. How to customize the width of the Site logo
From your dashboard, go to the Appearance > Customize > Header > Site Identity Section
Now Scroll bar is used for logo width Customize.
Click on Publish.
3. How to manage site title & tagline?
From your dashboard, go to the Appearance > Customize > Header > Site Identity Section
Now manage site title & tagline as per your choice.
Click on Publish.
4. How to change the site icon
From your dashboard, go to the Appearance > Customize > Header > Site Identity Section
Now Click on button & select Site icon . ;
You can use site icon size maximum 512 x 512px.
Click on Publish.
5. How to manage info 1 in the above header
From your dashboard, go to the Appearance > Customize > Header > Above header Section
Here you can manage left content.
Click on Publish.
6. How to manage info 2 & info 3 in the above header
From your dashboard, go to the Appearance > Customize > Header > Above header Section
Here you can manage social icons as per your choice.
Click on Publish.
7. Hide/Show Cart ,Search & My Account icon in Header Navigation
From your dashboard, go to the Appearance > Customize > Header > Header Navigation Section
Now Click on the check box for Hide/Show Cart icon.
Click on Publish.
8. Hide/Show Sticky Header
From your dashboard, go to the Appearance > Customize > Header > Sticky Header Section
Now Click on the check box for Hide/Show Sticky header
Click on Publish.
149. How to manage Slider 3 in SpaBiz Pro?
1.How do I manage Content in Slider Section-3?
From your dashboard, go to the Appearance > Customize > FrontPage Sections > Slider Section
Here you can manage content of Slider Section
Now Click on Publish.
2.How to manage Animation & Slider Speed?
From your dashboard, go to the Appearance > Customize > FrontPage Sections > Slider Section
Here you can manage Slider Speed & Animation Effects.
150. Install & Activate Burger Companion Plugin?
In the WordPress dashboard go to the appearance submenu and click on customize. After clicking on customizing you will in theme customizer. Here you have to show in the recommended plugin then click on the install & activate Button.
151. Banner Section Manage of Goggles Home Page!
1.Banner Section Manage!
From your dashboard, go to the Appearance > Customize > Goggles Homepage > Banner Section
Here you can manage the content of the Banner section
Now Click on Publish.
152. How to manage Blog Section in Kundoo
1.How to manage Title, Button Label, Link & icon
From your dashboard, go to the Appearance > Customize > FrontPage Sections > Blog Section
Here you can change title, button label, link & icon in Blog section.
Click on Publish.
2.How to manage no of posts display in FrontPage
From your dashboard, go to the Appearance > Customize > FrontPage Sections > Blog Section
Here you can manage no of posts display of Blog in FrontPage.
Click on Publish.
3.How to select category for blog section
From your dashboard, go to the Appearance > Customize > FrontPage Sections > Blog Section
Here you can select category for blog section .
Click on Publish.
4.How to manage blog Column
From your dashboard, go to the Appearance > Customize > FrontPage Sections > Blog Section
Here you can choose column layout in blog section.
Click on Publish.
153. How to manage Background Image in Setto Pro?
In WordPress Dashboard go to the Appearance submenu and click on Customize.
After clicking on customizing you will in theme Customizer.
Here you have to click on the Home Page Section.
Here you have to click on the Background Image Section
In-background Image Here you can manage the image.
Go to Customize ->Home Page Section-> Background Image Section
154. How to manage Pricing Section in CoziPress
1.How to manage title, Subtitle & Description Pro Features
From your dashboard, go to the Appearance > Customize > FrontPage Sections > Pricing Section
Here you can change title, Subtitle & Description in Pricing section.
Click on Publish.
2.How to display No. of Pricing Pro Features
From your dashboard, go to the Appearance > Customize > FrontPage Sections > Pricing Section
Here you can display No. of pricing in Pricing section.
Click on Publish.
3.How to manage Pricing Column Pro Features
From your dashboard, go to the Appearance > Customize > FrontPage Sections > pricing Section
Here you can choose column layout in pricing section.
Click on Publish.
4.How to create price section Pro Features
From your dashboard, go to the Pricing> Add New > Add New Price Table
Here you can create Pricing Table in Pricing section.
Click on Publish.
155. How to manage Contact Page in Spintech
1.Create a Page & Select Template
From your dashboard, go to the Dashboard > Pages > Add New
Now Create a page & Select the Template.
Click on Publish.
2.Hide/Show Contact Form.
From your dashboard, go to the Appearance > Customize > Page Templates > Contact Page
Now click on the check box for hide/show contact form.
Click on Publish.
3.How to manage title, Subtitle & Description in Contact Form.
From your dashboard, go to the Appearance > Customize > Page Templates > Contact Page
Here you can change the title, Subtitle & Description in Contact Form Section.
Click on Publish.
4.How to use shortcode in Contact Form.
From your dashboard, go to the Appearance > Customize > Page Templates > Contact Page
Here you can paste Shortcode in Contact Form Section.
Click on Publish.
5.How to change Phon icon & Content Change in Contact Form.
From your dashboard, go to the Appearance > Customize > Page Templates > Contact Page
Here you can change the icon & text in the Contact Form Section.
Click on Publish.
6.Hide/Show Address Section.
From your dashboard, go to the Appearance > Customize > Page Templates > Contact Page
Now click on the check box for the hide/show address section.
Click on Publish.
7.How to manage address content.
From your dashboard, go to the Appearance > Customize > Page Templates > Contact Page
Here you can change content in address content.
Click on Publish.
8.Hide/Show Call To Action in the contact page .
From your dashboard, go to the Appearance > Customize > Page Templates > Contact Page
Now click on the check box for the hide/show call to action section.
Click on Publish.
9.Hide/Show contact info in the contact page.
From your dashboard, go to the Appearance > Customize > Page Templates > Contact Page
Now click on the check box for hide/show contact info.
Click on Publish.
10.How to manage the content of contact info.
From your dashboard, go to the Appearance > Customize > Page Templates > Contact Page
Here you can manage content in contact info.
Click on Publish.
11.Hide/Show map section in the contact page.
From your dashboard, go to the Appearance > Customize > Page Templates > Contact Page
Now click on the check box for the hide/show map section.
Click on Publish.
12.Hide/Show opening hours in the contact page.
From your dashboard, go to the Appearance > Customize > Page Templates > Contact Page
Now click on the check box to hide/show opening hours in the contact page.
Click on Publish.
13.How to manage the content of opening hours section.
From your dashboard, go to the Appearance > Customize > Page Templates > Contact Page
Here you can manage content in opening hours.
Click on Publish.
156. How to setup Widgets Footer 1 to Footer 5 layout
1. How to setup Footer Widget in Footer Widget Area
From your dashboard, go to the Appearance > Widgets > Footer Widget Area
Here You can click on add a widget.
Now Select widgets from the list & fill the title according to you.
Click on Publish.
157. How to manage Funfact Section in Astrocare
1. How to manage funfact Content?
From your dashboard, go to the Appearance > Customize > FrontPage Sections > Funfact Section
Here you can manage content in the Funfact section.
Click on Publish.
2. How to manage the funfact Column?
From your dashboard, go to the Appearance > Customize > FrontPage Sections > Funfact Section
Here you can choose a column layout in funfact section.
Click on Publish.
3. How to add a Background image in funfact section?
From your dashboard, go to the Appearance > Customize > FrontPage Sections > Funfact Section
Here you can add & remove the background image in funfact section.
Click on Publish.
4. Astrocare Pro allows you to add even more Funfact.Pro Features
From your dashboard, go to the Appearance > Customize > FrontPage Sections > Funfact Section
Here you can add more Funfact in the Funfact section.
Click on Publish.
158. How to manage Slider Section in Spintech
1.How to manage Title, Subtitle & Description
From your dashboard, go to the Appearance > Customize > FrontPage Sections > Slider Section
Here you can manage content of slider section
Now Click on Publish.
2.How to manage Button label in slider
From your dashboard, go to the Appearance > Customize > FrontPage Sections > Slider Section
Here you can manage button label & Link
Click on Publish.
3.How to change slider image & Alignment
From your dashboard, go to the Appearance > Customize > FrontPage Sections > Slider Section
Here you can change slider image & set Alignment
Click on Publish
Spintech Pro allows you to add even more Sliders.Pro Features
4.How to manage Animation effects Pro Features
From your dashboard, go to the Appearance > Customize > FrontPage Sections > Slider Section
Here you can manage Animation Effects
Click on Publish
5.How to manage Slider Speed Pro Features
From your dashboard, go to the Appearance > Customize > FrontPage Sections > Slider Section
Here you can manage Slider Speed
Click on Publish
159. How to manage header section in Setto Pro?
1. How to change the Site logo?
From your dashboard, go to the Appearance > Customize > Header > Site Identity Section
Now Click on the select logo and choose a logo for your site.
If you change & remove the logo then you can use the buttons below it.
Click on Publish.
2. How to customize the width of the Site logo
From your dashboard, go to the Appearance > Customize > Header > Site Identity Section
Now Scroll bar is used for logo width Customize.
Click on Publish.
3. How to manage site title & tagline?
From your dashboard, go to the Appearance > Customize > Header > Site Identity Section
Now manage site title & tagline as per your choice.
Click on Publish.
4. How to change the site icon?
From your dashboard, go to the Appearance > Customize > Header > Site Identity Section
Now Click on button & select Site icon . ;
You can use site icon size maximum 512 x 512px.
Click on Publish.
5.How to Customize Site title & description font size?
From your dashboard, go to the Appearance > Customize > Header > Site Identity Section
Here you can customize the Site title & description.
Click on Publish.
6.How to select Header type ?
From your dashboard, go to the Appearance > Customize > Header > Header Type Section
Here you can select Header type
Click on Publish.
7. How to manage info 1 in the above header
From your dashboard, go to the Appearance > Customize > Header > Above header Section
Here you can manage left content.
Click on Publish.
8. How to manage info 2 & info 3 in the above header
From your dashboard, go to the Appearance > Customize > Header > Above header Section
Here you can manage social icons as per your choice.
Click on Publish.
9. Hide/Show Search, My Account, Wishlist & Cart icon in Header Navigation
From your dashboard, go to the Appearance > Customize > Header > Header Navigation Section
Now Click on the check box for Hide/Show icon.
Click on Publish.
10. Hide/Show Sticky Header
From your dashboard, go to the Appearance > Customize > Header > Sticky Header Section
Now Click on the check box for Hide/Show Sticky header
Click on Publish.
160. How to manage Slider Section in Owlpress Pro?
1. How to manage Title, Subtitle, Subtitle2 & Description
From your dashboard, go to the Appearance > Customize > FrontPage Sections > Slider Section
Here you can manage the content of the slider section
Now Click on Publish.
2. How to manage Button label in slider
From your dashboard, go to the Appearance > Customize > FrontPage Sections > Slider Section
Here you can manage button label 1 & button label second Link.
Click on Publish.
3. How to change slider image & icon
From your dashboard, go to the Appearance > Customize > FrontPage Sections > Slider Section
Here you can change the slider image & icon.
Click on Publish.
4. How to manage opacity, Animation effects & slider speed
From your dashboard, go to the Appearance > Customize >; FrontPage Sections > Slider Section
Here you can manage opacity, Animation effects & slider speed
Click on Publish.
161. How to manage Pricing Section SpaBiz Pro?
1.How to manage content of Pricing Section
From your dashboard, go to the Appearance > Customize > FrontPage Sections > Pricing Section
Here you can change title, Subtitle & Description (No of Pricing Display, Pricing Column ETC) in Pricing section.
Click on Publish.
162. How to manage General Section in Seokart Pro?
1. Hide/Show Breadcrumb Section, Enable Page Title on Breadcrumb & Enable Page Path on Breadcrumb?
From your dashboard, go to the Appearance > Customize > General > Breadcrumb Section
Now Click on the check box for Hide/Show Breadcrumb Section, Enable Page Title on Breadcrumb & Enable Page Path on Breadcrumb.
Click on Publish.
2. Manage Separator in Breadcrumb?
From your dashboard, go to the Appearance > Customize > General > Breadcrumb Section
Here you can manage the separator in the breadcrumb
Click on Publish.
3. How to Remove & Change Image & Attachment in Breadcrumb Section
From your dashboard, go to the Appearance > Customize > General > Breadcrumb Section
Here you can Remove & Change the image, Attachment in Breadcrumb Section.
Click on Publish.
4. How to manage opacity & Color Overlay of Breadcrumb
From your dashboard, go to the Appearance > Customize > General > Breadcrumb Section
Here you can manage opacity & Color Overlay
Click on Publish.
5. Hide/Show Preloader
From your dashboard, go to the Appearance > Customize > General > Preloader Section
Here you can Hide/Show Preloader in Spintech Pro
Click on Publish.
6. Hide/Show clip art
From your dashboard, go to the Appearance > Customize > General >; clip Art Section
Here you can hide/show clip Art on the theme.
Click on Publish.
7. Hide/Show Top Scroller & Change Icon
From your dashboard, go to the Appearance > Customize > General > Top Scroller Section
Here you can Hide/Show Top Scroller & Change icon
Click on Publish.
163. Home Page Setup in Seokart Pro?
How to Setup Home Page?
Go to Pages > Add New > Create a Page Named Home ( the name could be anything you like). On the Right Side Under the Template, the drop-down Menu is for Choosing the Home Page.
You have to Choose the Template and publish it.
2. How to Assign Home Page as a FrontPage?
From your dashboard, go to the Setting > Reading > Home Page Displays
Click on the radio button of your A Static page
Click on Save Changes.
164. How to manage Project Section in CoziPress
1.How to manage title, Subtitle & Description
From your dashboard, go to the Appearance > Customize > FrontPage Sections > Project Section
Here you can change title, Subtitle & Description in project section.
Click on Publish.
2.How to manage Project Column Pro Features
From your dashboard, go to the Appearance > Customize > FrontPage Sections > project Section
Here you can choose column layout in project section.
Click on Publish.
3.How to create project section Pro Features
From your dashboard, go to the Project> Add New > Add New Project
Here you can create Project Table in Project section.
Click on Publish.
165. How to manage Sponsor Section in CoziPress
1.How to manage title, Subtitle & Description Pro Features
From your dashboard, go to the Appearance > Customize > FrontPage Sections > Sponsor Section
Here you can change title, Subtitle & Description in Sponsor section.
Click on Publish.
2.How to manage Sponsor Content Pro Features
From your dashboard, go to the Appearance > Customize > FrontPage Sections > Sponsor Section
Here you setup content in sponsor section.
Click on Publish.
3.How to manage Sponsor Column Pro Features
From your dashboard, go to the Appearance > Customize > FrontPage Sections > Sponsor Section
Here you can choose column layout in Sponsor section.
Click on Publish.
4.How to manage sponsor style Pro Features
From your dashboard, go to the Appearance > Customize > FrontPage Sections > Sponsor Section
Here you can Select Sponsor Style.
Click on Publish.
166. How to manage Testimonial Section in Seokart Pro?
1. How to manage title, Subtitle & Description
From your dashboard, go to the Appearance > Customize > FrontPage Sections > Testimonial Section
Here you can change the title, Subtitle & Description in the Testimonial section.
Click on Publish.
2. How to manage Testimonial Content
From your dashboard, go to the Appearance > Customize > FrontPage Sections > Testimonial Section
Here you setup content in the testimonial section.
Click on Publish.
167. How to manage Sale Section?
1.How to manage Title & Subtitle in sale Section
From your dashboard, go to the Appearance > Customize > FrontPage Sections > Sale Section
Here you can manage title & Subtitle in the Sale Section
Now Click on Publish.
2.How to manage Price & Date in sale Section
From your dashboard, go to the Appearance > Customize > FrontPage Sections > Sale Section
Here you can manage Price & Date in the Sale Section
Now Click on Publish.
3.How to manage BG Image & Background Attachment in sale Section
From your dashboard, go to the Appearance > Customize > FrontPage Sections > Sale Section
Here you can manage BG Image & Background Attachment in Sale Section
Now Click on Publish.
168. Slider Manage of Lifestyle Home Page!
1.Lifestyle slider content!
From your dashboard, go to the Appearance > Customize > Lifestyle Home Page > Slider Section
Here you can manage the content of the slider section
Now Click on Publish.
169. How to manage Feature Section in Seokart Pro?
1. How to manage Title, Subtitle & Description Feature Section
From your dashboard, go to the Appearance > Customize > FrontPage Sections > Feature Section
Here you can manage the title, Subtitle & Description Feature Section
Now Click on Publish.
2. How do I manage the content of the Feature Section
From your dashboard, go to the Appearance > Customize > FrontPage Sections > Feature Section
Here you can manage the content of the Feature Section
Now Click on Publish.
3. Manage the center image of the Feature Section
From your dashboard, go to the Appearance > Customize > FrontPage Sections > Feature Section
Here you can manage the center image of the Feature Section
Now Click on Publish.
170. How to Setup Home Page?
Go to Pages > Add New > Create a Page Named Home ( the name could be anything you like). On the Right Side Under the Template, the drop-down Menu is for Choosing the Home Page.
You have to Choose the Template and publish it.
2. How to Assign Home Page as a FrontPage?
From your dashboard, go to the Setting > Reading > Home Page Displays
Click on the radio button of your A Static page
Click on Save Changes.
171. How to install StoreBiz Lite?
Go to the menu Appearance > Themes and click on the Add New button.
Click on the Upload Theme button.
Click on the Browse button and navigate to the unzipped theme package on your computer.
Look for a file called StoreBiz.zip Click on it to select, then click OK.
Click on the Install Now button and wait until the installation is complete.
Click on the Activate link to activate the theme on your WordPress site.
172. How to setup Background image in Astrocare
1. How to set up the Background image?
From your dashboard, go to the Appearance > Customize > Background image
Here You can set up the background image.
If you are changing & removing the logo then you can use the buttons below it.
Click on Publish.
2. How to set up a preset image?
From your dashboard, go to the Appearance > Customize > Background image
Here You can set up a preset background image.
Click on Publish.
3. How to manage image position & size
From your dashboard, go to the Appearance > Customize > Background image
Here You can manage the position & size background image.
Click on Publish.
4. How to manage the repeat background of the image & scroll with the page?
From your dashboard, go to the Appearance > Customize > Background image
Here You can manage repeat background images & scroll with page background images.
Click on Publish.
173. How to manage Gallery page?
1.How to manage title, Subtitle & Description?
From your dashboard, go to the Appearance > Customize > Page Template > Gallery Page
Here you can change title, Subtitle & Description in Gallery section.
Click on Publish.
2.How to manage Gallery Content?
From your dashboard, go to the Appearance > Customize > Page Template > Gallery Page
Here you setup content in gallery page.
Click on Publish.
174. How to manage Service Section Decorme?
1. How to manage content Service Section?
From your dashboard, go to the Appearance > Customize > FrontPage Sections > Service Section
Here you can manage content in the Service section.
Click on Publish.
175. How to manage Info Section in Seokart Pro?
1. How to manage content info
From your dashboard, go to the Appearance > Customize > FrontPage Sections > Info Section
Here you can manage content (Like- Title, Description, Icon, Image) in the info section.
Click on Publish.
2. How to manage info column layout
From your dashboard, go to the Appearance > Customize > FrontPage Sections > Info Section
Here you can manage the info column layout
Click on Publish
176. How to manage style configurator in Decorme?
1.How to manage website layout & preset background image.
From your dashboard, go to the Appearance > Customize > Style Configurator > Page Layout
Here you can manage the website layout & preset background image.
Click on Publish.
2.How to manage prebuilt theme color.
From your dashboard, go to the Appearance > Customize > Style Configurator > prebuilt theme color
Here you can manage prebuilt theme color.
Click on Publish.
3.How to enable/disable custom color.
From your dashboard, go to the Appearance > Customize > Style Configurator > custom color
Here you can manage custom colors.
Click on Publish.
4.How to manage custom primary & secondary colors.
From your dashboard, go to the Appearance > Customize > Style Configurator > custom color
Here you can manage custom primary & secondary colors.
Click on Publish.
5.How to enable/disable front pallate.
From your dashboard, go to the Appearance > Customize > Style Configurator > Front Pallate
Here you can enable/disable front pallate.
Click on Publish.
177. How to manage menu setup in Spintech
1.Home Page Setup in Spintech
From your dashboard, go to the Appearance > Menus > Select Menu
Here Select Menu according to you
Click on Save Menu.
178. How to manage Typography?
1. How to manage Font Size & Line height in Body Typography
From your dashboard , go to the Appearance > Customize > typography > body typography Section
Here You can manage Font Size &; line Height.
Click on Publish.
2. How to manage letter spacing in Body Typography
From your dashboard , go to the Appearance > Customize > typography > body typography Section
Here You can manage letter spacing.
Click on Publish.
3. How to manage Font weight & Font in Body Typography
From your dashboard , go to the Appearance > Customize > typography > body typography Section
Here You can manage weight & Font.
Click on Publish.
3. How to manage Font Transform & Decoration in Body Typography
From your dashboard , go to the Appearance > Customize > typography > body typography Section
Here You can manage Transform & Decoration.
Click on Publish.
5.How to manage Font Size & Line height H1 to H6 in Headings Typography
From your dashboard, go to the Appearance > Customize > typography > Heading Section
Here You can manage Font Size & line Height.
Click on Publish.
6. How to manage letter spacing in Heading Typography
From your dashboard , go to the Appearance > Customize > typography > body typography Section
Here You can manage letter spacing.
Click on Publish.
7. How to manage Font Style & Transform H1 to H6 in Headings Typography
From your dashboard , go to the Appearance > Customize > typography > Heading Section
Here You can manage Font Style & Transform.
Click on Publish.
179. How to manage Slider Section in Owlpress Lite?
1. How to manage Title, Subtitle & Description
From your dashboard, go to the Appearance > Customize > FrontPage Sections > Slider Section
Here you can manage the content of the slider section
Now Click on Publish.
2. How to manage Button label in slider
From your dashboard, go to the Appearance > Customize > FrontPage Sections > Slider Section
Here you can manage button label & Link
Click on Publish.
3. How to manage subtitle 2, Opacity & image in slider
From your dashboard, go to the Appearance > Customize > FrontPage Sections > Slider Section
Here you can manage subtitle 2, Opacity & image.
180. How to manage colors in Kundoo
1. How to manage Header Text Color Pro Features
From your dashboard , go to the Appearance > Customize > Colors > Header Text Color
Here You can manage header text color.
Click on Publish.
2. How to manage Background Color
From your dashboard , go to the Appearance > Customize > Colors > Background Color
Here You can manage background color.
Click on Publish.
181. How to manage Custom Section in Kundoo
1.How to manage title, Subtitle & Description Pro Features
From your dashboard, go to the Appearance > Customize > FrontPage Sections > Custom Section
Here you can change title, Subtitle & Description in Custom section.
Click on Publish.
2.How to manage custom edit section Pro Features
From your dashboard, go to the Appearance > Customize > FrontPage Sections > Custom Section
183. How to manage header section in StoreBiz Lite?
1. How to change the Site logo
From your dashboard, go to the Appearance > Customize > Header > Site Identity Section
Now Click on the select logo and choose a logo for your site.
If you change & remove the logo then you can use the buttons below it.
Click on Publish.
2. How to customize the width of the Site logo
From your dashboard, go to the Appearance > Customize > Header > Site Identity Section
Now Scroll bar use for logo width Customize.
Click on Publish.
3. How to manage Site Title & Tagline
From your dashboard, go to the Appearance > Customize > Header > Site Identity Section
Now manage site title & tagline as per your choice.
Click on Publish.
4.How to change the site icon
From your dashboard, go to the Appearance > Customize > Header > Site Identity Section
Now Click on button & select Site icon . ;
You can use site icon size maximum 512 x 512px.
Click on Publish.
5.How to manage info in the above header
From your dashboard, go to the Appearance > Customize > Header > Above header Section
Here you can manage Info First & Second as per your choice.
Click on Publish.
6.Hide/Show Cart icon in Header Navigation
From your dashboard, go to the Appearance > Customize > Header > Header Navigation Section
Now Click on the check box for Hide/Show Cart icon.
Click on Publish.
7.Manage Offer Zone Section in Header Navigation
From your dashboard, go to the Appearance > Customize > Header > Header Navigation Section
Now here you can manage Offer Section like icons content & hide/show.
Click on Publish.
8.Hide/Show Sticky Header
From your dashboard, go to the Appearance > Customize > Header > Sticky Header Section
Now Click on the check box for Hide/Show Sticky header
Click on Publish.
184. How to install Owlpress Pro Theme?
Via WordPress Dashboard install Owlpress Pro
Go to the menu Appearance > Themes and click on the Add New button.
Click on the Upload Theme button.
Click on the Browse button and navigate to the unzipped theme package on your computer.
Look for a file called Owlpress pro.zip Click on it to select, then click OK.
Click on the Install Now button and wait until the installation is complete.
Click on the Activate link to activate the theme on your WordPress site.
185. How to manage 404 Page in SpaBiz Pro?
1.How to manage Content in 404 Page
From your dashboard, go to the Appearance > Customize > Page Templates > 404 page
Here you can change Style, Title, Subtitle, Description, Button label, Button link in 404 page.
Click on Publish.
186. How to manage colors in Setto pro?
1. How to manage Background Color
From your dashboard , go to the Appearance > Customize > Colors > Background Color
Here You can manage background color.
Click on Publish.
187. How to Activate license in SpaBiz Pro?
Go to your WordPress website dashboard
Go to Appearance > Theme License
Enter your theme license key into the License Key field
Click Activate
188. Product Section Manage of Watch Home Page!
1.Product Section Manage!
From your dashboard, go to the Appearance > Customize > watch Home page > Product Section
Here you can manage the Title, Subtitle & Select category of the Product .
Now Click on Publish
2. Create a products!
From your dashboard, go to the Product > Add New>
Here you can add new products.
189. How to manage footer section?
1.How to manage footer background image related setting in the footer
From your dashboard, go to the Appearance > Customize > Footer > Footer Above
Here you can change the footer background image-related setting.
Click on Publish.
2.How to Hide/Show footer Above Section in Footer
From your dashboard, go to the Appearance > Customize > Footer > Footer Above
Here you can hide/show the footer above the Section.
Click on Publish.
3.How to Manage content footer Above Section in Footer
From your dashboard, go to the Appearance > Customize > Footer > Footer Above
Here you can manage footer content in the above Section.
Click on Publish.
4.How to manage footer widget layout in footer
From your dashboard, go to the Appearance > Customize > Footer > Footer Above
Here you can manage the footer widget layout.
Click on Publish.
5.How to manage footer bottom (LIke- Style, Icon & Copyright) in the footer
From your dashboard, go to the Appearance > Customize > Footer > Footer Above
Here you can manage the footer bottom.
Click on Publish.
190. Manage Title Latest Product Section
1.How to manage Title Latest Product Section
From your dashboard, go to the Appearance > Customize > FrontPage Sections > Latest Product Section
Here you can manage the title Latest Product Section
Now Click on Publish.
191. How to manage Company FAQ Page in Seokart Pro?
1.How to manage title,Subtitle & Description & hide/show
From your dashboard, go to the Dashboard > Page Template > FAQ Page
Now you can manage title,Subtitle & Description & hide/show .
Click on Publish.
2. How to manage content in the faq
From your dashboard, go to the Dashboard > Page Template > FAQ Page
Now you can manage content & Add new sections.
Click on Publish.
3. How to manage Question Area in the faq Page
From your dashboard, go to the Dashboard > Page Template > FAQ Page
Now you can manage the Question Area Section.
Click on Publish.
3. How to manage FAQ more options in the faq Page
From your dashboard, go to the Dashboard > Page Template > FAQ Page
Now you can manage the FAQ with more options.
Click on Publish.
192. Banner Section Manage of Electronics Home Page!
1.Banner Section Manage!
From your dashboard, go to the Appearance > Customize > FrontPage Sections > Banner Section
Here you can manage the content of the Banner section
Now Click on Publish
193. How to manage Banner Section in SpaBiz Pro?
1.How to manage content of Banner Section?
From your dashboard, go to the Appearance > Customize > FrontPage Sections > Banner Section
Here you can manage Content(image,title, subtitle, button label, button link )in Banner section.
Click on Publish.
194. How to manage section Reorder in Seokart Pro?
1. How to manage section reorder.
From your dashboard, go to the Appearance > Customize > Section Reorder
Here you can manage section reorder.
Click on Publish.
195. How to manage Typography in Appetizer?
1. How to manage Font Size & Line height in Body Typography
From your dashboard , go to the Appearance > Customize > typography > body typography Section
Here You can manage Font Size &; line Height.
Click on Publish.
2. How to manage letter spacing in Body Typography
From your dashboard , go to the Appearance > Customize > typography > body typography Section
Here You can manage letter spacing.
Click on Publish.
3. How to manage Font Style & Transform in Body Typography
From your dashboard , go to the Appearance > Customize > typography > body typography Section
Here You can manage Font Style & Transform.
Click on Publish.
4. How to manage weight & text decoration in Body Typography Pro Features
From your dashboard , go to the Appearance > Customize > typography > body typography Section
Here You can manage weight & text decoration.
Click on Publish.
5. How to manage Font Size & Line height H1 to H6 in Headings Typography
From your dashboard, go to the Appearance > Customize > typography > Heading Section
Here You can manage Font Size & line Height.
Click on Publish.
6. How to manage letter spacing in Heading Typography
From your dashboard , go to the Appearance > Customize > typography > body typography Section
Here You can manage letter spacing.
Click on Publish.
7. How to manage Font Style & Transform H1 to H6 in Headings Typography
From your dashboard , go to the Appearance > Customize > typography > Heading ;Section
Here You can manage Font Style & Transform.
Click on Publish.
8. How to manage weight & text decoration in Heading Typography
From your dashboard , go to the Appearance > Customize > typography > body typography Section
Here You can manage weight & text decoration.
Click on Publish.
196. How to setup Home Page?
1.How to create a Homepage
Go to Pages > Add New > Create a Page Named Home ( the name could be anything you like). On the Right Side Under the Template, the drop-down Menu is for Choosing the Home Page.
You have to Choose the Template and publish it.
2. How to Assign Home Page as a FrontPage?
From your dashboard, go to the Setting > Reading > Home Page Displays
Click on the radio button of your A Static page
Click on Save Changes.
197. How to manage Contact Page?
1.How to hide/show contact Addresses on the Contact page.
From your dashboard, go to the Appearance > Customize > Page Templates > Contact Page
Here you can hide/show in the Contact Address Section.
Click on Publish.
2.How to manage the content of Contact Address.
From your dashboard, go to the Appearance > Customize > Page Templates > Contact Page
Here you can change the content on Contact Page.
Click on Publish.
3.How to hide/show contact form in Contact page.
From your dashboard, go to the Appearance > Customize > Page Templates > Contact Page
Here you can hide/show contact form in Contact Form Section.
Click on Publish.
4.How to manage content of Contact Form .
From your dashboard, go to the Appearance > Customize > Page Templates > Contact Page
Here you can change the content in Contact Form.
Click on Publish.
5.How to hide/show Map in Contact page.
From your dashboard, go to the Appearance > Customize > Page Templates > Contact Page
Here you can hide/show map in Contact Page.
Click on Publish.
6.How to hide/show Contact info in Contact page.
From your dashboard, go to the Appearance > Customize > Page Templates > Contact Page
Here you can hide/show contact info in Contact Page.
Click on Publish.
7.How to manage content of Contact Info.
From your dashboard, go to the Appearance > Customize > Page Templates > Contact Page
Here you can change the content in Contact Info.
Click on Publish.
198. How to Manage Info-2 Section?
1.How to Manage Content info-2?
From your dashboard, go to the Appearance > Customize > FrontPage Sections > Info Section
Here you can manage content (Like- Title, Description, Icon, Image, button label) in the info section.
Click on Publish.
199. How to manage General Section in Seokart Lite?
1. Hide/Show Breadcrumb Section
From your dashboard, go to the Appearance > Customize > General > Breadcrumb Section
Now Click on the check box for Hide/Show Breadcrumb Section.
Click on Publish.
2. How to Remove & Change Image in Breadcrumb Section
From your dashboard, go to the Appearance > Customize > General > Breadcrumb Section
Here you can Remove & Change images in Breadcrumb Section.
Click on Publish.
4. How to manage Background Attachment image
From your dashboard, go to the Appearance > Customize > General > Breadcrumb Section
Here you can set the breadcrumb image according to you.
Click on Publish.
4. Hide/Show clip art
From your dashboard, go to the Appearance > Customize > General > clip Art Section
Here you can hide/show clip Art on the theme.
Click on Publish.
200. How to manage section Reorder in CoziPress
1.How to manage section reorder.
From your dashboard, go to the Appearance > Customize > Section Reorder
Here you can manage section reorder.
Click on Publish.
201. How to manage Service Section in Kundoo
1.How to manage title, Subtitle & Description
From your dashboard, go to the Appearance > Customize > FrontPage Sections > Service Section
Here you can change title, Subtitle & Description in Service section.
Click on Publish.
2.How to manage content Service Section
From your dashboard, go to the Appearance > Customize > FrontPage Sections > Service Section
Here you can manage content in Service section.
Click on Publish.
Kundoo Pro allows you to add even more services.Pro Features
3.How to manage image
From your dashboard, go to the Appearance > Customize > FrontPage Sections > Service Section
Here you can manage Image in Service section.
Click on Publish.
202. How to manage style configurator?
1.How to manage website layout & preset background image.
From your dashboard, go to the Appearance > Customize > Style Configurator > Page Layout
Here you can manage the website layout & preset background image.
Click on Publish.
2.How to manage prebuilt theme color.
From your dashboard, go to the Appearance > Customize > Style Configurator > prebuilt theme color
Here you can manage prebuilt theme color.
Click on Publish.
3.How to enable/disable custom color.
From your dashboard, go to the Appearance > Customize > Style Configurator > custom color
Here you can manage custom colors.
Click on Publish.
4.How to manage custom primary & secondary colors.
From your dashboard, go to the Appearance > Customize > Style Configurator > custom color
Here you can manage custom primary & secondary colors.
Click on Publish.
5.How to enable/disable the front palate.
From your dashboard, go to the Appearance > Customize > Style Configurator > Front Pallate
Here you can enable/disable the front palate.
Click on Publish.
203. How to Setup Home Page?
How to Setup Home Page?
Go to Pages > Add New > Create a Page Named Home ( the name could be anything you like).
On the Right Side Under the Template, the drop-down Menu is for Choosing the Home Page.
You have to Choose the Template and publish it.
2.How to Assign Home Page as a FrontPage?
From your dashboard, go to the Setting > Reading > Home Page Displays
Click on the radio button of your A Static page
Click on Save Changes.
204. How to manage header section in CoziPress
1. How to change the Site logo
From your dashboard , go to the Appearance > Customize > Header > Site Identity Section
Now Click on select logo and choose logo for your site .
If you are change & remove logo then you can use buttons below it.
Click on Publish.
2. How to customize width of Site logo
From your dashboard , go to the Appearance > Customize > Header > Site Identity Section
Now Scroll bar use for logo width Customize.
Click on Publish.
3. How to manage Site Title & Tagline
From your dashboard , go to the Appearance > Customize > Header > Site Identity Section
Now manage site title & tagline as per your choice .
Click on Publish.
4.How to display Site Title & Tagline
From your dashboard , go to the Appearance > Customize > Header > Site Identity Section
Now Click on Check box for Hide/Show Site title & tagline.
Click on Publish.
5.How to change the site icon
From your dashboard , go to the Appearance > Customize > Header > Site Identity Section
Now Click on button & select Site icon . ;
You can use site icon size maximum 512 x 512px.
Click on Publish.
6.How to Customize Site title & description font size Pro Features
From your dashboard , go to the Appearance > Customize > Header > Site Identity Section
Here you can customize Site title & description .
Click on Publish.
7.How to Change header type Pro Features
From your dashboard , go to the Appearance > Customize > Header > Header Style Section
Here you can select header type according to you .
Click on Publish.
8.Hide/Show Opening Hour Section
From your dashboard, go to the Appearance > Customize > Header > Above header Section
Check Box on the Hide/Show above Header option to reveal the header top bar options.
Click on Publish.
9.How to manage title & content in Opening Hour Section
From your dashboard, go to the Appearance > Customize > Header > Above header Section
Here you can change title & content as per your choice.
Click on Publish.
10.Hide /Show Support section
From your dashboard, go to the Appearance > Customize > Header > Above header Section
Check Box on the Hide/Show above Header option to reveal the header top bar options.
Click on Publish.
11.How to manage icon & text in support section
From your dashboard, go to the Appearance > Customize > Header > Above header Section
Now you can select icon in icons library & manage text in contact info section.
Click on Publish.
12.Hide/Show Social icon section
From your dashboard, go to the Appearance > Customize > Header > Above header Section
Check Box on the Hide/Show above Header option to reveal the header top bar options.
Click on Publish.
13.How to Manage Social icons
From your dashboard, go to the Appearance > Customize > Header > Above header Section
Now you can select icon in social icons library.
Click on Publish.
14.Hide/Show Button in Header
From your dashboard, go to the Appearance > Customize > Header > Above header Section
Check Box on the Hide/Show above Header option to reveal the header top bar options.
Click on Publish.
15.How to Manage Button Label & Icon
From your dashboard, go to the Appearance > Customize > Header > Above header Section
Now you can manage Button Label & Icon.
Click on Publish.
16.Hide/Show Cart icon in Header Navigation Pro Features
From your dashboard, go to the Appearance > Customize > Header > Header Navigation Section
Now Click on check box for Hide/Show Cart icon.
Click on Publish.
17.Hide/Show Search icon in Header Navigation
From your dashboard, go to the Appearance > Customize > Header > Header Navigation Section
Now Click on check box for Hide/Show Search icon.
Click on Publish.
18.Hide/Show Sticky Header
From your dashboard, go to the Appearance > Customize > Header > Sticky Header Section
Now Click on check box for Hide/Show Sticky header
Click on Publish.
205. How to manage food menu Page in Appetizer?
1. How to manage the food menu page
From your dashboard, go to the Appearance > Customize > Page Template Sections > Food Menu Page
Here you can manage the content Food Menu page
Now Click on Publish.
206. How to manage Error Page in Seokart Pro?
1. How to manage Content in Error Page
From your dashboard, go to the Appearance > Customize > Page Templates > 404 page
Here you can change the title, Description & button labels 1& 2 in the error page.
Click on Publish.
207. How to manage menu setup?
From your dashboard, go to the Appearance > Menus > Select Menu
Here Select Menu according to you
Click on Save Menu.
208. How to manage Latest Product Section ?
1.How do I hide/Show the Latest Product Section
From your dashboard, go to the Appearance > Customize > FrontPage Sections > Latest Product Section
Here you can Hide/Show Latest Product Section
Now Click on Publish.
2.How to manage Title Latest Product Section
From your dashboard, go to the Appearance > Customize > FrontPage Sections > Latest Product Section
Here you can manage title Latest Product Section
Now Click on Publish.
209. How to manage header section in SpaBiz Pro?
1. How to change the Site logo
From your dashboard, go to the Appearance > Customize > Header > Site Identity Section
Now Click on the select logo and choose a logo for your site.
If you change & remove the logo then you can use the buttons below it.
Click on Publish.
2. How to customize the width of the Site logo
From your dashboard, go to the Appearance > Customize > Header > Site Identity Section
Now Scroll bar use for logo width Customize.
Click on Publish.
3. How to manage Site Title & Tagline
From your dashboard, go to the Appearance > Customize > Header > Site Identity Section
Now manage site title & tagline as per your choice.
Click on Publish.
4.How to change the site icon
From your dashboard, go to the Appearance > Customize > Header > Site Identity Section
Now Click on button & select Site icon . ;
You can use site icon size maximum 512 x 512px.
Click on Publish.
5.How to Customize Site title & description font size
From your dashboard, go to the Appearance > Customize > Header > Site Identity Section
Here you can customize the Site title & description.
Click on Publish.
6.How to change Header Type?
From your dashboard, go to the Appearance > Customize > Header > Header Style Section
Here you can choose Header Type.
Click on Publish.
7.Hide/Show Search, Cart & Button label icon in Header Navigation
From your dashboard, go to the Appearance > Customize > Header > Header Navigation Section
Now Click on the check box for Hide/Show Cart icon.
Click on Publish.
8.Hide/Show Sticky Header
From your dashboard, go to the Appearance > Customize > Header > Sticky Header Section
Now Click on the check box for Hide/Show Sticky header
Click on Publish.
210. How to manage About page in Setto Pro?
1.Create a Page & Select Template
From your dashboard, go to the Dashboard > Pages > Add New
Now Create a page & Select the Template.
Click on Publish.
2.Manage About section content!
From your dashboard, go to the Dashboard > Appearance > Page template > About Page.
Here you can manage about Section content & Hide/Show Section.
Click on Publish.
3.Manage Vision section content!
From your dashboard, go to the Dashboard > Appearance > Page template > About Page> Vision Section.
Here you can manage about Section content & Hide/Show Section.
Click on Publish.
4.Counter section content!
From your dashboard, go to the Dashboard > Appearance > Page template > About Page> Counter Section.
Here you can manage Counter Section content & Hide/Show Section.
Click on Publish.
5.Team section content!
From your dashboard, go to the Dashboard > Appearance > Page template > About Page> Team Section.
Here you can manage Counter Section content & Hide/Show Section.
Click on Publish.
211. How to manage Gallery Section in Appetizer Pro?
1. How to manage Gallery Content & Column?
From your dashboard, go to the Appearance > Customize > FrontPage Sections > Gallery Section
Here you set up content in the gallery section.
Click on Publish.
212. How to Setup Home Page?
Go to Pages > Add New > Create a Page Named Home ( the name could be anything you like). On the Right Side Under the Template, the drop-down Menu is for Choosing the Home Page.
You have to Choose the Template and publish it.
2. How to Assign Home Page as a FrontPage?
From your dashboard, go to the Setting > Reading > Home Page Displays
Click on the radio button of your A Static page
Click on Save Changes.
213. Product Section Manage of Goggles Home Page!
1.Product Section Manage!
From your dashboard, go to the Appearance > Customize > Goggles Home page > Product Section
Here you can manage the Title & Select category of the Product .
Now Click on Publish
2. Create a products!
From your dashboard, go to the Product > Add New>
Here you can add new products.
214. How to manage menu setup in CoziPress
1.Menu Setup in CoziPress
From your dashboard, go to the Appearance > Menus > Select Menu
Here Select Menu according to you
Click on Save Menu.
215. How to manage Slider 2 in SpaBiz Pro?
1.How do I manage Content in Slider Section-2?
From your dashboard, go to the Appearance > Customize > FrontPage Sections > Slider Section
Here you can manage content of Slider Section
Now Click on Publish.
2.How to manage Background Image, Animation & Slider Speed?
From your dashboard, go to the Appearance > Customize > FrontPage Sections > Slider Section
Here you can manage Background Image , Slider Speed & Animation Effects.
216. How to manage blog Section?
1.How do I hide/Show Blog Section
From your dashboard, go to the Appearance > Customize > FrontPage Sections > Blog Section
Here you can Hide/Show Blog Section
Now Click on Publish.
2.How to manage Title Blog Section
From your dashboard, go to the Appearance > Customize > FrontPage Sections > Blog Section
Here you can manage the title Blog Section
Now Click on Publish.
3.How to manage No.Post of Display
From your dashboard, go to the Appearance > Customize > FrontPage Sections > Blog Section
Here you can manage No. Post of Display
Now Click on Publish.
217. How to install SpaBiz Pro?
Go to the menu Appearance > Themes and click on the Add New button.
Click on the Upload Theme button.
Click on the Browse button and navigate to the unzipped theme package on your computer.
Look for a file called spabiz-pro.zip Click on it to select, then click OK.
Click on the Install Now button and wait until the installation is complete.
Click on the Activate link to activate the theme on your WordPress site.
218. How to setup Background image in Spintech
1. How to setup Background image
From your dashboard , go to the Appearance > Customize > Background image
Here You can setup background image.
If you are change & remove logo then you can use buttons below it.
Click on Publish.
2. How to setup preset image
From your dashboard , go to the Appearance > Customize > Background image
Here You can setup preset background image.
Click on Publish.
3. How to manage image position & size
From your dashboard , go to the Appearance > Customize > Background image
Here You can manage position & size background image.
Click on Publish.
4. How to manage repeat background image & scroll with page
From your dashboard , go to the Appearance > Customize > Background image
Here You can manage repeat background image & scroll with page background image.
Click on Publish.
219. How to manage Portfolio Section in Seokart Pro?
1. How to change portfolio style
From your dashboard, go to the Appearance > Customize > FrontPage Sections > Portfolio Section
Here you can change the title, Subtitle & Description in the portfolio section.
Click on Publish.
2. How to manage title, Subtitle & Description
From your dashboard, go to the Appearance > Customize > FrontPage Sections > Portfolio Section
Here you can change the title, Subtitle & Description in the portfolio section.
Click on Publish.
3. How to manage button label, No of Portfolio Display & Portfolio Column
From your dashboard, go to the Appearance > Customize > FrontPage Sections > project Section
Here you can manage the button label, No of Portfolio Display & portfolio Column in the portfolio section.
Click on Publish.
220. How to manage Booking Page in Astrocare
1. Create a Page & Select Template
From your dashboard, go to the Dashboard > Pages > Add New
Now Create a page & Select the Template.
Click on Publish.
2. First, install the Amelia plugin
From your dashboard, go to the Dashboard > Plugin> Add New Plugin
3. How to Create a Provider Details?
From your dashboard, go to the Dashboard > Amelia > Settings > Provider Details
Here you can manage provider details (Like- Image, First Name, Last Name, and Email) on the Booking Page.
Click to Save Button
.
4. How to Create a new category?
Go to the Dashboard > Amelia > Services > Categories from your dashboard.
Here you can add a new category (Like- Categories Image and Categories title) on the Booking Page.
Click the Add Category Button
5. How do you add a new service?
From your dashboard, go to the Dashboard > Amelia > Services.
Click the Add Service Button
6. How do you create content services?
From your dashboard, go to the Dashboard > Amelia > Services > Add Service
After clicking on the button, a form will open on the right side and you have to fill in some details in it.
Here you can manage (Like:- Details, Duration & Pricing, and Gallery)
We will provide some screenshots
Click to Save Button
7. We provide category & service output here
We will provide some screenshots
221. How to manage Typography in Owlpress Lite?
1. How to manage Font Size & Line height in Body Typography
From your dashboard , go to the Appearance > Customize > typography > body typography Section
Here You can manage Font Size &; line Height.
Click on Publish.
2. How to manage Font Style & Transform in Body Typography
From your dashboard , go to the Appearance > Customize > typography > body typography Section
Here You can manage Font Style & Transform.
Click on Publish.
3. How to manage Font Size & Line height H1 to H6 in Headings Typography
From your dashboard, go to the Appearance > Customize > typography > Heading Section
Here You can manage Font Size & line Height.
Click on Publish.
4. How to manage Font Style & Transform H1 to H6 in Headings Typography
From your dashboard, go to the Appearance > Customize > typography > Heading Section
Here You can manage Font Style & Transform.
Click on Publish.
222. How to Demo Import for Hotel Galaxy Pro
Demo Import For Hotel Galaxy Pro
Install the One Click Demo Import plugin on your site
After installing the plugin,
Go to Appearance > Premade Demos
Select a theme that demos import
Finally, click the Import Demo Data Button
Wait for the import to finish
You are done!!!
Step 01.
Step 02.
Step 03.
Step 04.
How do you show the header menu Hotel Galaxy Pro?
Go to Dashboard > Appearance > Menu
223. Home Page Setup in Spintech
How to Setup Home Page?
Go to Pages > Add New > Create a Page Named Home ( the name could be anything you like). At the Right Side Under the Template drop-down Menu is for Choosing the Home Page.
You have to Choose the Template and publish it.
2.How to Assign Home Page as a Front Page?
From your dashboard , go to the Setting > Reading > Home Page Displays
Click on radio button of your A Static page
Click on Save Changes.
224. How to manage blog Section?
1.How do i hide/Show Blog Section
From your dashboard, go to the Appearance > Customize > FrontPage Sections > Blog Section
Here you can Hide/Show Blog Section
Now Click on Publish.
2. How to manage title & description Blog Section
From your dashboard, go to the Appearance > Customize > FrontPage Sections > Blog Section
Here you can manage the title & description Blog Section
Now Click on Publish.
3. How to manage No.Post of Display
From your dashboard, go to the Appearance > Customize > FrontPage Sections > Blog Section
Here you can manage No. Post of Display
Now Click on Publish.
225. How to setup Background image in CoziPress
1. How to setup Background image
From your dashboard , go to the Appearance > Customize > Background image
Here You can setup background image.
If you are change & remove logo then you can use buttons below it.
Click on Publish.
2. How to setup preset image
From your dashboard , go to the Appearance > Customize > Background image
Here You can setup preset background image.
Click on Publish.
3. How to manage image position & size
From your dashboard , go to the Appearance > Customize > Background image
Here You can manage position & size background image.
Click on Publish.
4. How to manage repeat background image & scroll with page
From your dashboard , go to the Appearance > Customize > Background image
Here You can manage repeat background image & scroll with page background image.
Click on Publish.
226. How to manage About page in Appetizer?
1. Create a Page & Select Template
From your dashboard, go to the Dashboard > Pages > Add New
Now Create a page & Select the Template.
Click on Publish.
2. Hide/Show About Section
From your dashboard, go to the Appearance > Customize > Page Templates > About Page
Now click on the check box for the hide/show About section.
Click on Publish.
3. How to manage title & description
From your dashboard, go to the Appearance > Customize > Page Templates > About Page
Now you can manage the title & Description.
Click on Publish.
4. How to manage Author content
From your dashboard, go to the Appearance > Customize > Page Templates > About Page
Now you can manage Author Content.
Click on Publish.
5. How to manage the right content
From your dashboard, go to the Appearance > Customize > Page Templates > About Page
Now you can manage the right Content.
Click on Publish.
6. How to manage title,subtitle,description & hide/show banner section
From your dashboard, go to the Appearance > Customize > Page Templates > About Page
Now you can title,subtitle,description & hide/show banner section.
Click on Publish.
7. How to manage Background image & opacity related setting in the banner section
From your dashboard, go to the Appearance > Customize > Page Templates > About Page
Now you can manage Background images & opacity related in the banner section.
Click on Publish.
8. How to manage why to choose section related setting
From your dashboard, go to the Appearance > Customize > Page Templates > About Page
Now you can manage why to choose a section-related setting in the banner section.
Click on Publish.
9. How to manage team section on about page
From your dashboard, go to the Appearance > Customize > Page Templates > About Page
Now you can manage the team section on the about page.
Click on Publish.
10. How to manage funfact section on the about page
From your dashboard, go to the Appearance > Customize > Page Templates > About Page
Now you can manage the funfact section on the about page.
Click on Publish.
11. How to manage the About 2 section in the about page
From your dashboard, go to the Appearance > Customize > Page Templates > About Page
Now you can manage the About2 section on the about page.
Click on Publish.
227. Sponsor Section Manage of Goggles Home Page!
1.Sponsor Section Manage!
From your dashboard, go to the Appearance > Customize > Goggles Home page > Sponsor Section
Here you can manage the Sponsor Content (Like : Link & image) .
Now Click on Publish
228. How to Demo Import for Kundoo pro
Demo Import For Kundoo pro
Install One Click Demo Import plugin in your site
After installing the plugin,
Go to Appearance > Premade Demos
Finally, click Import Demo Data Button
Wait for the import to finish
You are done!!!
229. How to manage Footer Section in Spintech
1. How to change the Footer bottom logo
From your dashboard , go to the Appearance > Customize > Footer > Footer Bottom Section
Now Click on select logo and choose logo for your site .
If you are change & remove logo then you can use buttons below it.
Click on Publish.
2. How to manage copyright content
From your dashboard , go to the Appearance > Customize > Footer > Footer Bottom Section
Here You can manage copyright content.
Click on Publish.
3.Hide/Show Menu in Footer Bottom
From your dashboard, go to the Appearance > Customize > Footer > Footer Bottom Section
Now click on check box for hide/show menu in footer bottom section.
Click on Publish.
230. How to install Setto Pro?
Go to the menu Appearance > Themes and click on the Add New button.
Click on the Upload Theme button.
Click on the Browse button and navigate to the unzipped theme package on your computer.
Look for a file called Setto.zip Click on it to select, then click OK.
Click on the Install Now button and wait until the installation is complete.
Click on the Activate link to activate the theme on your WordPress site.
231. How to install Spintech Pro Theme
Via WordPress Dashboard install Spintech Pro
Go to the menu Appearance > Themes and click on the Add New button.
Click on the Upload Theme button.
Click on the Browse button and navigate to the unzipped theme package on your computer.
Look for a file called Spintech pro.zip Click on it to select, then click OK.
Click on the Install Now button and wait until the installation is complete.
Click on the Activate link to activate the theme on your WordPress site.
232. How to manage Info Section in Spintech
1.Hide/Show Info Section
From your dashboard, go to the Appearance > Customize > FrontPage Sections > Info Section
Now click on check box for hide/show info section
Click on Publish.
2.How to manage title & Description
From your dashboard, go to the Appearance > Customize > FrontPage Sections > Info Section
Here you can change title & Description in info section.
Click on Publish.
3.How to manage Background image in info section
From your dashboard, go to the Appearance > Customize > FrontPage Sections > Info Section
Here you can select image type & Upload image.
Click on Publish.
4.How to manage icon in info section
From your dashboard, go to the Appearance > Customize > FrontPage Sections > Info Section
Now Select icon in icon gallery according your choice.
Click on Publish
Spintech Pro allows you to add even more Info.Pro Features
5.How to change info type Pro Features
From your dashboard, go to the Appearance > Customize > FrontPage Sections > Info Section
Here you can change info type
Click on Publish
6.How to manage info column layout Pro Features
From your dashboard, go to the Appearance > Customize > FrontPage Sections > Info Section
Here you can manage info column layout
Click on Publish
233. How to manage Team Section in Spintech
1.How to manage title, Subtitle & Description Pro Features
From your dashboard, go to the Appearance > Customize > FrontPage Sections > Team Section
Here you can change title, Subtitle & Description in team section.
Click on Publish.
2.How to manage team content Pro Features
From your dashboard, go to the Appearance > Customize > FrontPage Sections > Team Section
Here you setup content in team section.
Click on Publish.
3.How to manage team column Pro Features
From your dashboard, go to the Appearance > Customize > FrontPage Sections > Team Section
Here you can choose column layout in team section.
Click on Publish.
234. How to manage section Reorder in Kundoo
1.How to manage section reorder.
From your dashboard, go to the Appearance > Customize > Section Reorder
Here you can manage section reorder.
Click on Publish.
235. Banner Section Manage of Lingerie Home Page!
1.Banner Section Manage!
From your dashboard, go to the Appearance > Customize > Lingerie Homepage > Banner Section
Here you can manage the content of the Banner section
Now Click on Publish.
236. How to manage section Reorder in Astrocare Pro
1. How to manage section reordering?
From your dashboard, go to the Appearance > Customize > Section Reorder
Here you can manage section reordering.
Click on Publish.
237. How to manage Typography in SpaBiz Pro?
1. How to manage Body Typography
From your dashboard , go to the Appearance > Customize > typography > body typography Section
Here You can manage Font Family, Size, Line Height, Letter Spacing, Weight, Font Style, Transform, Text Decoration
Click on Publish.
2. How to manage H1 to H6 in Headings Typography
From your dashboard, go to the Appearance > Customize > typography > Headings Section
Here You can manage Font Family, Font Size, Line Height, Letter Spacing, Font Weight, Font Style, Text Transform & Text Decoration.
238. How to manage Team Section in CoziPress
1.How to manage title, Subtitle & Description Pro Features
From your dashboard, go to the Appearance > Customize > FrontPage Sections > Team Section
Here you can change title, Subtitle & Description in team section.
Click on Publish.
2.How to manage team content Pro Features
From your dashboard, go to the Appearance > Customize > FrontPage Sections > Team Section
Here you setup content in team section.
Click on Publish.
3.How to manage team column Pro Features
From your dashboard, go to the Appearance > Customize > FrontPage Sections > Team Section
Here you can choose column layout in team section.
Click on Publish.
239. How to setup Header image in SpaBiz Pro?
1. How to setup Header image
From your dashboard , go to the Appearance > Customize > Header image
Here You can setup header image.
If you are change & remove logo then you can use buttons below it.
Click on Publish.
240. How to manage Mobile Section in Astrocare
1. How to manage Mobile Section Title & Subtitles?
From your dashboard, go to the Appearance > Customize > FrontPage Sections > Mobile Section
Here you can change the Title & subtitle of the Mobile section.
Click on Publish.
2. How to Change/Remove an image's Mobile Section Images?
From your dashboard, go to the Appearance > Customize > FrontPage Sections > Mobile Section
Here you can change/remove the images of the Mobile section.
Click on Publish.
241. Home Page Setup in Kundoo Pro
1.How to Setup Home Page?
Go to Pages > Add New > Create a Page Named Home ( the name could be anything you like).
On the Right Side Under the Template, a drop-down Menu is for Choosing the Home Page.
You have to Choose the Template and publish it.
2.How to Assign Home Page as a Front Page?
From your dashboard , go to the Setting > Reading > Home Page Displays
Click on radio button of your A Static page
Click on Save Changes.
242. How to Activate license in Decorme?
Go to your WordPress website dashboard
Go to Appearance > Theme License
Enter your theme license key into the License Key field
Click Activate
243. How to manage Slide in Decorme?
1.How do I manage Content in Slider Section?
From your dashboard, go to the Appearance > Customize > FrontPage Sections > Slider Section
Here you can manage content of Slider Section
Now Click on Publish.
2.Manage Opacity of Slider Section?
From your dashboard, go to the Appearance > Customize > FrontPage Sections > Slider Section
Here you can manage Opacity.
244. Install & Activate Burger Companion Plugin?
In the WordPress dashboard go to the appearance submenu and click on customize. After clicking on customizing you will in theme customizer. Here you have to show in the recommended plugin then click on the install & activate Button.
245. How to manage section Reorder in Appetizer Pro?
1. How to manage section reorder.
From your dashboard, go to the Appearance > Customize > Section Reorder
Here you can manage section reorder.
Click on Publish.
246. Additional CSS in Astrocare
1. How to add Additional CSS
From your dashboard, go to the Appearance > Additional CSS >
Here you can paste your Additional CSS
Click on Publish.
247. How to Activate a license in Astrocare pro
How to Activate License key in Astrocare pro
Go to your WordPress website dashboard
Go to Appearance > Theme License
Enter your theme license key into the License Key field
Click Activate
248. How to manage Product Section Setto Lite?
1.How do I hide/Show the Product Section?
From your dashboard, go to the Appearance > Customize > FrontPage Sections > Product Section
Here you can Hide/Show Product Section
Now Click on Publish.
2.How to manage Title Product Section?
From your dashboard, go to the Appearance > Customize > FrontPage Sections > Product Section
Here you can manage title Product Section
Now Click on Publish.
249. How to manage Company Support Page in Spintech
1.Create a Page & Select Template
From your dashboard, go to the Dashboard > Pages > Add New
Now Create a page & Select the Template in Page Attributes.
Click on Publish.
2.Hide/Show Company Support Section in the company support page
From your dashboard, go to the Appearance > Customize > Page Templates > Company Support Page
Now click on the check box for the hide/show company Support section.
Click on Publish.
3.How to manage title, Subtitle & Description in the company Support section
From your dashboard, go to the Appearance > Customize > Page Templates > Company Support page
Here you can change the title, Subtitle & Description in the Company Support Section.
Click on Publish.
4.How to manage content in the company support section.
From your dashboard, go to the Appearance > Customize > Page Templates > Company Support page
Here you can manage content in the company Support section.
Click on Publish.
5.Hide/Show Company Support Care in the company support page
From your dashboard, go to the Appearance > Customize > Page Templates > Company Support Page
Now click on the check box for hide/show company Support Care section.
Click on Publish.
6.How to manage content in the company support care section.
From your dashboard, go to the Appearance > Customize > Page Templates > Company Support page
Here you can manage content in the company Support care section.
Click on Publish.
250. How to create blog post of Kundoo
1. How to create a blog post
From your dashboard, go to the Appearance > post > add a new post
Here you can create a new blog post.
Click on Publish.
251. How to manage header section in Decorme Lite?
1. How to change the Site logo
From your dashboard, go to the Appearance > Customize > Header > Site Identity Section
Now Click on the select logo and choose a logo for your site.
If you change & remove the logo then you can use the buttons below it.
Click on Publish.
2. How to customize the width of the Site logo
From your dashboard, go to the Appearance > Customize > Header > Site Identity Section
Now Scroll bar use for logo width Customize.
Click on Publish.
3. How to manage Site Title & Tagline
From your dashboard, go to the Appearance > Customize > Header > Site Identity Section
Now manage site title & tagline as per your choice.
Click on Publish.
4.How to change the site icon
From your dashboard, go to the Appearance > Customize > Header > Site Identity Section
Now Click on button & select Site icon . ;
You can use site icon size maximum 512 x 512px.
Click on Publish.
5. How to manage social icons in the header section?
From your dashboard, go to the Appearance > Customize > Header > Header Navigation
Here you can manage social icons as per your choice.
Click on Publish.
6. How to manage contact info in the header section?
From your dashboard, go to the Appearance > Customize > Header > header section
Here you can contact info .
Click on Publish.
7.Hide/Show Sticky Header
From your dashboard, go to the Appearance > Customize > Header > Sticky Header Section
Now Click on the check box for Hide/Show Sticky header
Click on Publish.
252. How to manage Funfact Section in CoziPress
1.How to manage Content Pro Features
From your dashboard, go to the Appearance > Customize > FrontPage Sections > Funfact Section
Here you can manage content in Funfact section.
Click on Publish.
2.How to manage Funfact Column Pro Features
From your dashboard, go to the Appearance > Customize > FrontPage Sections > Funfact Section
Here you can choose column layout in funfact section.
Click on Publish.
3.How to add Background image Pro Features
From your dashboard, go to the Appearance > Customize > FrontPage Sections > Funfact Section
Here you can change & remove background image in funfact section.
Click on Publish.
4.How to setup Background image Position Pro Features
From your dashboard, go to the Appearance > Customize > FrontPage Sections > Funfact Section
Here you can setup background image position in funfact section.
Click on Publish.
253. How to create Job of CoziPress
1.How to create Job of CoziPress
From your dashboard, go to the Appearance > job > add new job
Here you can create new job.
Click on Publish.
254. How to manage Custom Section in Seokart Pro?
1. How to manage title, Subtitle & Description
From your dashboard, go to the Appearance > Customize > FrontPage Sections > Custom Section
Here you can change the title, Subtitle & Description in the Custom section.
Click on Publish.
2. How to change content edit
From your dashboard, go to the Appearance > Customize > FrontPage Sections > Custom Section
Now click the edit button
Here you can editable the section content in the Custom section.
Click on Publish.
255. How to manage General Section?
1.Manage Breadcrumb Section!
From your dashboard, go to the Appearance > Customize > General > Breadcrumb Section
Now Click on the check box for Hide/Show Breadcrumb Section.
Also manage background image here .
Click on Publish.
256. How to manage background image?
1. How to the setup Background image
From your dashboard, go to the Appearance > Customize > Background image
Here You can set up a background image.
If you change & remove the logo then you can use the buttons below it.
Click on Publish.
2. How to setup preset image
From your dashboard, go to the Appearance > Customize > Background image
Here You can setup a preset background image.
Click on Publish.
3. How to manage image position & size
From your dashboard, go to the Appearance > Customize > Background image
Here You can manage the position & size of background image.
Click on Publish.
4. How to manage repeat background images & scroll with the page
From your dashboard, go to the Appearance > Customize > Background image
Here You can manage repeat background images & scroll with the page background images.
Click on Publish.
257. How to manage Sponsor section in Astrocare
1. How to manage titles?
From your dashboard, go to the Appearance > Customize > Frontpage sections >Sponsor Section
Here you can change the titles in the Sponsor Section.
Click on Publish
2. How to add the images of the Sponsor section.
From your dashboard, go to the Appearance > Customize > Frontpage sections >Sponsor Section
Here you can change the content (like- Image)in the Sponsor Section.
Click on Publish
3. Astrocare Pro allows you to add even more Sponsor.Pro Features
From your dashboard, go to the Appearance > Customize > FrontPage Sections > Sponsor Section
Here you can add more Sponsor in the Sponsor section.
Click on Publish.
258. How to Demo Import for Astrocare pro
Demo Import For Astrocare pro
Install the One Click Demo Import plugin on your site
After installing the plugin,
Go to Appearance > Premade Demos
Finally, click the Import Demo Data Button
Wait for the import to finish
You are done!!!
259. How to manage Service Section in Spintech
1.Hide/Show Service Section
From your dashboard, go to the Appearance > Customize > FrontPage Sections > Service Section
Now click on check box for hide/show Service section
Click on Publish.
2.How to manage title, Subtitle & Description
From your dashboard, go to the Appearance > Customize > FrontPage Sections > Service Section
Here you can change title, Subtitle & Description in Service section.
Click on Publish.
3.How to manage content Service Section
From your dashboard, go to the Appearance > Customize > FrontPage Sections > Service Section
Here you can manage content in Service section.
Click on Publish.
4.How to select image type Pro Features
From your dashboard, go to the Appearance > Customize > FrontPage Sections > Service Section
Here you can select image/icon in Service section.
Click on Publish.
Spintech Pro allows you to add even more services.Pro Features
5.How to add load more label Pro Features
From your dashboard, go to the Appearance > Customize > FrontPage Sections > Service Section
Here you can add load more label in Service section.
Click on Publish.
260. How to manage Gallery page in Owlpress Pro?
1. How to manage title, subtitle & description
From your dashboard, go to the Appearance > Customize > Page Template > Gallery Page
Here you can change the title, Subtitle & Description on the Gallery Page.
Click on Publish.
2. How to manage Gallery Content
From your dashboard, go to the Appearance > Customize > Page Template > Gallery Page
Here you set up content in the gallery section.
Click on Publish.
261. How to install CoziPress Pro Theme
Via WordPress Dashboard install CoziPress Pro
Go to the menu Appearance > Themes and click on the Add New button.
Click on the Upload Theme button.
Click on the Browse button and navigate to the unzipped theme package on your computer.
Look for a file called CoziPress pro.zip Click on it to select, then click OK.
Click on the Install Now button and wait until the installation is complete.
Click on the Activate link to activate the theme on your WordPress site.
262. How to manage Design & Development Section in Spintech
1.Hide/Show Design & Development Section
From your dashboard, go to the Appearance > Customize > FrontPage Sections > Design & Development Section
Now click on check box for hide/show Design & Development section.
Click on Publish.
2.How to manage title, Subtitle & Description
From your dashboard, go to the Appearance > Customize > FrontPage Sections > Design & Development Section
Here you can change title, Subtitle & Description in Design & Development section.
Click on Publish.
3.How to manage content Design & Development Section
From your dashboard, go to the Appearance > Customize > FrontPage Sections > Design & Development Section
Here you can manage content in Design & Development section.
Click on Publish.
4.How to Linkable in title Design & Development Section Pro Features
From your dashboard, go to the Appearance > Customize > FrontPage Sections > Design & Development Section
Here you can add link on title in Design & Development section.
Click on Publish.
5.How to select image or icon type Pro Features
From your dashboard, go to the Appearance > Customize > FrontPage Sections > Design & Development Section
Here you can select image/icon in Design & Development section.
Click on Publish.
Spintech Pro allows you to add even more Design & Development Section.Pro Features
6.How to remove & change image Design & Development section Pro Features
From your dashboard, go to the Appearance > Customize > FrontPage Sections > Design & Development Section
Here you can change & remove image in Design & Development section.
Click on Publish.
263. How to manage footer section in CoziPress
1.How to manage footer background image related setting in footer
From your dashboard, go to the Appearance > Customize > Footer > Footer Background
Here you can change footer background image related setting.
Click on Publish.
2.How to manage footer bottom in footer
From your dashboard, go to the Appearance > Customize > Footer > Footer Bottom
Here you can manage footer bottom .
Click on Publish.
3.How to manage Footer Parallax in footer
From your dashboard, go to the Appearance > Customize > Footer > Footer Parallax
Here you can change Footer Parallax related setting.
Click on Publish.
264. How to manage style configurator in Seokart Pro?
1. How to manage website layout & preset background image.
From your dashboard, go to the Appearance > Customize > Style Configurator > Page Layout
Here you can manage the website layout & preset background image.
Click on Publish.
2. How to manage prebuilt theme color.
From your dashboard, go to the Appearance > Customize > Style Configurator > prebuilt theme color
Here you can manage prebuilt theme color.
Click on Publish.
3. How to enable/disable custom color.
From your dashboard, go to the Appearance > Customize > Style Configurator > custom color
Here you can manage custom colors.
Click on Publish.
4. How to manage custom primary & secondary colors.
From your dashboard, go to the Appearance > Customize > Style Configurator > custom color
Here you can manage custom primary & secondary colors.
Click on Publish.
5. How to enable/disable front pallate.
From your dashboard, go to the Appearance > Customize > Style Configurator > Front Pallate
Here you can enable/disable front pallate.
Click on Publish.
265. How to manage FAQ Page in SpaBiz Pro?
1.Create FAQ Page & Select Template
From your dashboard, go to the Dashboard > Pages > Add New
Now Create a page & Select the Template.
Click on Publish.
2.How to manage content?
From your dashboard, go to the Appearance > Customize > Page Templates > FAQ Page
Here you can change hide/show, title, Subtitle, Description, Background Image & Content in FAQ Section.
Click on Publish.
266. How to manage Sade Sati page in Astrocare Pro
1. Create a Page & Select Template
From your dashboard, go to the Dashboard > Pages > Add New
Now Create a page & Select the Template.
Click on Publish.
267. How to manage FAQ Page in Kundoo
1.Create a Page & Select Template
From your dashboard, go to the Dashboard > Pages > Add New
Now Create a page & Select the Template.
Click on Publish.
2.How to manage title, Subtitle & Description.
From your dashboard, go to the Appearance > Customize > Page Templates > FAQ Page
Here you can change the title, Subtitle & Description.
Click on Publish.
3.How to manage FAQ Content
From your dashboard, go to the Appearance > Customize > Page Template > FAQ Page
Here you setup content in FAQ Page.
Click on Publish.
268. How to Activate license in Owlpress pro?
How to Activate License key in Owlpress pro
Go to your WordPress website dashboard
Go to Appearance > Theme License
Enter your theme license key into the License Key field
Click Activate
269. How to manage Company Location Page in Spintech
1.Create a Page & Select Template
From your dashboard, go to the Dashboard > Pages > Add New
Now Create a page & Select the Template in Page Attributes.
Click on Publish.
2.Hide/Show Company Location Section in the company Location page
From your dashboard, go to the Appearance > Customize > Page Templates > Company Location Page
Now click on the check box for the hide/show company location section.
Click on Publish.
3.How to manage title, Subtitle & Description in the company location section
From your dashboard, go to the Appearance > Customize > Page Templates > Company location page
Here you can change the title, Subtitle & Description in the location Section.
Click on Publish.
4.How to Change & Remove image in the company location section
From your dashboard, go to the Appearance > Customize > Page Templates > Company Location page
Here you can change & remove the image in the Company Location section .
Click on Publish.
5.How to manage content in the company location section.
From your dashboard, go to the Appearance > Customize > Page Templates > Company Location page
Here you can manage content in the company location section.
Click on Publish.
270. How to manage Project Section in Decorme?
1.How to manage content of Project Section?
From your dashboard, go to the Appearance > Customize > FrontPage Sections > Project Section
Here you can change title, Subtitle & Description (Project Title, Link & image ETC) .
Click on Publish.
271. How to install Kundoo Pro Theme
Via WordPress Dashboard install Kundoo Pro
Go to the menu Appearance > Themes and click on the Add New button.
Click on the Upload Theme button
Click on the Browse button and navigate to the unzipped theme package on your computer.
Look for a file called Kundoo pro.zip Click on it to select, then click OK.
Click on the Install Now button and wait until the installation is complete.
Click on the Activate link to activate the theme on your WordPress site.
272. How to manage Recipes Section?
1. How to manage title & description?
From your dashboard, go to the Appearance > Customize > FrontPage Sections > Recipes Section
Here you can change the title, & Description in the Recipes Section.
Click on Publish.
2. How to manage category, column & no of Recipes Display?
From your dashboard, go to the Appearance > Customize > FrontPage Sections > Recipes Section
Here you can change the Category, Column & No of Recipes Display in the Recipes Section.
Click on Publish.
3. How to manage the right content?
From your dashboard, go to the Appearance > Customize > FrontPage Sections > Recipes Section
Here you can change the Recipes List (right content)in the Recipes Section.
Click on Publish.
273. How to manage Feature Section?
1. How do I hide/Show Feature Section
From your dashboard, go to the Appearance > Customize > FrontPage Sections > Feature Section
Here you can Hide/Show Feature Section
Now Click on Publish.
2. How to manage Title, Subtitle & Description Feature Section
From your dashboard, go to the Appearance > Customize > FrontPage Sections > Feature Section
Here you can manage the title, Subtitle & Description Feature Section
Now Click on Publish.
3. How do I manage the content of the Feature Section
From your dashboard, go to the Appearance > Customize > FrontPage Sections > Feature Section
Here you can manage the content of the Feature Section
Now Click on Publish.
3. Manage the center image of the Feature Section
From your dashboard, go to the Appearance > Customize > FrontPage Sections > Feature Section
Here you can manage the center image of the Feature Section
Now Click on Publish.
274. How to manage Blog Section?
1. How to manage the Content of the Blog section?
From your dashboard, go to the Appearance > Customize > FrontPage Sections > Blog Section
Here you can manage title, Subtitle & Description Like(Select category for Blog Section, Blog Column & No of Posts displayed).
Click on Publish.
275. How to manage About page in Spintech
1.Create a Page & Select Template
From your dashboard, go to the Dashboard > Pages > Add New
Now Create a page & Select the Template.
Click on Publish.
2.Hide/Show About Section
From your dashboard, go to the Appearance > Customize > Page Templates > About Page
Now click on check box for hide/show About section.
Click on Publish.
3.How to change Background Image About Section
From your dashboard, go to the Appearance > Customize > Page Templates > About Page
Here you can change background image in About section.
Click on Publish.
4.How to Edit content in About Section
From your dashboard, go to the Appearance > Customize > Page Templates > About Page
Now click on edit box for manage content.
Click on Publish.
5.Hide/Show CTA Section
From your dashboard, go to the Appearance > Customize > Page Templates > About Page
Now click on check box for hide/show CTA section.
Click on Publish.
6.Hide/Show Step Section
From your dashboard, go to the Appearance > Customize > Page Templates > About Page
Now click on check box for hide/show CTA section.
Click on Publish.
7.How to manage title, Subtitle & Description in Step Section
From your dashboard, go to the Appearance > Customize > Page Templates > About Page
Here you can change title, Subtitle & Description in Step section.
Click on Publish.
8.How to manage content setup in Step Section
From your dashboard, go to the Appearance > Customize > Page Templates > About Page
Here you can manage content in step section.
Click on Publish.
9.Hide/Show Journey Section
From your dashboard, go to the Appearance > Customize > Page Templates > About Page
Now click on check box for hide/show Journey section.
Click on Publish.
10.How to manage title, Subtitle & Description in Journey Section
From your dashboard, go to the Appearance > Customize > Page Templates > About Page
Here you can change title, Subtitle & Description in Journey section.
Click on Publish.
11.How to manage content setup in Journey Section
From your dashboard, go to the Appearance > Customize > Page Templates > About Page
Here you can manage content in journey section.
Click on Publish.
12.How to change & remove Background image in Journey Section
From your dashboard, go to the Appearance > Customize > Page Templates > About Page
Here you can change & remove background image in journey section.
Click on Publish.
13.Hide/Show Team Section
From your dashboard, go to the Appearance > Customize > Page Templates > About Page
Now click on check box for hide/show Team section.
Click on Publish.
14.Hide/Show Testimonial Section
From your dashboard, go to the Appearance > Customize > Page Templates > About Page
Now click on check box for hide/show Testimonial section.
Click on Publish.
15.Hide/Show Funfact Section
From your dashboard, go to the Appearance > Customize > Page Templates > About Page
Now click on check box for hide/show funfact section.
Click on Publish.
16.Hide/Show Skill Section
From your dashboard, go to the Appearance > Customize > Page Templates > About Page
Now click on check box for hide/show skill section.
Click on Publish
.
17.How to manage title, Subtitle & Description in Skill Section
From your dashboard, go to the Appearance > Customize > Page Templates > About Page
Here you can change title, Subtitle & Description in Skill section.
Click on Publish.
18.How to change & remove image in Skill Section
From your dashboard, go to the Appearance > Customize > Page Templates > About Page
Here you can change & remove image in Skill section.
Click on Publish.
19.How to Edit content in Skill Section
From your dashboard, go to the Appearance > Customize > Page Templates > About Page
Now click on edit box for manage content.
Click on Publish.
276. How to manage Service Page in Owlpress Pro?
1. Create a Page & Select Template
From your dashboard, go to the Dashboard > Pages > Add New
Now Create a page & Select the Template.
Click on Publish.
2. How to manage title, subtitle, description
From your dashboard, go to the Appearance > Customize > Page Template > Service Page
Here you can change the title, Subtitle & Description in the Service Page.
Click on Publish.
3. How to manage content
From your dashboard, go to the Appearance > Customize > Page Template > Service Page
Here you can change the content on the Service Page.
Click on Publish.
4. How to manage column setting
From your dashboard, go to the Appearance > Customize > Page Template > Service Page
Here you can manage the column in the Service Page.
Click on Publish.
277. How to manage style configurator in SpaBiz Pro?
1.How to manage website layout & preset background image.
From your dashboard, go to the Appearance > Customize > Style Configurator > Page Layout
Here you can manage the website layout & preset ,Custom background image, background, Custom background color.
Click on Publish.
2.How to manage prebuilt theme color.
From your dashboard, go to the Appearance > Customize > Style Configurator > prebuilt theme color
Here you can manage prebuilt theme color.
Click on Publish.
3.How to manage custom primary & secondary colors.
From your dashboard, go to the Appearance > Customize > Style Configurator > custom color
Here you can manage custom primary & secondary colors.
Click on Publish.
4.How to enable/disable front pallate.
From your dashboard, go to the Appearance > Customize > Style Configurator > Front Pallate
Here you can enable/disable front pallate.
Click on Publish.
278. How to manage colors in Owlpress Pro?
How to manage header text & background color?
From your dashboard , go to the Appearance > Customize > Colors > Background Color
Here You can manage header text & background color.
Click on Publish.
279. How to setup Header image in CoziPress
1. How to setup Header image
From your dashboard , go to the Appearance > Customize > Header image
Here You can setup header image.
If you are change & remove logo then you can use buttons below it.
Click on Publish.
280. Insta Section Manage of Lingerie Home Page!
1.Insta Section Manage!
From your dashboard, go to the Appearance > Customize > Lingerie Home page > Insta Section
Here you can manage the content .
Now Click on Publish.
281. How to setup Background image in Decorme?
1. How to setup Background image
From your dashboard , go to the Appearance > Customize > Background image
Here You can setup background image.
If you are change & remove logo then you can use buttons below it.
Click on Publish.
2. How to setup preset image
From your dashboard , go to the Appearance > Customize > Background image
Here You can setup preset background image.
Click on Publish.
3. How to manage image position & size
From your dashboard , go to the Appearance > Customize > Background image
Here You can manage position & size background image.
Click on Publish.
4. How to manage repeat background image & scroll with page
From your dashboard , go to the Appearance > Customize > Background image
Here You can manage repeat background image & scroll with page background image.
Click on Publish.
282. How to manage Team Section in Owlpress Pro?
1. How to manage title, Subtitle & Description
From your dashboard, go to the Appearance > Customize > FrontPage Sections > Team Section
Here you can change the title, Subtitle & Description in the team section.
Click on Publish.
2. How to manage team content
From your dashboard, go to the Appearance > Customize > FrontPage Sections > Team Section
Here you set up content in the team section.
Click on Publish.
283. How to manage Call to Action Section?
1.How to manage content of CTA Section
From your dashboard, go to the Appearance > Customize > FrontPage Sections > call to action Section
Here you can manage content of CTA Section Like(Phone , Content & Button )
Click on Publish.
284. How to setup Header image in Decorme?
1. How to setup Header image
From your dashboard , go to the Appearance > Customize > Header image
Here You can setup header image.
If you are change & remove logo then you can use buttons below it.
Click on Publish.
285. How to manage Blog Section in Decorme?
1.How to manage Content of Blog section?
From your dashboard, go to the Appearance > Customize > FrontPage Sections > Blog Section
Here you can manage title, Subtitle & Description Like(Select category for Blog Section, Blog Column & No of Posts Display).
Click on Publish.
286. How to manage Blog Section in Seokart Lite?
1. How to manage title, Subtitle & Description
From your dashboard, go to the Appearance > Customize > FrontPage Sections > Blog Section
Here you can change the title, Subtitle & Description in the Blog section.
Click on Publish.
2. How to manage no of posts display in FrontPage
From your dashboard, go to the Appearance > Customize > FrontPage Sections > Blog Section
Here you can manage no of posts display on Blog in FrontPage.
Click on Publish.
287. Collection Section Manage of Lingerie Home Page!
1.Collection Section Content!
From your dashboard, go to the Appearance > Customize > Lingerie Home Page > Slider Section
Here you can manage the title & category.
Now Click on Publish.
288. About Section Manage of Watch Home Page!
1.Left Content in About Section !
From your dashboard, go to the Appearance > Customize > Watch Home Page > About Section
Here you can manage the left content of the About section
Now Click on Publish.
2.Right Content in About Section !
From your dashboard, go to the Appearance > Customize > Watch Home Page > About Section
Here you can manage the Right content of the About section
Now Click on Publish.
289. How to manage Testimonial Section in Astrocare
1. How to manage titles & Subtitles?
From your dashboard, go to the Appearance > Customize > FrontPage Sections > Testimonial Section
Here you can change the title and subtitle in the Testimonial section.
Click on Publish.
2. How to manage Testimonial Content?
From your dashboard, go to the Appearance > Customize > FrontPage Sections > Testimonial Section
Here you set up content in the testimonial section.
Click on Publish.
3. Astrocare Pro allows you to add even more star icons. Pro Features
From your dashboard, go to the Appearance > Customize > FrontPage Sections > Testimonial Section
Here you can add more star icons in the Testimonial section.
Click on Publish.
4. Astrocare Pro allows you to add even more Testimonials. Pro Features
From your dashboard, go to the Appearance > Customize > FrontPage Sections > Testimonial Section
Here you can add more Testimonials to the Testimonial section.
Click on Publish.
290. How to Setup Home Page?
How to Setup Home Page?
Go to Pages > Add New > Create a Page Named Home ( the name could be anything you like). On the Right Side Under the Template, the drop-down Menu is for Choosing the Home Page.
You have to Choose the Template and publish it.
2.How to Assign Home Page as a FrontPage?
From your dashboard, go to the Setting > Reading > Home Page Displays
Click on the radio button of your A Static page
Click on Save Changes.
291. How to manage Info Section in CoziPress
1.Hide/Show Info Section
From your dashboard, go to the Appearance > Customize > FrontPage Sections > Info Section
Now click on check box for hide/show info section
Click on Publish.
2.How to manage content info
From your dashboard, go to the Appearance > Customize > FrontPage Sections > Info Section
Here you can manage content (Like :- Title, Description, Icon, Image) in info section.
Click on Publish.
CoziPress Pro allows you to add even more Info.Pro Features
3.How to manage info column layout Pro Features
From your dashboard, go to the Appearance > Customize > FrontPage Sections > Info Section
Here you can manage info column layout
Click on Publish
292. How to manage style configurator in Kundoo
1.How to manage prebuilt theme color.
From your dashboard, go to the Appearance > Customize > Style Configurator > prebuilt theme color
Here you can manage prebuilt theme color.
Click on Publish.
2.How to enable/disable custom color.
From your dashboard, go to the Appearance > Customize > Style Configurator > custom color
Here you can manage custom colors.
Click on Publish.
3.How to manage custom primary & secondary colors.
From your dashboard, go to the Appearance > Customize > Style Configurator > custom color
Here you can manage custom primary & secondary colors.
Click on Publish.
4.How to enable/disable front pallate.
From your dashboard, go to the Appearance > Customize > Style Configurator > Front Pallate
Here you can enable/disable front pallate.
Click on Publish.
293. How to manage Blog Section in Seokart Pro?
1. How to manage title, Subtitle & Description
From your dashboard, go to the Appearance > Customize > FrontPage Sections > Blog Section
Here you can change the title, Subtitle & Description in the Blog section.
Click on Publish.
2. How to manage no of posts displayed in FrontPage
From your dashboard, go to the Appearance > Customize > FrontPage Sections > Blog Section
Here you can manage no of posts displayed on Blog in FrontPage.
Click on Publish.
3. How to select a category for the blog section
From your dashboard, go to the Appearance > Customize > FrontPage Sections > Blog Section
Here you can select a category for the blog section.
Click on Publish.
4. How to manage blog Column
From your dashboard, go to the Appearance > Customize > FrontPage Sections > Blog Section
Here you can choose a column layout in the blog section.
Click on Publish.
294. How to Activate license in CoziPress pro
How to Activate License key in CoziPress pro
Go to your WordPress website dashboard
Go to Appearance > Theme License
Enter your theme license key into the License Key field
Click Activate
295. How to manage header section in Owlpress Lite?
1. How to change the Site logo
From your dashboard, go to the Appearance > Customize > Header > Site Identity Section
Now Click on the select logo and choose a logo for your site.
If you change & remove the logo then you can use the buttons below it.
Click on Publish.
2. How to customize the width of the Site logo
From your dashboard, go to the Appearance > Customize > Header > Site Identity Section
Now Scroll bar is used for logo width Customize.
Click on Publish.
3. How to manage site title & tagline
From your dashboard, go to the Appearance > Customize > Header > Site Identity Section
Now manage site title & tagline as per your choice.
Click on Publish.
4. How to change the site icon
From your dashboard, go to the Appearance > Customize > Header > Site Identity Section
Now Click on the button & select the Site icon.
You can use a site icon size maximum of 512 x 512px.
Click on Publish.
5. How to manage social icons in the above header
From your dashboard, go to the Appearance > Customize > Header > Header Navigation
Here you can manage social icons as per your choice.
Click on Publish.
6. How to manage the Button in the above header
From your dashboard, go to the Appearance > Customize > Header > header navigation
Here you can manage the button as per your choice.
Click on Publish.
7. How to manage info in the below header
From your dashboard, go to the Appearance > Customize > Header > Below Header
Here you can manage the below header as per your choice.
Click on Publish.
8. Hide/Show Sticky Header
From your dashboard, go to the Appearance > Customize > Header > Sticky Header Section
Now Click on the check box for Hide/Show Sticky header
Click on Publish.
296. Newsletter Section Manage of Lingerie Home Page!
1.Testimonial Section Manage!
From your dashboard, go to the Appearance > Customize > Lingerie Home page > Testimonial Section
Here you can manage the content .
Now Click on Publish.
2.Newsletter Section Manage!
From your dashboard, go to the Appearance > Customize > Lingerie Home page > Newsletter Section
Here you can manage the Video Link, Title, Subtitle & Short code of Form .
Now Click on Publish .
297. How to manage Blog Page in SpaBiz Pro?
1.How to manage Blog Page?
From your dashboard, go to the Appearance > Customize > Page Template > Blog Page
Here you can change title, subtitle, description & Select Category for Blog Page .
Click on Publish.
298. How to manage colors in Appetizer Pro?
1. How to manage Background Color
From your dashboard , go to the Appearance > Customize > Colors > Background Color
Here You can manage background color.
299. Manage Testimonial Section?
1.How to manage Testimonial Section
From your dashboard, go to the Appearance > Customize > FrontPage Sections >Testimonial Section
Here you can manage the title Testimonial Section
Now Click on Publish.
2.How to manage Column Testimonial Section
From your dashboard, go to the Appearance > Customize > FrontPage Sections >Testimonial Section
Here you can manage Column Testimonial Section
Now Click on Publish.
300. How to manage Testimonial Section
1.How do I hide/Show Testimonial Section
From your dashboard, go to the Appearance > Customize > FrontPage Sections > Testimonial Section
Here you can Hide/Show Testimonial Section
Now Click on Publish.
2.How to manage Testimonial Section
From your dashboard, go to the Appearance > Customize > FrontPage Sections >Testimonial Section
Here you can manage the title Testimonial Section
Now Click on Publish.
301. How to manage Feature Section in Appetizer Pro?
1. How to manage Title & Description Feature Section
From your dashboard, go to the Appearance > Customize > FrontPage Sections > Feature Section
Here you can manage the title, Subtitle & Description Feature Section
Now Click on Publish.
2. How do I manage the content of the Feature Section
From your dashboard, go to the Appearance > Customize > FrontPage Sections > Feature Section
Here you can manage the content of the Feature Section
Now Click on Publish.
3. How do I manage the opening hours section in the Feature Section
From your dashboard, go to the Appearance > Customize > FrontPage Sections > Feature Section
Here you can manage the opening hours section in the Feature Section.
Now Click on Publish.
302. How to manage Typography?
1. How to manage Font Size & Line height in Body Typography
From your dashboard , go to the Appearance > Customize > typography > body typography Section
Here You can manage Font Size &; line Height.
Click on Publish.
2.How to manage Font Style & Transform in Body Typography
From your dashboard , go to the Appearance > Customize > typography > body typography Section
Here You can manage Font Style & Transform.
Click on Publish.
3.How to manage Font Size & Line height H1 to H6 in Headings Typography
From your dashboard, go to the Appearance > Customize > typography > Heading Section
Here You can manage Font Size & line Height.
Click on Publish.
4.How to manage Font Style & Transform H1 to H6 in Headings Typography
From your dashboard, go to the Appearance > Customize > typography > Heading Section
Here You can manage Font Style & Transform.
Click on Publish.
303. How to Activate license in Setto Pro?
Go to your WordPress website dashboard
Go to Appearance > Theme License
Enter your theme license key into the License Key field
Click Activate
304. How to Setup Home Page?
Go to Pages > Add New > Create a Page Named Home ( the name could be anything you like). On the Right Side Under the Template, the drop-down Menu is for Choosing the Home Page.
You have to Choose the Template and publish it.
2. How to Assign Home Page as a FrontPage?
From your dashboard, go to the Setting > Reading > Home Page Displays
Click on the radio button of your A Static page
Click on Save Changes.
305. How to manage Funfact Section in Kundoo
1.How to manage title, Subtitle & Description
From your dashboard, go to the Appearance > Customize > FrontPage Sections > Funfact Section
Here you can change title, Subtitle & Description in Testimonial section.
Click on Publish
2.How to manage Funfact Content
From your dashboard, go to the Appearance > Customize > FrontPage Sections > Funfact Section
Here you setup content in Funfact section.
Click on Publish.
3.How to manage Funfact Column Pro Features
From your dashboard, go to the Appearance > Customize > FrontPage Sections > Funfact Section
Here you can choose column layout in Funfact section.
Click on Publish.
306. How to setup Background image in Owlpress Pro?
1. How to the setup Background image
From your dashboard, go to the Appearance > Customize > Background image
Here You can set up a background image.
If you change & remove the logo then you can use the buttons below it.
Click on Publish.
2. How to setup preset image
From your dashboard, go to the Appearance > Customize > Background image
Here You can set up preset background images.
Click on Publish.
3. How to manage image position & size
From your dashboard, go to the Appearance > Customize > Background image
Here You can manage the position & size of the background image.
Click on Publish.
4. How to manage repeat background images & scroll with the page
From your dashboard, go to the Appearance > Customize > Background image
Here You can manage repeat background images & scroll with page background images.
Click on Publish.
307. How to manage Team Page in SpaBiz Pro?
1.Create a Page & Select Template
From your dashboard, go to the Dashboard > Pages > Add New
Now Create a page & Select the Template.
Click on Publish.
2.How to manage Team Page?
From your dashboard, go to the Appearance > Customize > Page Templates > Team Page
Here you can manage Team Section.
Click on Publish.
308. How to manage header section in Astrocare
1. How to manage Site Title & Tagline
From your dashboard, go to the Appearance > Customize > Header > Site Identity Section
Now manage the site title & tagline as per your choice.
Click on Publish.
2. How to change the Site logo
From your dashboard, go to the Appearance > Customize > Header > Site Identity Section
Now Click on Select logo and choose the logo for your site.
If you are change & remove the logo then you can use the buttons below it.
Click on Publish.
3. How to customize the width of the Site logo
From your dashboard, go to the Appearance > Customize > Header > Site Identity Section
Now Scroll bar is used for logo width Customize.
Click on Publish.
4. How to display Site Title & Tagline
From your dashboard, go to the Appearance > Customize > Header > Site Identity Section
Now Click on The Check box for Hide/Show Site title & tagline.
Click on Publish.
5. How to change the site icon
From your dashboard, go to the Appearance > Customize > Header > Site Identity Section.
Now Click on the button & select the Site icon.
You can use a site icon size maximum of 512 x 512px.
Click on Publish.
6. How to Customize the Site Title & description font size
From your dashboard, go to the Appearance > Customize > Header > Site Identity Section
Here you can customize the Site title & description.
Click on Publish.
7. Hide/Show Opening Hours and Email Section
From your dashboard, go to the Appearance > Customize > Header > Above header Section
Check the Box on the Hide/Show above the Header option to reveal the header top bar options.
Click on Publish.
8. How to manage title & content in the Opening Hours Section
From your dashboard, go to the Appearance > Customize > Header > Above header Section
Here you can change the title & content as per your choice.
Click on Publish.
9. How to manage icons & text in the Email section
From your dashboard, go to the Appearance > Customize > Header > Above header Section
You can now choose an icon from the icon library and manage the text in the contact info section.
Click on Publish.
10. How to Manage Button Label
From your dashboard, go to the Appearance > Customize > Header > Above header Section
Now you can manage Button Label.
Click on Publish.
11. Hide/Show Sticky Header
From your dashboard, go to the Appearance > Customize > Header > Sticky Header Section
Now Click on the check box for Hide/Show Sticky header
Click on Publish.
309. How to manage colors in CoziPress
1. How to manage Header Text Color Pro Features
From your dashboard , go to the Appearance > Customize > Colors > Header Text Color
Here You can manage header text color.
Click on Publish.
2. How to manage Background Color
From your dashboard , go to the Appearance > Customize > Colors > Background Color
Here You can manage background color.
Click on Publish.
310. How to manage Typography?
1.Font Size & Line height in Body Typography !
From your dashboard , go to the Appearance > Customize > typography > body typography Section
Here You can manage Font Size &; line Height.
Click on Publish.
2. Manage letter spacing in Body Typography!
From your dashboard , go to the Appearance > Customize > typography > body typography Section
Here You can manage letter spacing.
Click on Publish.
3.Font weight & Font in Body Typography!
From your dashboard , go to the Appearance > Customize > typography > body typography Section
Here You can manage weight & Font.
Click on Publish.
3. Manage Font Transform & Decoration in Body Typography!
From your dashboard , go to the Appearance > Customize > typography > body typography Section
Here You can manage Transform & Decoration.
Click on Publish.
5.Manage Font Size & Line height H1 to H6 in Headings Typography!
From your dashboard, go to the Appearance > Customize > typography > Heading Section
Here You can manage Font Size & line Height.
Click on Publish.
6.Manage letter spacing in Heading Typography!
From your dashboard , go to the Appearance > Customize > typography > body typography Section
Here You can manage letter spacing.
Click on Publish.
7. Manage Font Style & Transform H1 to H6 in Headings Typography
From your dashboard , go to the Appearance > Customize > typography > Heading Section
Here You can manage Font Style & Transform.
Click on Publish.
311. How to manage Funfact Section in Decorme?
1.How to manage Content of Funfact section
From your dashboard, go to the Appearance > Customize > FrontPage Sections > Funfact Section
Here you can manage content in Funfact section.
Click on Publish.
312. Required image size for all section in StoreBiz Pro.
313. How to manage General Section in StoreBiz Lite?
1.Hide/Show Breadcrumb Section
From your dashboard, go to the Appearance > Customize > General > Breadcrumb Section
Now Click on the check box for Hide/Show Breadcrumb Section.
Click on Publish.
2.How to Remove & Change Image in Breadcrumb Section
From your dashboard, go to the Appearance > Customize > General > Breadcrumb Section
Here you can Remove & Change images in Breadcrumb Section.
Click on Publish.
3.How to Manage Min Height
From your dashboard, go to the Appearance > Customize > General > Breadcrumb Section
Here you can manage min-height in Breadcrumb Section.
Click on Publish.
4.How to manage Background Attachment image
From your dashboard, go to the Appearance > Customize > General > Breadcrumb Section
Here you can set the breadcrumb image according to you.
Click on Publish.
5.How to manage the opacity of Breadcrumb
From your dashboard, go to the Appearance > Customize > General > Breadcrumb Section
Here you can manage opacity & Color Overlay
Click on Publish.
314. How to manage footer section?
1.How to manage footer background image-related setting in the footer.
From your dashboard, go to the Appearance > Customize > Footer > Footer Background
Here you can change the footer background image-related setting.
Click on Publish.
2.How to manage the Copyright footer bottom in the footer.
From your dashboard, go to the Appearance > Customize > Footer > Footer Background
Here you can change the Copyright Text.
Click on Publish.
315. Manage Gallery Section?
1.How to manage Gallery Section
From your dashboard, go to the Appearance > Customize > FrontPage Sections >Gallery Section
Here you can manage gallery Section
Now Click on Publish.
2.How to manage column Gallery Section
From your dashboard, go to the Appearance > Customize > FrontPage Sections >Gallery Section
Here you can manage column in gallery Section
Now Click on Publish.
316. How to manage Slider Section in Appetizer Pro?
1. How to manage Title, Subtitle & Description?
From your dashboard, go to the Appearance > Customize > FrontPage Sections > Slider Section
Here you can manage the content of the slider section
Now Click on Publish.
2. How to manage Button label & Price in the slider?
From your dashboard, go to the Appearance > Customize > FrontPage Sections > Slider Section
Here you can manage button label 1 & button label second Link.
Click on Publish.
3. How to change slider image & Alignment
From your dashboard, go to the Appearance > Customize > FrontPage ;Sections > Slider Section
Here you can change the slider image & set Alignment
4. How to manage Opacity, Animation effects & slider speed
From your dashboard, go to the Appearance > Customize > FrontPage Sections > Slider Section
Here you can manage opacity color, Animation effects & slider speed
Click on Publish.
317. How to manage kundli Matching page in Astrocare
1. Create a Page & Select Template
From your dashboard, go to the Dashboard > Pages > Add New
Now Create a page & Select the Template.
Click on Publish.
2. How to manage titles, descriptions & Images?
From your dashboard, go to the Appearance > Customize > Page Templates > Kundli Matching Page
Now you can manage the title, description & image.
Click on Publish.
3. How do you manage other sections?
From your dashboard, go to the Appearance > Customize > Page Template > Kundli Matching Page
Here you can hide/show other sections.
Click on Publish.
318. Product Section Manage of Lifestyle Home Page!
1.Product Section Manage!
From your dashboard, go to the Appearance > Customize > Lifestyle Home page > Product Section
Here you can manage the Title & Select category of the Product .
Now Click on Publish
2. Create a products!
From your dashboard, go to the Product > Add New>
Here you can add new products.
319. How to manage Blog Section in Appetizer Pro?
1. How to manage title & description
From your dashboard, go to the Appearance > Customize > FrontPage Sections > Blog Section
Here you can change the title & description in the Blog section.
Click on Publish.
2. How to manage no of posts displayed in FrontPage
From your dashboard, go to the Appearance > Customize > FrontPage Sections > Blog Section
Here you can manage no of posts displayed on Blog in FrontPage.
Click on Publish.
3. How to select a category for the blog section
From your dashboard, go to the Appearance > Customize > FrontPage Sections > Blog Section
Here you can select a category for the blog section.
Click on Publish.
4. How to manage blog Column
From your dashboard, go to the Appearance > Customize > FrontPage Sections > Blog Section
Here you can choose a column layout in the blog section.
Click on Publish.
320. How to manage footer section in Owlpress Lite?
1. How to manage footer background image related setting in the footer
From your dashboard, go to the Appearance > Customize > Footer > Footer Background
Here you can change the footer background image-related setting.
Click on Publish.
2. How to manage content in Footer Above Section
From your dashboard, go to the Appearance > Customize > Footer > Footer Above
Here you can manage content in Footer Above Section.
Click on Publish.
3. How to manage copyright & Support section footer bottom.
From your dashboard, go to the Appearance > Customize >; Footer > Footer Background
Here you can change the copyright & Support section.
Click on Publish.
4. How to manage payment icon section footer bottom.
From your dashboard, go to the Appearance > Customize > Footer > Footer Background
Here you can change the payment icons section.
Click on Publish.
321. How to manage Return Policy page in Setto Pro?
1.Create a Return Policy & Select Template
From your dashboard, go to the Dashboard > Pages > Add New
Now Create a page & Select the Template.
Click on Publish.
2.Manage Return Policy Page!
From your dashboard, go to the Dashboard > Page template >Return Policy Page.
Here you can manage Return Policy Page in About Page.
Click on Publish.
322. How to setup Background image in Seokart Pro?
1. How to the setup Background image
From your dashboard, go to the Appearance > Customize > Background image
Here You can set up a background image.
If you change & remove logo then you can use buttons below it.
Click on Publish.
2. How to setup preset image
From your dashboard , go to the Appearance > Customize > Background image
Here You can setup preset background image.
Click on Publish.
3. How to manage image position & size
From your dashboard , go to the Appearance > Customize > Background image
Here You can manage position & size background image.
Click on Publish.
4. How to manage repeat background image & scroll with page
From your dashboard , go to the Appearance > Customize > Background image
Here You can manage repeat background image & scroll with page background image.
Click on Publish.
323. Slider Category Manage of Lingerie Home Page!
1.Slider Category content!
From your dashboard, go to the Appearance > Customize > Lingerie Home Page > Slider Section
Here you can manage the content of the slider section
Now Click on Publish.
324. How to manage team section in Seokart?
1. How do I hide/Show Team Section
From your dashboard, go to the Appearance > Customize > FrontPage Sections > Team Section
Here you can Hide/Show Team Section
Now Click on Publish.
2. How to manage Title, Subtitle & Description
From your dashboard, go to the Appearance > Customize > FrontPage Sections > Team Section
Here you can manage the title, subtitle & description of the Team section
Now Click on Publish.
3. How do I manage the content of the Team Section
From your dashboard, go to the Appearance > Customize > FrontPage Sections > Team Section
Here you can manage the content of the Team Section
Now Click on Publish.
4. Manage the Background image of the team Section
From your dashboard, go to the Appearance > Customize > FrontPage Sections > Team Section
Here you can manage the Background image of the Team Section
Now Click on Publish.
325. How to manage Company Leadership Page
1.Create a Page & Select Template
From your dashboard, go to the Dashboard > Pages > Add New
Now Create a page & Select the Template.
Click on Publish.
2.Hide/Show Team Section in Company Leadership Page
From your dashboard, go to the Appearance > Customize > Page Templates > Company About Page
Now click on the check box for the hide/show Team section.
Click on Publish.
326. How to manage colors in SpaBiz Pro?
1. How to manage Color?
From your dashboard , go to the Appearance > Customize > Colors > Color
Here You can manage background color.
Click on Publish.
327. How to install Appetizer Pro Theme
Via WordPress Dashboard install Appetizer Pro
Go to the menu Appearance > Themes and click on the Add New button.
Click on the Upload Theme button.
Click on the Browse button and navigate to the unzipped theme package on your computer.
Look for a file called Appetizer pro.zip Click on it to select, then click OK.
Click on the Install Now button and wait until the installation is complete.
Click on the Activate link to activate the theme on your WordPress site.
328. How to manage background image?
In WordPress Dashboard go to the Appearance submenu and click on Customize.
After clicking on customizing you will in theme Customizer.
Here you have to click on the Home Page Section.
In-background Image Here you can manage the image.
Go to Customize ->Home Page Section-> Background Image Section
329. How to manage 404 Page in Astrocare
1. How do you manage content on a 404 page?
From your dashboard, go to the Appearance > Customize > Page Templates > 404 page
You can change the title, Subtitle, Subtite2 & Button Label on the 404 page.
Click on Publish.
2. How do you change Error Style on a 404 page?
From your dashboard, go to the Appearance > Customize > Page Templates > 404 page
You can change theError Styleon the 404 page.
Click on Publish.
3. How do you Change & Remove Images on a 404 page?
From your dashboard, go to the Appearance > Customize > Page Templates > 404 page
You can change & remove theImageon the 404 page.
Click on Publish.
330. How to manage Gallery Section in CoziPress
1.How to manage title, Subtitle & Description Pro Features
From your dashboard, go to the Appearance > Customize > FrontPage Sections > Gallery Section
Here you can change title, Subtitle & Description in Gallery section.
Click on Publish.
2.How to manage Gallery Content Pro Features
From your dashboard, go to the Appearance > Customize > FrontPage Sections > Gallery Section
Here you setup content in gallery section.
Click on Publish.
3.How to manage Gallery Column Pro Features
From your dashboard, go to the Appearance > Customize > FrontPage Sections > Gallery Section
Here you can choose column layout in gallery section.
Click on Publish.
331. How to manage header section in Appetizer Pro?
1. How to change the Site logo
From your dashboard, go to the Appearance > Customize > Header > Site Identity Section
Now Click on the select logo and choose a logo for your site.
If you change & remove the logo then you can use the buttons below it.
Click on Publish.
2. How to customize the width of the Site logo
From your dashboard, go to the Appearance > Customize > Header > Site Identity Section
Now Scroll bar is used for logo width Customize.
Click on Publish.
3. How to manage Site Title & Tagline
From your dashboard, go to the Appearance > Customize > Header > Site Identity Section
Now manage site title & tagline as per your choice.
Click on Publish.
4. How to change the site icon
From your dashboard, go to the Appearance > Customize > Header > Site Identity Section
Now Click on button & select Site icon . ;
You can use site icon size maximum 512 x 512px.
Click on Publish.
5. How to Customize Site title & description font size
From your dashboard, go to the Appearance > Customize > Header > Site Identity Section
Here you can customize the Site title & description.
Click on Publish.
6. How to select a header type
From your dashboard, go to the Appearance > Customize > Header > Header Style Section
Here you can customize the Site title & description.
Click on Publish.
7. How to manage opening hours & phone in the above header
From your dashboard, go to the Appearance > Customize > Header > Above header Section
Here you can manage phone & opening hours.
Click on Publish.
8. How to manage social icons in the above header
From your dashboard, go to the Appearance > Customize > Header > Above header Section
Here you can manage social icons as per your choice.
Click on Publish.
9. Hide/Show Cart & Search icon in Header Navigation
From your dashboard, go to the Appearance > Customize > Header > Header Navigation Section
Now Click on the check box for Hide/Show Cart icon.
Click on Publish.
10. Manage Button in Header Navigation
From your dashboard, go to the Appearance > Customize > Header > Header Navigation Section
Now you can manage button.
Click on Publish.
11. Hide/Show Sticky Header
From your dashboard, go to the Appearance > Customize > Header > Sticky Header Section
Now Click on the check box for Hide/Show Sticky header
Click on Publish.
332. How to manage Typography in Astrocare
1. How to manage all body Typography in Astrocare
From your dashboard, go to the Appearance > Customize > Typography> Body Typography Section
Here You can manage Typography (Like:- Font Family, Font Size, line Height, letter spacing, weight, Font Style, Transform, and text decoration)
Click on Publish.
2. How to manage all H1 to H6 in Headings Typography?
From your dashboard, go to the Appearance > Customize > Typography > Heading Section
Here You can manage Typography (Like:- Font Family, Font Size, line Height, letter spacing, weight, Font Style, Transform, and text decoration)
Click on Publish.
333. How to manage the General Section
1. Hide/Show Breadcrumb Section
From your dashboard, go to the Appearance > Customize > General > Breadcrumb Section.
Now Click on the check box for Hide/Show Breadcrumb Section.
Click on Publish.
2.Hide/Show Enable Page Title & Page Path on Breadcrumb
From your dashboard, go to the Appearance > Customize > General > Breadcrumb Section
Now Click on the check box for Hide/Show Enable Page Title & Page Path on Breadcrumb.
Click on Publish.
3. How to Manage Min Height
From your dashboard, go to the Appearance > Customize > General > Breadcrumb Section
Here you can manage the minimum height in the Breadcrumb Section.
Click on Publish.
4. How to Remove & Change BG Image & Breadcrumbs Heading Image in Breadcrumb Section
From your dashboard, go to the Appearance > Customize > General > Breadcrumb Section
Here you can Remove & Change the image in the Breadcrumb Section.
Click on Publish.
5. Hide/Show Preloader
From your dashboard, go to the Appearance > Customize > General > Preloader Section
Here you can Hide/Show Preloader in Astrocare Pro
Click on Publish.
6. How to Hide/Show & change the Top Scroller Icon
From your dashboard, go to the Appearance > Customize > General > Top Scroller Section
Here you can Hide/Show & Change Top Scroller in Astrocare Pro.
Click on Publish.
7. How to Remove & Change Image in Title Image Section
From your dashboard, go to the Appearance > Customize > General > Title Image Section
Here you can Remove & Change the image in the Title Image Section.
Click on Publish
334. How to manage Slider Section in Seokart Pro?
1. How to manage Title, Subtitle & Description
From your dashboard, go to the Appearance > Customize > FrontPage Sections > Slider Section
Here you can manage the content of the slider section
Now Click on Publish.
2. How to manage Button label in slider
From your dashboard, go to the Appearance > Customize > FrontPage Sections > Slider Section
Here you can manage button label 1 & button label second Link.
Click on Publish.
3. How to change slider image, icon & Alignment
From your dashboard, go to the Appearance > Customize > FrontPage Sections > Slider Section
Here you can change the slider image & set Alignment
Click on Publish.
4. How to manage background color, Animation effects & slider speed
From your dashboard, go to the Appearance > Customize >; FrontPage Sections > Slider Section
Here you can manage background color, Animation effects & slider speed
Click on Publish.
335. How to manage Team Section in SpaBiz Pro?
1.How to manage title, Subtitle & Description?
From your dashboard, go to the Appearance > Customize > FrontPage Sections > Team Section
Here you can change title, Subtitle & Description in team section.
Click on Publish.
2.How to manage team content?
From your dashboard, go to the Appearance > Customize > FrontPage Sections > Team Section
Here you setup content in team section.
Click on Publish.
336. Additional CSS in Kundoo
1.How to add Additional CSS
From your dashboard , go to the Appearence > Additional CSS >
Here you can to paste your Additional Css
Click on Publish.
337. How to manage sponsor Section?
1.How to manage sponsor Section
From your dashboard, go to the Appearance > Customize > FrontPage Sections >Sponsor Section
Here you can manage sponsor Section
Now Click on Publish.
2.How to manage column sponsor Section
From your dashboard, go to the Appearance > Customize > FrontPage Sections >Sponsor Section
Here you can manage the column in sponsor Section
Now Click on Publish.
338. How to manage work flow section in Seokart Pro?
1. How to manage title, Subtitle & Description
From your dashboard, go to the Appearance > Customize > FrontPage Sections > Work Flow Section
Here you can manage the title, Subtitle & Description section.
Click on Publish.
2. How to manage Content
From your dashboard, go to the Appearance > Customize > FrontPage Sections > Work Flow Section
Here you can manage content in the Work Flow Section.
Click on Publish.
339. How to manage Design Section in Kundoo
1.How to manage title, Subtitle & Description
From your dashboard, go to the Appearance > Customize > FrontPage Sections > Design Section
Here you can change title, Subtitle & Description in Design section.
Click on Publish.
2.How to manage Left content Design Section
From your dashboard, go to the Appearance > Customize > FrontPage Sections > Design Section
Here you can change title, icon, image 1& 2 in Design section.
Click on Publish.
3.How to manage Right content Design Section
From your dashboard, go to the Appearance > Customize > FrontPage Sections > Design Section
Here you can manage content in Design section.
Click on Publish.
4.How to manage Right contact Info & Button Design Section
From your dashboard, go to the Appearance > Customize > FrontPage Sections > Design Section
Here you can manage contact info & Button in Design section.
Click on Publish.
340. How to manage colors in Owlpress Lite?
How to manage header text & background color?
From your dashboard , go to the Appearance > Customize > Colors > Background Color
Here You can manage header text & background color.
Click on Publish.
341. How to manage Contact Page in Appetizer?
1. Create a Page & Select Template
From your dashboard, go to the Dashboard > Pages > Add New
Now Create a page & Select the Template.
Click on Publish.
2. How to manage contact details.
From your dashboard, go to the Appearance > Customize > Page Templates > Contact Page
Here you can manage contact details.
Click on Publish.
3. How to manage contact banners.
From your dashboard, go to the Appearance > Customize > Page Templates > Contact Page
Here you can manage contact banners.
Click on Publish.
4. How to manage contact form.
From your dashboard, go to the Appearance > Customize > Page Templates > Contact Page
Here you can manage the contact form.
Click on Publish.
342. How to manage Working Section in Kundoo
1.How to manage title, Subtitle & Description
From your dashboard, go to the Appearance > Customize > FrontPage Sections > Working Section
Here you can change title, Subtitle & Description in Working section.
Click on Publish.
2.How to manage Working Content
From your dashboard, go to the Appearance > Customize > FrontPage Sections > Working Section
Here you setup content in working section.
Click on Publish.
3.How to manage Working Column
From your dashboard, go to the Appearance > Customize > FrontPage Sections > Working Section
Here you can choose column layout in Working section.
Click on Publish.
343. How to manage Reservation Section in Appetizer Pro?
1. How to manage Title & Description
From your dashboard, go to the Appearance > Customize > FrontPage Sections > Reservation Section
Here you can manage the title & Description Reservation Section.
Now Click on Publish.
2. How to use contact form 7 shortcode
From your dashboard, go to the Appearance > Customize > FrontPage Sections > Reservation Section
Here you can manage the contact form 7 shortcode Reservation Section.
Now Click on Publish.
3. How to use manage background image related setting
From your dashboard, go to the Appearance > Customize > FrontPage Sections > Reservation Section
Here you can manage the background image-related setting Reservation Section.
Now Click on Publish.
344. How to manage Typography in Decorme?
1. How to manage Font Size & Line height in Body Typography
From your dashboard , go to the Appearance > Customize > typography > body typography Section
Here You can manage Font Size &; line Height.
Click on Publish.
2. How to manage letter spacing in Body Typography
From your dashboard , go to the Appearance > Customize > typography > body typography Section
Here You can manage letter spacing.
Click on Publish.
3. How to manage Font Style & Transform in Body Typography
From your dashboard , go to the Appearance > Customize > typography > body typography Section
Here You can manage Font Style & Transform.
Click on Publish.
4. How to manage weight & text decoration in Body Typography Pro Features
From your dashboard , go to the Appearance > Customize > typography > body typography Section
Here You can manage weight & text decoration.
Click on Publish.
5. How to manage Font Size & Line height H1 to H6 in Headings Typography
From your dashboard, go to the Appearance > Customize > typography > Heading Section
Here You can manage Font Size & line Height.
Click on Publish.
6. How to manage letter spacing in Heading Typography
From your dashboard , go to the Appearance > Customize > typography > body typography Section
Here You can manage letter spacing.
Click on Publish.
7. How to manage Font Style & Transform H1 to H6 in Headings Typography
From your dashboard , go to the Appearance > Customize > typography > Heading ;Section
Here You can manage Font Style & Transform.
Click on Publish.
8. How to manage weight & text decoration in Heading Typography
From your dashboard , go to the Appearance > Customize > typography > body typography Section
Here You can manage weight & text decoration.
Click on Publish.
345. How to manage Special Menu Section in Appetizer Pro?
1. How to manage title & description?
From your dashboard, go to the Appearance > Customize > FrontPage Sections > Special Menu Section
Here you can change the title, & Description in the Special Menu section.
Click on Publish.
2. How to manage Menu Column & No of Menu Display?
From your dashboard, go to the Appearance > Customize > FrontPage Sections > Special Menu Section
Here you can change the title, & Description in the Special Menu section.
Click on Publish.
3. How to manage background image-related settings?
From your dashboard, go to the Appearance > Customize > FrontPage Sections > Special Menu Section
Here you can change the background image-related setting in the Special Menu section.
Click on Publish.
346. Collection Section Manage of Goggles Home Page!
1.Collection Section Content!
From your dashboard, go to the Appearance > Customize > Goggles Home Page > Slider Section
Here you can manage the title & category.
Now Click on Publish.
347. How to manage 404 Page in Appetizer?
1. How to manage Content in 404 Page
From your dashboard, go to the Appearance > Customize > Page Templates > 404 page
Here you can change the title, Subtitle, SUbtitle2, SUbtitle3 & button label in the 404 page.
Click on Publish.
348. Install & Activate Burger Companion Plugin?
In the WordPress dashboard go to the appearance submenu and click on customize. After clicking on customizing you will in theme customizer. Here you have to show in the recommended plugin then click on the install & activate Button.
349. Required image size all section Kundoo
1. Slider Section :- 1920*960 pixels
2. Service Section :- 285*450, 508*409 pixels
3. CTA Section :- 1920*1040 pixels
4. Testimonial Section :- 130*130 pixels
5. Sponsors Section :- 1920*1050 pixels
6. Design Section :- 680*469, 732*525 pixels
7. Blog Section :- 829*1288 pixels
8. Gallery Section :- 480*570 pixels
9. Team Section :- 350*400 pixels
10.Breadcrumb Section :- 1920*847 pixels
350. How to manage Testimonial Section in Kundoo
1.How to manage title, Subtitle & Description
From your dashboard, go to the Appearance > Customize > FrontPage Sections > Testimonial Section
Here you can change title, Subtitle & Description in Testimonial section.
Click on Publish.
2.How to manage content Testimonial Section
From your dashboard, go to the Appearance > Customize > FrontPage Sections > Testimonial Section
Here you can manage content in Testimonial section.
Click on Publish.
351. How to manage Portfolio Section in Owlpress Pro?
1. How to manage title, Subtitle & Description
From your dashboard, go to the Appearance > Customize > FrontPage Sections > Portfolio Section
Here you can change the title, Subtitle & Description in the portfolio section.
Click on Publish.
2. How to manage No of Portfolio Display & Portfolio Column
From your dashboard, go to the Appearance > Customize > FrontPage Sections > project Section
Here you can manage the No of Portfolio Display & portfolio Column in the portfolio section.
Click on Publish.
352. How to add Additional CSS?
1. How to add Additional CSS
From your dashboard, go to the Appearance > Additional CSS
Here you can paste your Additional CSS
Click on Publish.
353. How to manage Free Calculators Section in Astrocare Pro
1. How can we manage the title & column layout?
From your dashboard, go to the Appearance > Customize > FrontPage Sections > Calculators Section
Here you can change the title in the Calculators section.
Here you can manage Column Layout in the Calculators section
Click on Publish.
2. How can we manage content in the Calculators section?
From your dashboard, go to the Appearance > Customize > FrontPage Sections > Calculators Section
Here you can change the content in the Calculators section.
Click on Publish.
3. Astrocare Pro allows you to add even more Calculators.Pro Features
From your dashboard, go to the Appearance > Customize > FrontPage Sections > Calculators Section
Here you can add more calculators in the Calculators section.
Click on Publish.
354. How to install Setto Lite?
Go to the menu Appearance > Themes and click on the Add New button.
Click on the Upload Theme button.
Click on the Browse button and navigate to the unzipped theme package on your computer.
Look for a file called Setto.zip Click on it to select, then click OK.
Click on the Install Now button and wait until the installation is complete.
Click on the Activate link to activate the theme on your WordPress site.
355. How to manage Service Page in Kundoo
1.Create a Page & Select Template
From your dashboard, go to the Dashboard > Pages > Add New
Now Create a page & Select the Template.
Click on Publish.
2.How to manage title, Subtitle & Description.
From your dashboard, go to the Appearance > Customize > Page Templates > Service Page
Here you can change the title, Subtitle & Description in Service Page.
Click on Publish.
3.How to manage Content in Service Page.
From your dashboard, go to the Appearance > Customize > Page Templates > Service Page
Here you can change the Content in Service Page.
4.How to manage Button Label & Column.
From your dashboard, go to the Appearance > Customize > Page Templates > Service Page
Here you can button label & choose column layout in Service Page.
Click on Publish.
356. Home Page Setup in Appetizer Pro?
1.How to Setup Home Page?
Go to Pages > Add New > Create a Page Named Home ( the name could be anything you like). On the Right Side Under the Template, the drop-down Menu is for Choosing the Home Page.
You have to Choose the Template and publish it.
2. How to Assign Home Page as a FrontPage?
From your dashboard, go to the Setting > Reading > Home Page Displays
Click on the radio button of your A Static page
Click on Save Changes.
357. How to manage Portfolio Page in Owlpress Pro?
1. How to manage Portfolio Page?
From your dashboard, go to the Appearance > Customize > Page Templates > Portfolio Page
Here you can manage here button label, column setting & Title.
Click on Publish.
358. How to manage Featuer Section in Kundoo
1.How to manage title, Subtitle & Description
From your dashboard, go to the Appearance > Customize > FrontPage Sections > Featuer Section
Here you can change title, Subtitle & Description in Featuer section.
Click on Publish.
2.How to manage content Featuer Section
From your dashboard, go to the Appearance > Customize > FrontPage Sections > Featuer Section
Here you can manage content in Featuer section.
Click on Publish.
3.How to manage Our Featuers Heading
From your dashboard, go to the Appearance > Customize > FrontPage Sections > Featuer Section
Here you can change our Featuers Heading in Featuer section.
Click on Publish.
359. How to manage style configurator in Appetizer Pro?
1. How to manage website layout & preset background image.
From your dashboard, go to the Appearance > Customize > Style Configurator > Page Layout
Here you can manage the website layout & preset background image.
Click on Publish.
2. How to manage prebuilt theme color.
From your dashboard, go to the Appearance > Customize > Style Configurator > prebuilt theme color
Here you can manage prebuilt theme color.
Click on Publish.
3. How to enable/disable custom color.
From your dashboard, go to the Appearance > Customize > Style Configurator > custom color
Here you can manage custom colors.
Click on Publish.
4. How to manage custom primary & secondary colors.
From your dashboard, go to the Appearance > Customize > Style Configurator > custom color
Here you can manage custom primary & secondary colors.
Click on Publish.
5. How to enable/disable front pallate.
From your dashboard, go to the Appearance > Customize > Style Configurator > Front Pallate
Here you can enable/disable front pallate.
Click on Publish.
360. How to manage CTA 2 Section in Kundoo
1.How to manage title, Subtitle & Description
From your dashboard, go to the Appearance > Customize > FrontPage Sections > CTA 2 Section
Here you can change title, Subtitle & Description in CTA 2 section.
Click on Publish.
2.How to manage Button 1 & 2 CTA 2 Section
From your dashboard, go to the Appearance > Customize > FrontPage Sections > CTA 2 Section
Here you can change Button 1& 2 in CTA 2 section.
Click on Publish.
3.How to manage Background in CTA 2 Section
From your dashboard, go to the Appearance > Customize > FrontPage Sections > CTA 2 Section
Here you can manage background in CTA 2 section.
Click on Publish.
361. How to install Hotel Galaxy Pro Theme
Via WordPress Dashboard install Hotel Galaxy Pro
Go to the Appearance > Themes menu and click on the Add New button.
Click on the Upload Theme button
Click on the Browse button and navigate to the unzipped theme package on your computer.
Look for a file called Hotel Galaxy pro.zip Click on it to select, then click OK.
Click on the Install Now button and wait until the installation is complete.
Click on the Activate link to activate the theme on your WordPress site.
362. How to manage colors in Astrocare
1. How to manage Background Color
From your dashboard, go to the Appearance > Customize > Colors > Background Color
Here You can manage background color.
Click on Publish.
363. How to manage Company FAQ Page in Spintech
1.Create a Page & Select Template
From your dashboard, go to the Dashboard > Pages > Add New
Now Create a page & Select the Template.
Click on Publish.
2.Hide/Show Company FAQ in company FAQ page
From your dashboard, go to the Appearance > Customize > Page Templates > Company FAQ Page
Now click on the check box for hide/show company FAQ page.
Click on Publish.
364. How to manage footer section?
1. How to manage footer background image-related settings in the footer?
From your dashboard, go to the Appearance > Customize > Footer > Footer Above
Here you can change the footer background image-related setting.
Click on Publish.
2. How to manage the Copyright Section in the footer?
From your dashboard, go to the Appearance > Customize > Footer > Footer Above
Here you can manage the copyright & Payment icon.
Click on Publish.
365. How to manage Kundli Matching Section in Astrocare
1. How can we manage the title & subtitle?
From your dashboard, go to the Appearance > Customize > FrontPage Sections > Kundli matching section
Here you can change the title & subtitle in the Kundli matching section.
Click on Publish.
366. Deal Section Manage of Electronics Home Page!
1.Deal Section Manage!
From your dashboard, go to the Appearance > Customize > Electronics Home Page Sections > Deal Section
Here you can manage the Title, Subtitle & Select category of the Product .
Now Click on Publish
367. How to manage Funfact Section in SpaBiz Pro?
1.How to manage Content of Funfact section
From your dashboard, go to the Appearance > Customize > FrontPage Sections > Funfact Section
Here you can manage Title, Subtitle, Description, Button Label, Button Link in Funfact section.
Click on Publish.
Here you can manage content in Funfact section.
Click on Publish.
Here you can manage Background Image, Opacity, Overlay Color in Funfact section.
Click on Publish.
368. How to manage section Reorder in Spintech
1.How to manage section reorder.
From your dashboard, go to the Appearance > Customize > Section Reorder
Here you can manage section reorder.
Click on Publish.
369. How to manage Sponsor Section in Owlpress Pro?
1. How to manage title, Subtitle & Description
From your dashboard, go to the Appearance > Customize > FrontPage Sections > Sponsor Section
Here you can change the title, Subtitle & Description in the Sponsor section.
Click on Publish.
2. How to manage Sponsor Content
From your dashboard, go to the Appearance > Customize > FrontPage Sections > Sponsor Section
Here you set up content in the sponsor section.
Click on Publish.
3. How to manage Sponsor Column, Button Label & Sponsor Type
From your dashboard, go to the Appearance > Customize > FrontPage Sections > Sponsor Section
Here you can choose Sponsor Column, Button Label & Sponsor Type in the Sponsor section.
Click on Publish.
4. Background image related setting
From your dashboard, go to the Appearance > Customize > General > Breadcrumb Section
Now you can manage background image & opacity in Breadcrumb.
Click on Publish.
370. How to manage Feature Section in Owlpress Lite?
1. How do I hide/show Feature Section
From your dashboard, go to the Appearance > Customize > FrontPage Sections > Feature Section
Here you can Hide/Show Feature Section
Now Click on Publish.
2. How to manage title, subtitle & description Feature Section
From your dashboard, go to the Appearance > Customize > FrontPage Sections > Feature Section
Here you can manage the title, Subtitle & Description Feature Section
Now Click on Publish.
3. How do I manage the content of the Feature Section
From your dashboard, go to the Appearance > Customize > FrontPage Sections > Feature Section
Here you can manage the content of the Feature Section
Now Click on Publish.
4. Background image related setting
From your dashboard, go to the Appearance > Customize > FrontPage Sections > Feature Section
Here you can manage the image change & Background Attachment of the Feature Section
Now Click on Publish.
371. How to manage 404 page in Setto Pro?
1.Manage 404 page content!
From your dashboard, go to the Dashboard > Appearance > Page template > 404 Page.
Here you can manage content of 404 page .
Click on Publish.
372. How to manage Typography in Spintech
1. How to manage Font Size & Line height in Body Typography
From your dashboard , go to the Appearance > Customize > typography > body typography Section
Here You can manage Font Size &; line Height.
Click on Publish.
2. How to manage letter spacing in Body Typography Pro Features
From your dashboard , go to the Appearance > Customize > typography > body typography Section
Here You can manage letter spacing.
Click on Publish.
3. How to manage Font Style & Transform in Body Typography
From your dashboard , go to the Appearance > Customize > typography > body typography Section
Here You can manage Font Style & Transform.
Click on Publish.
4. How to manage weight & text decoration in Body Typography Pro Features
From your dashboard , go to the Appearance > Customize > typography > body typography Section
Here You can manage weight & text decoration.
Click on Publish.
5.How to manage Font Size & Line height H1 to H6 in Headings Typography
From your dashboard , go to the Appearance > Customize > typography > Heading Section
Here You can manage Font Size & line Height.
Click on Publish.
6. How to manage letter spacing in Heading Typography Pro Features
From your dashboard , go to the Appearance > Customize > typography > body typography Section
Here You can manage letter spacing.
Click on Publish.
7. How to manage Font Style & Transform H1 to H6 in Headings Typography
From your dashboard , go to the Appearance > Customize > typography > Heading Section
Here You can manage Font Style & Transform.
Click on Publish.
8. How to manage weight & text decoration in Heading Typography Pro Features
From your dashboard , go to the Appearance > Customize > typography > body typography Section
Here You can manage weight & text decoration.
Click on Publish.
373. How to manage Call To Action Section in Spintech
1.Hide/Show Call To Action Section
From your dashboard, go to the Appearance > Customize > FrontPage Sections > call to action Section
Now click on check box for hide/show call to action section.
Click on Publish.
2.How to manage Title & Description in call to action section
From your dashboard, go to the Appearance > Customize > FrontPage Sections > call to action Section
Here you can change title & Description in call to action section.
Click on Publish.
3.How to manage button label & link call to action Section
From your dashboard, go to the Appearance > Customize > FrontPage Sections > call to action Section
Here you can manage button label in call to action section.
Click on Publish.
4.How to add second button label & link call to action Section Pro Features
From your dashboard, go to the Appearance > Customize > FrontPage Sections > call to action Section
Here you can manage button label in call to action section.
Click on Publish.
5.How to add background image call to action Section Pro Features
From your dashboard, go to the Appearance > Customize > FrontPage Sections > call to action Section
Here you can manage background image in call to action section.
Click on Publish.
6.How to manage background image position call to action Section
Pro Features
From your dashboard, go to the Appearance > Customize > FrontPage Sections >; call to action Section
Here you can manage background image position in call to action section.
Click on Publish.
374. How to manage About page in Decorme?
1.Create a Page & Select Template
From your dashboard, go to the Dashboard > Pages > Add New
Now Create a page & Select the Template.
Click on Publish.
2.Hide/Show About Section
From your dashboard, go to the Appearance > Customize > Page Templates > About Page
Now click on check box for hide/show About section.
Click on Publish.
3.How to manage left content?
From your dashboard, go to the Appearance > Customize > Page Templates > About Page
Here you can change left content in About section.
Click on Publish.
4.How to manage right content?
From your dashboard, go to the Appearance > Customize > Page Templates > About Page
Here you can change Right content in About section.
Click on Publish.
5.How to manage banner section?
From your dashboard, go to the Appearance > Customize > Page Templates > About Page
Here you can manage banner section in About section.
Click on Publish.
6.How to manage sponsor section?
From your dashboard, go to the Appearance > Customize > Page Templates > About Page
Here you can manage sponsor section in About section.
Click on Publish.
375. How to manage Call To Action Section in Seokart Pro?
2. How to manage CTA Title & Shortcode in a call to action
From your dashboard, go to the Appearance > Customize > FrontPage Sections > call to action Section
Here you can change the title & shortcode in a call to action section.
Click on Publish.
376. How to manage FAQ page in Setto Pro?
1.Create a Page FAQ & Select Template
From your dashboard, go to the Dashboard > Pages > Add New
Now Create a page & Select the Template.
Click on Publish.
2.Manage FAQ section content!
From your dashboard, go to the Dashboard > Page template > FAQ Page.
Here you can manage about Section content & Hide/Show Section.
Click on Publish.
377. How to manage Blog Section in Astrocare
1. How to manage title, Subtitle & Description
From your dashboard, go to the Appearance > Customize > FrontPage Sections > Blog Section
Here you can change the title, Subtitle & Description in the Blog section.
Click on Publish.
2. How to manage no posts display on FrontPage
From your dashboard, go to the Appearance > Customize > FrontPage Sections > Blog Section
Here you can manage no posts displayed on the Blog on FrontPage.
Click on Publish.
3. How to select a category for the blog section Pro Features
From your dashboard, go to the Appearance > Customize > FrontPage Sections > Blog Section
Here you can select a category for the blog section.
Click on Publish
4. How to manage blog Column Pro Features
From your dashboard, go to the Appearance > Customize > FrontPage Sections > Blog Section
Here you can choose a column layout in the blog section.
Click on Publish.
5. How to create blog posts for Astrocare?
From your dashboard, go to the Post > add a new post.
Here you can create a new blog post.
Click on Publish.
378. How to manage to browse category in Setto Lifestyle?
1. How to Hide/Show Browse Category Section?
From your dashboard, go to the Appearance > Customize > FrontPage Sections > Browse Category Section
Here you can Hide/Show Browse Category Section.
2. How to add image in Browser category?
From your dashboard, go to the Product > category > edit
Here you can upload image in Browse Category Section.
379. How to Setup Home Page
How to Setup Home Page?
Go to Pages > Add New > Create a Page Named Home ( the name could be anything you like).
On the Right Side Under the Template, the drop-down Menu is for Choosing the Home Page.
You have to Choose the Template and publish it.
2. How do you assign the home page as a front page?
From your dashboard, go to the Settings> Reading > Home Page Displays
Click on the radio button on your A Static page
Click on Save Changes.
380. How to manage header section in Kundoo
1. How to change the Site logo
From your dashboard , go to the Appearance > Customize > Header > Site Identity Section
Now Click on select logo and choose logo for your site .
If you are change & remove logo then you can use buttons below it.
Click on Publish.
2. How to customize width of Site logo
From your dashboard , go to the Appearance > Customize > Header > Site Identity Section
Now Scroll bar use for logo width Customize.
Click on Publish.
3. How to manage Site Title & Tagline
From your dashboard , go to the Appearance > Customize > Header > Site Identity Section
Now manage site title & tagline as per your choice .
Click on Publish.
4.How to display Site Title & Tagline
From your dashboard , go to the Appearance > Customize > Header > Site Identity Section
Now Click on Check box for Hide/Show Site title & tagline.
Click on Publish.
5.How to change the site icon
From your dashboard , go to the Appearance > Customize > Header > Site Identity Section
Now Click on button & select Site icon.
You can use site icon size maximum 512 x 512px.
Click on Publish.
6.How to Customize Site title & description font size Pro Features
From your dashboard , go to the Appearance > Customize > Header > Site Identity Section
Here you can customize Site title & description .
Click on Publish.
7.How to Change header type Pro Features
From your dashboard , go to the Appearance > Customize > Header > Header Style Section
Here you can select header type according to you .
Click on Publish.
8.Hide/Show Search Section
From your dashboard, go to the Appearance > Customize > Header > Header Navigation Section
Check Box on the Hide/Show option to reveal the Search options.
Click on Publish.
9.How to manage Header Navigation Button
From your dashboard, go to the Appearance > Customize > Header > Header Navigation Section
Here you can change icon label & link as per your choice.
Click on Publish.
10.Hide/Show Sticky Header
From your dashboard, go to the Appearance > Customize > Header > Sticky Header Section
Now Click on check box for Hide/Show Sticky header
Click on Publish.
381. How to manage Typography in Kundoo
1. How to manage Font Size & Line height in Body Typography
From your dashboard , go to the Appearance > Customize > typography > body typography Section
Here You can manage Font Size &; line Height.
Click on Publish.
2. How to manage letter spacing in Body Typography Pro Features
From your dashboard , go to the Appearance > Customize > typography > body typography Section
Here You can manage letter spacing.
Click on Publish.
3. How to manage Font Style & Transform in Body Typography
From your dashboard , go to the Appearance > Customize > typography > body typography Section
Here You can manage Font Style & Transform.
Click on Publish.
4. How to manage weight & text decoration in Body Typography Pro Features
From your dashboard , go to the Appearance > Customize > typography > body typography Section
Here You can manage weight & text decoration.
Click on Publish.
5.How to manage Font Size & Line height H1 to H6 in Headings Typography
From your dashboard , go to the Appearance > Customize > typography > Heading Section
Here You can manage Font Size & line Height.
Click on Publish.
6. How to manage letter spacing in Heading Typography Pro Features
From your dashboard , go to the Appearance > Customize > typography > body typography Section
Here You can manage letter spacing.
Click on Publish.
7. How to manage Font Style & Transform H1 to H6 in Headings Typography
From your dashboard , go to the Appearance > Customize > typography > Heading Section
Here You can manage Font Style & Transform.
Click on Publish.
8. How to manage weight & text decoration in Heading Typography Pro Features
From your dashboard , go to the Appearance > Customize > typography > body typography Section
Here You can manage weight & text decoration.
Click on Publish.
382. How to manage general section in Appetizer Pro?
1. Hide/Show Breadcrumb, Page Title & Page Path on Breadcrumb!
From your dashboard, go to the Appearance > Customize > General > Breadcrumb Section
Now Click on the check box for Hide/Show Breadcrumb Section.
Click on Publish.
2. Manage Min Height & Separator
From your dashboard, go to the Appearance > Customize > General > Breadcrumb Section
Now you can manage Min Height & Separator in Breadcrumb.
Click on Publish.
3. How to Remove & Change Image & Attachment in Breadcrumb Section
From your dashboard, go to the Appearance > Customize > General > Breadcrumb Section
Here you can Remove & Change the image, Attachment in Breadcrumb Section.
Click on Publish.
4. How to manage opacity & Color Overlay of Breadcrumb
From your dashboard, go to the Appearance > Customize > General > Breadcrumb Section
Here you can manage opacity & Color Overlay
Click on Publish.
5. Hide/Show Preloader
From your dashboard, go to the Appearance > Customize > General > Preloader Section
Here you can Hide/Show Preloader in Spintech Pro
Click on Publish.
7. Hide/Show Top Scroller & Change Icon
From your dashboard, go to the Appearance > Customize > General > Top Scroller Section
Here you can Hide/Show Top Scroller & Change icon
Click on Publish.
383. How to manage style configurator in Spintech
1.How to manage website layout & preset background image.
From your dashboard, go to the Appearance > Customize > Style Configurator > Page Layout
Here you can manage the website layout & preset background image.
Click on Publish.
2.How to manage prebuilt theme color.
From your dashboard, go to the Appearance > Customize > Style Configurator > prebuilt theme color
Here you can manage prebuilt theme color.
Click on Publish.
3.How to enable/disable custom color.
From your dashboard, go to the Appearance > Customize > Style Configurator > custom color
Here you can manage custom colors.
Click on Publish.
4.How to manage custom primary & secondary colors.
From your dashboard, go to the Appearance > Customize > Style Configurator > custom color
Here you can manage custom primary & secondary colors.
Click on Publish.
5.How to enable/disable front pallate.
From your dashboard, go to the Appearance > Customize > Style Configurator > Front Pallate
Here you can enable/disable front pallate.
Click on Publish.
384. How to manage Service Section in Owlpress Pro?
1. How to manage title, Subtitle, Description
From your dashboard, go to the Appearance > Customize > FrontPage Sections > Service Section
Here you can change the title, Subtitle & Description in the Service section.
Click on Publish.
2. How to manage content Service Section
From your dashboard, go to the Appearance > Customize > FrontPage Sections > Service Section
Here you can manage content in the Service section.
Click on Publish.
3. How to manage column layout
From your dashboard, go to the Appearance > Customize > FrontPage Sections > Service Section
Here you can manage Column Layout in the Service section.
Click on Publish.
385. How to manage Slider 2 in Decorme?
1.How do I manage Content in Slider Section-2?
From your dashboard, go to the Appearance > Customize > FrontPage Sections > Slider Section
Here you can manage content of Slider Section
Now Click on Publish.
2.How to manage Opacity & Slider Social Icons?
From your dashboard, go to the Appearance > Customize > FrontPage Sections > Slider Section
Here you can manage Opacity & Slider Social Icons.
386. How to manage Feature Section in owlpress Pro?
1. How to manage Title, Subtitle & Description
From your dashboard, go to the Appearance > Customize > FrontPage Sections > Feature Section
Here you can manage the title, Subtitle & Description Feature Section
Now Click on Publish.
2. How do I manage the content of the Feature Section
From your dashboard, go to the Appearance > Customize > FrontPage Sections > Feature Section
Here you can manage the content of the Feature Section
Now Click on Publish.
3. Background image related setting
From your dashboard, go to the Appearance > Customize > General > Breadcrumb Section
Now you can manage background image & opacity in Breadcrumb.
Click on Publish.
387. How to manage Testimonial Section in SpaBiz Pro?
1.How to manage content Testimonial Section?
From your dashboard, go to the Appearance > Customize > FrontPage Sections > Testimonial Section
Here you can change title, Subtitle & Description (content- image, title ,subtitle, description ) in Testimonial section.
Click on Publish.
388. How to Activate license in StoreBiz ?
Go to your WordPress website dashboard
Go to Appearance > Theme License
Enter your theme license key into the License Key field
Click Activate
389. How to manage Slider Section in StoreBiz?
1.How do I hide/Show Left Content in Slider Section
From your dashboard, go to the Appearance > Customize > FrontPage Sections > Slider Section
Here you can Hide/Show Slider Section
Now Click on Publish.
2.How to manage Title, Subtitle & Description
From your dashboard, go to the Appearance > Customize > FrontPage Sections > Slider Section
Here you can manage the content of the slider section
Now Click on Publish.
2.How to manage Button label in slider
From your dashboard, go to the Appearance > Customize > FrontPage Sections > Slider Section
Here you can manage button label & Link
Click on Publish.
3.How to change slider image & Alignment
From your dashboard, go to the Appearance > Customize > FrontPage Sections > Slider Section
Here you can change the slider image & set Alignment
Click on Publish.
4.How to manage Animation effects
From your dashboard, go to the Appearance > Customize > FrontPage Sections > Slider Section
Here you can manage Animation Effects
Click on Publish
5.How to manage Slider Speed
From your dashboard, go to the Appearance > Customize > FrontPage Sections > Slider Section
Here you can manage Slider Speed
Click on Publish
6.How do I hide/Show the Right Content in Slider Section
From your dashboard, go to the Appearance > Customize > FrontPage Sections > Slider Section
Here you can Hide/Show Slider Section
Now Click on Publish.
390. Home Page Setup in Owlpress Pro?
Go to Pages > Add New > Create a Page Named Home ( the name could be anything you like). On the Right Side Under the Template, the drop-down Menu is for Choosing the Home Page.
You have to Choose the Template and publish it.
2. How to Assign Home Page as a FrontPage?
From your dashboard, go to the Setting > Reading > Home Page Displays
Click on the radio button of your A Static page
Click on Save Changes.
391. Sponsor Section Manage of Watch Home Page!
1.Sponsor Section Manage!
From your dashboard, go to the Appearance > Customize > watch Home page > Sponsor Section
Here you can manage the Sponsor Content (Like : Link & image) .
Now Click on Publish
392. How to manage Gallery Section in Owlpress Pro?
1. How to manage title, Subtitle & Description
From your dashboard, go to the Appearance > Customize > FrontPage Sections > Gallery Section
Here you can change the title, Subtitle & Description in the Gallery section.
Click on Publish.
2. How to manage Gallery Content
From your dashboard, go to the Appearance > Customize > FrontPage Sections > Gallery Section
Here you set up content in the gallery section.
Click on Publish.
3. Background image related setting
From your dashboard, go to the Appearance > Customize > General > Breadcrumb Section
Now you can manage background image & opacity in Breadcrumb.
Click on Publish.
393. How to manage Blog Section in Owlpress Lite?
1. How to manage title, Subtitle & Description
From your dashboard, go to the Appearance > Customize > FrontPage Sections > Blog Section
Here you can change the title, Subtitle & Description in the Blog section.
Click on Publish.
2. How to manage no of posts displayed in FrontPage
From your dashboard, go to the Appearance > Customize > FrontPage Sections > Blog Section
Here you can manage no of posts displayed on Blog in FrontPage.
Click on Publish.
394. How to manage Call to Action Section in Decorme?
1.How to manage content of CTA Section
From your dashboard, go to the Appearance > Customize > FrontPage Sections > call to action Section
Here you can manage content of CTA Section Like(Phone , Content & Button )
Click on Publish.
395. How to manage Slider Section in CoziPress
1.How to manage Title, Subtitle & Description
From your dashboard, go to the Appearance > Customize > FrontPage Sections > Slider Section
Here you can manage content of slider section
Now Click on Publish.
2.How to manage Button label in slider
From your dashboard, go to the Appearance > Customize > FrontPage Sections > Slider Section
Here you can manage button label & Link
Click on Publish.
3.How to change slider image & Alignment
From your dashboard, go to the Appearance > Customize > FrontPage Sections > Slider Section
Here you can change slider image & set Alignment
Click on Publish
Spintech Pro allows you to add even more Sliders.Pro Features
4.How to manage Animation effects Pro Features
From your dashboard, go to the Appearance > Customize > FrontPage Sections > Slider Section
Here you can manage Animation Effects
Click on Publish
5.How to manage Slider Speed Pro Features
From your dashboard, go to the Appearance > Customize > FrontPage Sections > Slider Section
Here you can manage Slider Speed
Click on Publish
396. Info Section Manage of Goggles Home Page!
1.Info Section Content!
From your dashboard, go to the Appearance > Customize > Goggles Home Page > Slider Section
Here you can manage the content of the slider section
Now Click on Publish.
397. How to manage menu setup?
From your dashboard, go to the Appearance > Menus > Select Menu
Here Select Menu according to you
Click on Save Menu.
398. How to manage Sponsor Section SpaBiz Pro?
1. How to manage content Sponsor Section?
From your dashboard, go to the Appearance > Customize > FrontPage Sections > Sponsor Section
Here you can manage content in the sponsor section.
Click on Publish.
399. Install & Activate Burger Companion Plugin?
In the WordPress dashboard go to the appearance submenu and click on customize. After clicking on customizing you will in theme customizer. Here you have to show in the recommended plugin then click on the install & activate Button.
400. How to add Additional CSS?
1. How to add Additional CSS
From your dashboard, go to the Appearance > Additional CSS >
Here you can paste your Additional CSS
Click on Publish.
401. How to manage footer section in Astrocare
1. How to manage the footer top (LIke:- Footer Logo, Copyright, Social Icons & Footer Right Description) in the footer?
From your dashboard, go to the Appearance > Customize > Footer > Footer top
Here you can manage the footer top.
Click on Publish.
2. How to change the footer background color in Astrocare?
From your dashboard, go to the Appearance > Customize > Footer > Footer Background
Here you can change the Background color in the footer Background.
Click on Publish.
3. How to manage the footer widget layout in the footer?
From your dashboard, go to the Appearance > Customize > Footer > Footer Widget Area
Here you can manage the footer widget layout.
Click on Publish.
4. How to manage the footer bottom (LIke:- Payment Method) in the footer?
From your dashboard, go to the Appearance > Customize > Footer > Footer bottom
Here you can manage the footer bottom.
Click on Publish.
402. Banner Section Manage of Watch Home Page!
1.Banner Section Manage!
From your dashboard, go to the Appearance > Customize > Watch Homepage > Banner Section
Here you can manage the content of the Banner section
Now Click on Publish.
403. Manage Best Seller Products Section?
1.How to manage Best Seller Products Section
From your dashboard, go to the Appearance > Customize > FrontPage Sections > Deals Product Section
Here you can manage the Deals Product Section
Now Click on Publish.
404. How to Set Home Page3?
Front Look Home Page3
Go to Pages > Add New > Create a Page Named Home ( the name could be anything you like). On the Right Side Under the Template, the drop-down Menu is for Choosing the Home Page.
You have to Choose the Template and publish it.
405. Newsletter Section Manage of Lifestyle Home Page!
1.Newsletter Section Manage!
From your dashboard, go to the Appearance > Customize > Lifestyle Home page > Newsletter Section
Here you can manage the content of Newsletter section .
Now Click on Publish .
406. Demo Import For Setto Pro?
Install One Click Demo Import plugin on your site
After installing the plugin,
Go to Appearance > Premade Demos
Finally, click Import Demo Data Button
Wait for the import to finish
You are done!!!
407. How to manage Company Career Page in CoziPress
1.Create a Page & Select Template
From your dashboard, go to the Dashboard > Pages > Add New
Now Create a page & Select the Template.
Click on Publish.
2.Hide/Show Job Section in company Career page
From your dashboard, go to the Appearance > Customize > Page Templates > Company Careers Page
Now click on the check box for the hide/show company careers section.
Click on Publish.
3.How to manage title, Subtitle & Description in job section
From your dashboard, go to the Appearance > Customize > Page Templates > Company Careers Page
Now click on here manage title, Subtitle & Description.
Click on Publish.
4.How to manage content of job section
From your dashboard, go to the Appearance & Customize > Page Templates > Company Careers Page
Now click on here manage content of job section.
Click on Publish.
5.Hide/Show Benefit Section in company Career page
From your dashboard, go to the Appearance > Customize > Page Templates > Company Careers Page
Now click on the check box for the hide/show company benefit section.
Click on Publish.
6.How to manage title, Subtitle & Description in benefit section
From your dashboard, go to the Appearance > Customize > Page Templates > Company Careers Page
Now click on here manage title, Subtitle & Description.
Click on Publish.
7.How to manage content in benefit section
From your dashboard, go to the Appearance > Customize > Page Templates > Company Careers Page
Now click on here manage content of benefit section.
Click on Publish.
8.Hide/Show opening job Section in company Career page
From your dashboard, go to the Appearance > Customize > Page Templates > Company Careers Page
Now click on the check box for the hide/show opening job section.
Click on Publish.
9.How to manage content in opening job section
From your dashboard, go to the Appearance > Customize > Page Templates > Company Careers Page
Now click on here manage content of opening job section.
Click on Publish.
408. How to manage Contact Page in Kundoo
1.Create a Page & Select Template
From your dashboard, go to the Dashboard > Pages > Add New
Now Create a page & Select the Template.
Click on Publish.
2.How to manage title, Subtitle & Description in Info Section.
From your dashboard, go to the Appearance > Customize > Page Templates > Contact Page
Here you can change the title, Subtitle, Description & hide/show in Info Section.
Click on Publish.
3.How to manage Info Content in Info Section.
From your dashboard, go to the Appearance > Customize > Page Templates > Contact Page
Here you can change the Info Content in Info Section.
Click on Publish.
4.How to manage Address title, Subtitle &Description.
From your dashboard, go to the Appearance > Customize > Page Templates > Contact Page
Here you can change the title, Subtitle, Description, Address title & hide/show in Address Section.
Click on Publish.
5.How to manage Address Content.
From your dashboard, go to the Appearance > Customize > Page Templates > Contact Page
Here you can change the Address Content.
Click on Publish.
6.How to use shortcode in contact page for Form.
From your dashboard, go to the Appearance > Customize > Page Templates > Contact Page
Here you can use shortcode for form.
Click on Publish.
7.How to manage background image related setting.
From your dashboard, go to the Appearance > Customize > Page Templates > Contact Page
Here you can change background image related setting in contact Contact Page.
Click on Publish.
8.How to manage map related setting.
From your dashboard, go to the Appearance > Customize > Page Templates > Contact Page
Here you can change map related setting in contact Page.
Click on Publish.
409. How to manage footer section?
1.How to manage footer bottom section in the footer.
From your dashboard, go to the Appearance > Customize > Footer > Footer Bottom
Here you can manage the footer bottom section.
Click on Publish.
410. How to manage Service page in Astrocare
1. Create a Page & Select Template
From your dashboard, go to the Dashboard > Pages > Add New
Now Create a page & Select the Template.
Click on Publish.
2. How to manage service style?
From your dashboard, go to the Appearance > Customize > Page Templates > Service Page
Now select style the Service style.
Click on Publish.
411. How to manage Special Menu Page in Appetizer?
1. Create a Special Menu
From your dashboard, go to the Dashboard > Special Menu > Add New
Now create a special menu.
Click on Publish.
2. How to manage a special menu page
From your dashboard, go to the Appearance > Customize > Page Templates > special menu page
Now you can manage the special menu page.
Click on Publish.
412. Required image size all section Astrocare Pro
From your dashboard, go to the Appearance > Customize > Page Template > Gallery Page
Here you can change title, Subtitle & Description in Gallery section.
Click on Publish.
2.How to manage Gallery Content
From your dashboard, go to the Appearance > Customize > Page Template > Gallery Page
Here you setup content in gallery Page.
Click on Publish.
414. How to manage menu setup?
From your dashboard, go to the Appearance > Menus > Select Menu
Here Select Menu according to you
Click on Save Menu.
415. How to manage Page Full Width page in Astrocare Pro
1. Create a Page & Select Template
From your dashboard, go to the Dashboard > Pages > Add New
Now Create a page & Select the Template.
Click on Publish.
416. How to manage Feature Product Section
1.How do I hide/Show Feature Product Section
From your dashboard, go to the Appearance > Customize > FrontPage Sections > Feature Product Section
Here you can Hide/Show Feature Product Section
Now Click on Publish.
2.How to manage Title Feature Product Section
From your dashboard, go to the Appearance > Customize > FrontPage Sections > Feature Product Section
Here you can manage the title Feature Product Section
Now Click on Publish.
417. How to add Additional CSS
1.How to add Additional CSS
From your dashboard, go to the Appearance > Additional CSS >
Here you can paste your Additional CSS
Click on Publish.
418. How to manage Contact Page in Owlpress Pro?
1. Create a Page & Select Template
From your dashboard, go to the Dashboard > Pages > Add New
Now Create a page & Select the Template.
Click on Publish.
2. How to manage the contact visit section.
From your dashboard, go to the Appearance > Customize > Page Templates > Contact Page
Here you can manage the contact visit section.
Click on Publish.
3. How to title ,description & hide/show contact banner section.
From your dashboard, go to the Appearance > Customize > Page Templates > Contact Page
Here you can manage the contact banner section.
Click on Publish.
4. How to manage content in the contact banner section.
From your dashboard, go to the Appearance > Customize > Page Templates > Contact Page
Here you can manage the contact banner section.
Click on Publish.
5. How to manage background image-related settings.
From your dashboard, go to the Appearance > Customize > Page Templates > Contact Page
Here you can manage background images & overlay color in the contact banner section.
Click on Publish.
6. How to manage the contact form section.
From your dashboard, go to the Appearance > Customize > Page Templates > Contact Page
Here you can manage the contact form section.
Click on Publish.
7. How to hide/show map section.
From your dashboard, go to the Appearance > Customize > Page Templates > Contact Page
Here you can hide/show the map section.
Click on Publish.
8. How to manage the contact office section.
From your dashboard, go to the Appearance > Customize > Page Templates > Contact Page
Here you can manage the contact office section.
Click on Publish.
419. Additional CSS in Spintech
1.How to add Additional CSS
From your dashboard , go to the Appearance > Additional CSS >
Here you can to paste your Additional CSS
Click on Publish.
420. How to setup Background image in SpaBiz Pro?
1. How to setup Background image
From your dashboard , go to the Appearance > Customize > Background image
Here You can setup background image, setup preset background image, position & size background image, repeat background image, Scroll with Page.
Click on Publish.
421. How to manage Elementor Plugin
1. How to install the Elementor Plugin
From your dashboard, go to Plugins > Add New Plugins
We support the Elementor Plugin on the Astrocare Pro theme
2. Create a Page & Select Template
From your dashboard, go to the Dashboard > Pages > Add New
Now Create a Page & Select the Template.
Click on Publish.
3. How to manage the content of Elementor Plugin?
You can add the content you need here
422. How to manage Astrologer Section in Astrocare Pro
1. How to manage title & Subtitle Pro Features
From your dashboard, go to the Appearance > Customize > FrontPage Sections > Team Section
Here you can change the title & Subtitle in the team section.
Click on Publish.
2. How to manage Astrologer content Pro Features
From your dashboard, go to the Astrologer > Add new Astrologer
Here you set up content in the astrologer section.
Click on Publish.
423. How to manage Team Section in Kundoo
1.How to manage title, Subtitle & Description Pro Features
From your dashboard, go to the Appearance > Customize > FrontPage Sections > Team Section
Here you can change title, Subtitle & Description in team section.
Click on Publish.
2.How to manage team content Pro Features
From your dashboard, go to the Appearance > Customize > FrontPage Sections > Team Section
Here you setup content in team section.
Click on Publish.
3.How to manage team column Pro Features
From your dashboard, go to the Appearance > Customize > FrontPage Sections > Team Section
Here you can choose column layout in team section.
Click on Publish.
424. How to Create a Service Page & Select Template?
1.Create a Service Page & Select Template
From your dashboard, go to the Dashboard > Pages > Add New
Now Create a page & Select the Template in Page Attributes.
Click on Publish.
425. How to manage Blog Section in Spintech
1.Hide/Show Blog Section in Spintech
From your dashboard, go to the Appearance > Customize > FrontPage Sections > Blog Section
Now click on check box for hide/show blog section.
Click on Publish.
2.How to manage title, Subtitle & Description
From your dashboard, go to the Appearance > Customize > FrontPage Sections > Blog Section
Here you can change title, Subtitle & Description in Blog section.
Click on Publish.
3.How to manage no of posts display in FrontPage
From your dashboard, go to the Appearance > Customize > FrontPage Sections > Blog Section
Here you can manage no of posts display of Blog in FrontPage.
Click on Publish.
4.How to select category for blog section Pro Features
From your dashboard, go to the Appearance > Customize > FrontPage Sections > Blog Section
Here you can select category for blog section .
Click on Publish.
5.How to manage blog Column Pro Features
From your dashboard, go to the Appearance > Customize > FrontPage Sections > Blog Section
Here you can choose column layout in blog section.
Click on Publish.
426. How to add icon to category on electronic homepage?
1. How to Hide/Show Browse Category Section?
From your dashboard, go to the Appearance > Customize > FrontPage Sections > Browse Category Section
Here you can Hide/Show Browse Category Section.
2. How to add icon in Browser category?
From your dashboard, go to the Product > category > edit
Here you can paste icofont code in Browse Category Section.
427. How to manage Slider 1 in Decorme?
1.How do I manage Content in Slider Section 1?
From your dashboard, go to the Appearance > Customize > FrontPage Sections > Slider Section
Here you can manage content of Slider Section
Now Click on Publish.
2.How to manage Opacity, Animation & Slider Speed?
From your dashboard, go to the Appearance > Customize > FrontPage Sections > Slider Section
Here you can manage Opacity, Slider Speed & Animation Effects.
428. How to manage item menu Page in Appetizer?
1. How to manage the item menu page
From your dashboard, go to the Appearance > Customize > Page Template Sections > item Menu Page
Here you can manage the content item Menu page.
Now Click on Publish.
2. How to add item menu description
From your dashboard, go to the Special Menu > Item Menu > Description Page Template Sections > item Menu Page Here you can manage the item menu description.
Now Click on Publish.
3. How to add item menu category image & description
From your dashboard, go to the Special Menu > Special Menu Categories & category edit >
Here you can manage the category image & description.
Now Click on Publish.
429. How to setup Header image in Owlpress Pro?
1. How to the setup Header image
From your dashboard, go to the Appearance > Customize > Header image
Here You can set up a header image.
If you change & remove the logo then you can use the buttons below it.
Click on Publish.
430. How to manage Product Section?
1. How to manage title & description?
From your dashboard, go to the Appearance > Customize > FrontPage Sections > Product Section
Here you can change the title, & Description in the Product Section.
Click on Publish.
2. How to manage category, column & No of Product Display?
From your dashboard, go to the Appearance > Customize > FrontPage Sections > Product Display
Here you can change the Category, Column & No of Product Display in the Product Display.
Click on Publish.
3. How to manage Background image-related settings?
From your dashboard, go to the Appearance > Customize > FrontPage Sections > Product Display
Here you can change the Background image-related setting in the Product Display.
Click on Publish.
431. How to manage header image ?
1. How to the setup Header image
From your dashboard, go to the Appearance > Customize > Header image
Here You can set up a header image.
If you change & remove the logo then you can use the buttons below it.
Click on Publish.
432. How to manage header image in Seokart?
1. How to the setup Header image
From your dashboard, go to the Appearance > Customize > Header image
Here You can set up a header image.
If you change & remove the logo then you can use the buttons below it.
Click on Publish.
433. How to manage Company FAQ Page in CoziPress
1.Create a Page & Select Template
From your dashboard, go to the Dashboard > Pages > Add New
Now Create a page & Select the Template.
Click on Publish.
2.How to manage title,Subtitle & Description
From your dashboard, go to the Dashboard > Page Template > FAQ Page
Now you can manage title,Subtitle & Description .
Click on Publish.
3.How to manage content of FAQ page
From your dashboard, go to the Dashboard > Page Template > FAQ Page
Now you can manage content of FAQ page.
Click on Publish.
434. How to manage Header Image in storebiz?
1. How to the setup Header image
From your dashboard, go to the Appearance > Customize > Header image
Here You can set up a header image.
If you change & remove the logo then you can use the buttons below it.
Click on Publish.
435. How to manage Appointment Section in SpaBiz Pro?
1.How to manage content Appointment Section?
From your dashboard, go to the Appearance > Customize > FrontPage Sections > Appointment Section
Here you can change title, Subtitle & Description (content , image, form title, form shortcode ) in appointment section.
Click on Publish.
436. How to manage Pricing Section in Spintech
1.How to manage title, Subtitle & Description Pro Features
From your dashboard, go to the Appearance > Customize > FrontPage Sections > Pricing Section
Here you can change title, Subtitle & Description in Pricing section.
Click on Publish.
2.How to display No. of Pricing Pro Features
From your dashboard, go to the Appearance > Customize > FrontPage Sections > Pricing Section
Here you can display No. of pricing in Pricing section.
Click on Publish.
3.How to manage Pricing Column Pro Features
From your dashboard, go to the Appearance > Customize > FrontPage Sections > pricing Section
Here you can choose column layout in pricing section.
Click on Publish.
437. How to manage Typography in Spintech
1. How to manage Font Size & Line height in Body Typography
From your dashboard , go to the Appearance > Customize > typography > body typography Section
Here You can manage Font Size &; line Height.
Click on Publish.
2. How to manage Font Style & Transform in Body Typography
From your dashboard , go to the Appearance > Customize > typography > body typography Section
Here You can manage Font Style & Transform.
Click on Publish.
3.How to manage Font Size & Line height H1 to H6 in Headings Typography
From your dashboard , go to the Appearance > Customize > typography > Heading Section
Here You can manage Font Size & line Height.
Click on Publish.
4. How to manage Font Style & Transform H1 to H6 in Headings Typography
From your dashboard , go to the Appearance > Customize > typography > Heading Section
Here You can manage Font Style & Transform.
Click on Publish.
438. How to manage Slider Section in StoreBiz?
1.How do i hide/Show Left Content in Slider Section
From your dashboard, go to the Appearance > Customize > FrontPage Sections > Slider Section
Here you can Hide/Show Slider Section
Now Click on Publish.
2.How to manage Title, Subtitle & Description
From your dashboard, go to the Appearance > Customize > FrontPage Sections > Slider Section
Here you can manage the content of the slider section
Now Click on Publish.
3.How to change slider image & Alignment
From your dashboard, go to the Appearance > Customize > FrontPage Sections > Slider Section
Here you can change slider image & set Alignment
Click on Publish
4.How to Manage Opacity
From your dashboard, go to the Appearance > Customize > FrontPage Sections > Slider Section
Here you can change slider opacity
Click on Publish
5.How do I hide/Show the Right Content in Slider Section
From your dashboard, go to the Appearance > Customize > FrontPage Sections > Slider Section
Here you can Hide/Show Slider Section
Now Click on Publish.
6.How to manage content info
From your dashboard, go to the Appearance > Customize > FrontPage Sections > Info Section
Here you can manage content (Like- Title, Description, Icon, Image) in info section.
Click on Publish.
439. How to manage Coming Soon Page in Owlpress Pro?
1. Enable/Disable coming soon page
From your dashboard, go to the Appearance > Customize > Page Templates > Coming soon Page
Now click on the check box for enable/disable coming soon page.
Click on Publish.
2. Select style of coming soon page
From your dashboard, go to the Appearance > Customize > Page Templates > Coming soon Page
Here you can select the style of coming soon page according to you.
Click on Publish.
3. Manage Title & Description in coming soon page
From your dashboard, go to the Appearance > Customize > Page Templates > Coming soon Page
Here you can select the style of coming soon page according to you.
Click on Publish.
4. How to manage Time in Comingsoon Page
From your dashboard, go to the Appearance > Customize > Page Templates > Coming soon Page
Here You Can Manage time.
Click on Publish.
440. How to manage Background Image in storebiz?
In WordPress Dashboard go to the Appearance submenu and click on Customize.
After clicking on customizing you will in theme Customizer.
Here you have to click on the Home Page Section.
Here you have to click on the Background Image Section
In-background Image Here you can manage the image.
Go to Customize ->Home Page Section-> Background Image Section
441. How to manage General Section in Setto Lite?
1. Hide/Show Breadcrumb Section
From your dashboard, go to the Appearance > Customize > General > Breadcrumb Section
Now Click on the check box for Hide/Show Breadcrumb Section.
Click on Publish.
2. Manage Min Height
From your dashboard, go to the Appearance > Customize > General > Breadcrumb Section
Now you can manage min-height in Breadcrumb.
Click on Publish.
442. How to manage Horoscope Report page in Astrocare
1. Create a Page & Select Template
From your dashboard, go to the Dashboard > Pages > Add New
Now Create a page & Select the Template.
Click on Publish.
2. How to manage title & subtitle.
From your dashboard, go to the Appearance > Customize > Page Templates > Horoscope Report Page
Now you can manage the title & subtitle.
Click on Publish.
3. How to manage Horoscope Report Page content?
From your dashboard, go to the Appearance > Customize > Page Templates > Horoscope Report Page
Now you can manage the content.
Click on Publish
4. Astrocare Pro allows you to add even more Horoscope Report Pages. Pro Features
From your dashboard, go to the Appearance > Customize > Page Templates > Horoscope Report Page
Here you can add more Horoscope Reports to the Horoscope Report pages.
Click on Publish.
443. How to manage Sponsor Section in Kundoo
1.How to manage title, Subtitle & Description
From your dashboard, go to the Appearance > Customize > FrontPage Sections > Sponsor Section
Here you can change title, Subtitle & Description in Sponsor section.
Click on Publish.
2.How to manage content Sponsor Section
From your dashboard, go to the Appearance > Customize > FrontPage Sections > Sponsor Section
Here you can manage content in Sponsor section.
Click on Publish.
3.How to manage Background image, Sponsor Column & Background Attachment
From your dashboard, go to the Appearance > Customize > FrontPage Sections > Sponsor Section
Here you can manage Background image, Sponsor Column & Background Attachment in Sponsor section.
Click on Publish.
444. How to manage 404 Page in Owlpress Pro?
1. How to manage Content in 404 Page
From your dashboard, go to the Appearance > Customize > Page Templates > 404 page
Here you can change the title, description & button label on the 404 page.
Click on Publish.
445. How to setup Header image in Spintech
1. How to setup Header image
From your dashboard , go to the Appearance > Customize > Header image
Here You can setup header image.
If you are change & remove logo then you can use buttons below it.
Click on Publish.
446. How to manage Contact page in Astrocare
1. Create a Page & Select Template
From your dashboard, go to the Dashboard > Pages > Add New
Now Create a page & Select the Template.
Click on Publish
2. Hide/Show Contact Address Section
From your dashboard, go to the Appearance > Customize > Page Templates > Contact Page
Now click on the check box for hide/show contact address section.
Click on Publish.
3. How to manage title & subtitle?
From your dashboard, go to the Appearance > Customize > Page Templates > Contact Page
Now you can manage the title & subtitle.
Click on Publish.
4. How to manage the address Content of the contact section?
From your dashboard, go to the Appearance > Customize > Page Templates > Contact Page
Now you can manage the contents.
Click on Publish.
5. Astrocare Pro allows you to add even more Address Section. Pro Features
From your dashboard, go to the Appearance > Customize > Page Templates > Contact Page
Here you can add more addresses section in the Contact Page
Click on Publish.
6. Hide/Show Contact Section
From your dashboard, go to the Appearance > Customize > Page Templates > Contact Page
Now click on the check box for hide/show contact section.
Click on Publish.
7. How to manage the title & subtitle on the contact form section?
From your dashboard, go to the Appearance > Customize > Page Templates > Contact Page
Now you can manage the title & subtitle.
Click on Publish.
8. How do you manage other sections?
From your dashboard, go to the Appearance > Customize > Page Template > Contact Page
Here you can hide/show other sections.
Click on Publish.
447. How to Create a Service Page & Select Template
1.Create a Service Page & Select Template
From your dashboard, go to the Dashboard > Pages > Add New
Now Create a page & Select the Template in Page Attributes.
Click on Publish.
448. How to manage sponsor Section?
1. How to manage title, subtitle & description
From your dashboard, go to the Appearance > Customize > FrontPage Sections >Sponsor Section
Here you can manage title, subtitle & description
Now Click on Publish.
2. How to manage content & column sponsor Section
From your dashboard, go to the Appearance > Customize > FrontPage Sections >Sponsor Section
Here you can manage the content &; column in sponsor Section
Now Click on Publish.
449. How to manage Header Image in Setto Lite?
1. How to the setup Header image
From your dashboard, go to the Appearance > Customize > Header image
Here You can set up a header image.
If you change & remove the logo then you can use the buttons below it.
Click on Publish.
450. Service Section Manage of Lifestyle Home Page!
1.Service Section Manage!
From your dashboard, go to the Appearance > Customize > Lifestyle Home Page > Service Section
Here you can manage the content of the service section
Now Click on Publish.
451. How to manage Pricing Section Decorme?
1.How to manage content of Pricing Section
From your dashboard, go to the Appearance > Customize > FrontPage Sections > Pricing Section
Here you can change title, Subtitle & Description (No of Pricing Display, Pricing Column ETC) in Pricing section.
Click on Publish.
452. How to manage Blog Section in SpaBiz Pro?
1.How to manage Content of Blog section?
From your dashboard, go to the Appearance > Customize > FrontPage Sections > Blog Section
Here you can manage title, Subtitle & Description Like(Select category for Blog Section, Blog Column & No of Posts Display).
Click on Publish.
453. How to manage General Section in Setto Pro?
1. Hide/Show Breadcrumb & Enable Page Path on Breadcrumb
From your dashboard, go to the Appearance > Customize > General > Breadcrumb Section
Now Click on the check box for Hide/Show Breadcrumb Section.
Click on Publish.
2. Manage Min Height
From your dashboard, go to the Appearance > Customize > General > Breadcrumb Section
Now you can manage min-height in Breadcrumb.
Click on Publish.
3.How to manage Background Image & Attachment image
From your dashboard, go to the Appearance > Customize > General > Breadcrumb Section
Here you can set the breadcrumb image according to you.
Click on Publish.
4.How to manage opacity & Overlay Color of Breadcrumb
From your dashboard, go to the Appearance > Customize > General > Breadcrumb Section
Here you can manage opacity & Color Overlay
Click on Publish.
7.How to manage Top Scroller?
From your dashboard, go to the Appearance > Customize > General > Preloader Section
Here you can manage the Scroller icon & also the Hide/Show setting.
Click on Publish.
454. How to manage Page Left Sidebar page in Astrocare Pro
1. Create a Page & Select Template
From your dashboard, go to the Dashboard > Pages > Add New
Now Create a Page & Select the Template.
Click on Publish.
455. How to manage Header Image in Setto Pro?
1. How to the setup Header image
From your dashboard, go to the Appearance > Customize > Header image
Here You can set up a header image.
If you change & remove the logo then you can use the buttons below it.
Click on Publish.
456. Hide/Show Sidebar in Blog Single Page?
1.How to hide/show sidebar in Blog Single Page.
From your dashboard, go to the Appearance > Customize > Page Templates > Blog SIngle Page
Here you can hide/show the Sidebar on the Blog Single Page.
Click on Publish.
457. How to manage header section in Spintech
1. How to change the Site logo
From your dashboard , go to the Appearance > Customize > Header > Site Identity Section
Now Click on select logo and choose logo for your site .
If you are change & remove logo then you can use buttons below it.
Click on Publish
2. How to customize width of Site logo
From your dashboard , go to the Appearance > Customize > Header > Site Identity Section
Now Scroll bar use for logo width Customize.
Click on Publish.
3. How to manage Site Title & Tagline
From your dashboard , go to the Appearance > Customize > Header > Site Identity Section
Now manage site title & tagline as per your choice .
Click on Publish.
4.How to display Site Title & Tagline
From your dashboard , go to the Appearance > Customize > Header > Site Identity Section
Now Click on Check box for Hide/Show Site title & tagline.
Click on Publish.
5.How to change the site icon
From your dashboard , go to the Appearance > Customize > Header > Site Identity Section
Now Click on button & select Site icon .
You can use site icon size maximum 512 x 512px.
Click on Publish.
6.How to Customize Site title & description font size Pro Features
From your dashboard , go to the Appearance > Customize > Header > Site Identity Section
Here you can customize Site title & description .
Click on Publish.
7.How to Change header type Pro Features
From your dashboard , go to the Appearance > Customize > Header > Header Style Section
Here you can select header type according to you .
Click on Publish.
8.Hide/Show Hirring Section
From your dashboard, go to the Appearance > Customize > Header > Above header Section
Check Box on the Hide/Show above Header option to reveal the header top bar options.
Click on Publish.
9.How to manage title & content in Hirring Section
From your dashboard, go to the Appearance > Customize > Header > Above header Section
Here you can change title & content as per your choice.
Click on Publish.
10.Hide /Show Contact info section
From your dashboard, go to the Appearance > Customize > Header > Above header Section
Check Box on the Hide/Show above Header option to reveal the header top bar options.
Click on Publish.
11.How to manage icon & text in contact info section
From your dashboard, go to the Appearance > Customize > Header > Above header Section
Now you can select icon in icons library & manage text in contact info section.
Click on Publish.
12.Hide/Show Social icon section
From your dashboard, go to the Appearance > Customize > Header > Above header Section
Check Box on the Hide/Show above Header option to reveal the header top bar options.
Click on Publish.
13.How to Manage Social icons
From your dashboard, go to the Appearance > Customize > Header > Above header Section
Now you can select icon in social icons library.
Click on Publish.
14.Hide/Show Cart icon in Header Navigation Pro Features
From your dashboard, go to the Appearance > Customize > Header > Header Navigation Section
Now Click on check box for Hide/Show Cart icon.
Click on Publish.
15.Hide/Show Search icon in Header Navigation
From your dashboard, go to the Appearance > Customize > Header > Header Navigation Section
Now Click on check box for Hide/Show Search icon.
Click on Publish.
16.Hide / Show Contact in Header Navigation
From your dashboard, go to the Appearance > Customize > Header > Header Navigation Section
Now Click on check box for Hide/Show Contact.
Click on Publish.
17.How to manage icon in contact Header Navigation
From your dashboard, go to the Appearance > Customize > Header > Header Navigation Section
Here you can choose icon for contact.
Now Click on publish.
18.How to manage title & text in contact Header navigation
From your dashboard, go to the Appearance > Customize > Header > Header Navigation Section
Here you can manage title & text according to you.
Now Click on publish.
19.Hide/Show Sticky Header
From your dashboard, go to the Appearance > Customize > Header > Sticky Header Section
Now Click on check box for Hide/Show Sticky header
Click on Publish.
458. How to manage General Section in CoziPress
1.Hide/Show Breadcrumb Section
From your dashboard, go to the Appearance > Customize > General > Breadcrumb Section
Now Click on check box for Hide/Show Breadcrumb Section.
Click on Publish.
2.How to Remove & Change Image in Breadcrumb Section
From your dashboard, go to the Appearance > Customize > General > Breadcrumb Section
Here you can Remove & Change image in Breadcrumb Section.
Click on Publish.
3.How to Manage Min Height
From your dashboard, go to the Appearance > Customize > General > Breadcrumb Section
Here you can manage min height in Breadcrumb Section.
Click on Publish.
4.How to manage Background Attachment image
From your dashboard, go to the Appearance > Customize > General > Breadcrumb Section
Here you can set breadcrumb image according to you.
Click on Publish.
5.How to manage opacity & Color Overlay of Breadcrumb
From your dashboard, go to the Appearance > Customize > General > Breadcrumb Section
Here you can manage opacity & Color Overlay
Click on Publish.
6.Hide/Show Preloader Pro Features
From your dashboard, go to the Appearance > Customize > General > Preloader Section
Here you can Hide/Show Preloader in Spintech Pro
Click on Publish.
7.Hide/Show Top Scroller Pro Features
From your dashboard, go to the Appearance > Customize > General > Top Scroller Section
Here you can Hide/Show Top Scroller in Spintech Pro
Click on Publish.
8.How to change Scroller Icon Pro Features
From your dashboard, go to the Appearance > Customize > General > Top Scroller Section
Here you can change Scroller icon in library
Click on Publish.
459. Deal Section Manage of Lifestyle Home Page!
1.Deal Section Manage!
From your dashboard, go to the Appearance > Customize > Deal Home Page > Deal Section
Here you can manage the Title, Subtitle & Select category of the Product .
Now Click on Publish.
460. How to manage footer-2 in SpaBiz Pro?
1. Manage Footer Above in footer-2
From your dashboard, go to the Appearance > Customize > Footer > Footer Above
Here you can manage footer content in the above Section.
Click on Publish.
461. How to manage footer section in Decorme?
1.How to manage footer background image related setting in footer
From your dashboard, go to the Appearance > Customize > Footer > Footer Above
Here you can change footer background image related setting.
Click on Publish.
2.How to manage footer widget layout in footer
From your dashboard, go to the Appearance > Customize > Footer > Footer Above
Here you can manage footer widget layout.
Click on Publish.
3.How to manage footer bottom (LIke :- Contact,Column & Hide/Show Setting) in footer
From your dashboard, go to the Appearance > Customize > Footer > Footer Above
Here you can manage footer bottom
Click on Publish.
4.How to manage Copyright Section in footer
From your dashboard, go to the Appearance > Customize > Footer > Footer Above
Here you can manage copyright & Payment icon.
Click on Publish.
462. How to manage menu setup?
From your dashboard, go to the Appearance > Menus > Select Menu
Here Select Menu according to you
Click on Save Menu.
463. How to manage header section in Owlpress Pro?
1. How to change the Site logo
From your dashboard, go to the Appearance > Customize > Header > Site Identity Section
Now Click on the select logo and choose a logo for your site.
If you change & remove the logo then you can use the buttons below it.
Click on Publish.
2. How to customize the width of the Site logo
From your dashboard, go to the Appearance > Customize > Header > Site Identity Section
Now Scroll bar is used for logo width Customize.
Click on Publish.
3. How to manage Site Title & Tagline
From your dashboard, go to the Appearance > Customize > Header > Site Identity Section
Now manage site title & tagline as per your choice.
Click on Publish.
4. How to change the site icon
From your dashboard, go to the Appearance > Customize > Header > Site Identity Section
Now Click on button & select Site icon . ;
You can use site icon size maximum 512 x 512px.
Click on Publish.
5. How to Customize Site title & description font size
From your dashboard, go to the Appearance > Customize > Header > Site Identity Sectio
Here you can customize the Site title & description.
Click on Publish.
6. How to manage social icons in the above header
From your dashboard, go to the Appearance > Customize > Header > Header Navigation
Here you can manage social icons as per your choice.
Click on Publish.
7. How to manage the Button in the above header
From your dashboard, go to the Appearance > Customize > Header > header navigation
Here you can manage the button as per your choice.
Click on Publish.
8. How to manage info in the below header
From your dashboard, go to the Appearance > Customize > Header > Below Header
Here you can manage the below header as per your choice.
Click on Publish.
9. Hide/Show Sticky Header
From your dashboard, go to the Appearance > Customize > Header > Sticky Header Section
Now Click on the check box for Hide/Show Sticky header
Click on Publish.
464. How to manage Service Section SpaBiz Pro?
1. How to manage Service-1?
From your dashboard, go to the Appearance > Customize > FrontPage Sections > Service Section
Here you can manage Title, Subtitle, Description in the Service section.
Click on Publish.
Here you can manage content & Column in the Service-1.
Click on Publish.
2. How to manage Service-2?
From your dashboard, go to the Appearance > Customize > FrontPage Sections > Service Section
Here you can manage content in the Service-2.
Click on Publish.
465. How to Activate license in Appetizer pro?
How to Activate License key in Appetizer pro
Go to your WordPress website dashboard
Go to Appearance > Theme License
Enter your theme license key into the License Key field
Click Activate
466. How to manage About page in Owlpress Pro?
1. Create a Page & Select Template
From your dashboard, go to the Dashboard > Pages > Add New
Now Create a page & Select the Template.
Click on Publish.
2. Hide/Show About Section
From your dashboard, go to the Appearance > Customize > Page Templates > About Page
Now click on the check box for the hide/show About section.
Click on Publish.
3. How to manage the left content
From your dashboard, go to the Appearance > Customize > Page Templates > About Page
Now you can manage the left Content.
Click on Publish.
4. How to manage the right content
From your dashboard, go to the Appearance > Customize > Page Templates > About Page
Now you can manage the right Content.
Click on Publish.
5. How to manage title, subtitle description & hide/show of Process section
From your dashboard, go to the Appearance > Customize > Page Templates > About Page
Now you can manage the title, subtitle description & hide/show of the Process section.
Click on Publish.
6. How to manage the content of the Process section
From your dashboard, go to the Appearance > Customize > Page Templates > About Page
Now you can manage the content of the Process section.
Click on Publish.
7. Background image related setting of the process section
From your dashboard, go to the Appearance > Customize > General > Breadcrumb Section
Now you can manage background image & opacity in Breadcrumb.
Click on Publish.
8. Hide/Show Timeline Section
From your dashboard, go to the Appearance > Customize > Page Templates > About Page
Now click on the check box for the hide/show TimeLine section.
Click on Publish.
9. How to manage title, subtitle & description of timeline section
From your dashboard, go to the Appearance > Customize > Page Templates > About Page
Now you can manage title, subtitle & Description.
Click on Publish.
10. How to manage Content of timeline section
From your dashboard, go to the Appearance > Customize > Page Templates > About Page
Now you can manage content here in the Timeline section.
Click on Publish.
11. Hide/Show Mission Section
From your dashboard, go to the Appearance > Customize > Page Templates > About Page
Now click on the check box for the hide/show Mission section.
Click on Publish.
12. Title, Subtitle & Description in Mission Section
From your dashboard, go to the Appearance > Customize > Page Templates > About Page
Now here you can manage Title, Subtitle & Description Mission section.
Click on Publish.
13. How to manage left content in the mission section
From your dashboard, go to the Appearance > Customize > Page Templates > About Page
Now here you can manage the left content in the Mission section.
Click on Publish.
14. How to manage Sponsor in the mission section
From your dashboard, go to the Appearance > Customize > Page Templates > About Page
Now here you can manage Sponsor in the Mission section.
Click on Publish.
467. How to manage 404 Page in Decorme?
1.How to manage Content in 404 Page
From your dashboard, go to the Appearance > Customize > Page Templates > 404 page
Here you can change title, Subtitle SUbtite2 & Description in 404 page.
Click on Publish.
468. How to manage Blog Section?
1.How to manage Title & Content Blog Section
From your dashboard, go to the Appearance > Customize > FrontPage Sections > Blog Section
Here you can manage the title & content Blog Section
Now Click on Publish.
2.How to manage blog column & no. of post display in Blog Section
From your dashboard, go to the Appearance > Customize > FrontPage Sections > Blog Section
Here you can manage the blog column & no. of post display in blog Section
Now Click on Publish.
469. How to install Appetizer Lite?
Go to the menu Appearance > Themes and click on the Add New button.
Click on the Upload Theme button.
Click on the Browse button and navigate to the unzipped theme package on your computer.
Look for a file called Appetizer.zip Click on it to select, then click OK.
Click on the Install Now button and wait until the installation is complete.
Click on the Activate link to activate the theme on your WordPress site.
470. How to manage Gallery page in CoziPress
1.How to manage title, Subtitle & Description Pro Features
From your dashboard, go to the Appearance > Customize > Page Template > Gallery Page
Here you can change title, Subtitle & Description in Gallery section.
Click on Publish.
2.How to manage Gallery Content Pro Features
From your dashboard, go to the Appearance > Customize > Page Template > Gallery Page
Here you setup content in gallery section.
Click on Publish.
471. How to manage Testimonial Section in CoziPress
1.How to manage title, Subtitle & Description
From your dashboard, go to the Appearance > Customize > FrontPage Sections > Testimonial Section
Here you can change title, Subtitle & Description in Testimonial section.
Click on Publish.
2.How to manage Testimonial Content
From your dashboard, go to the Appearance > Customize > FrontPage Sections > Testimonial Section
Here you setup content in testimonial section.
Click on Publish.
3.How to manage testimonial Column Pro Features
From your dashboard, go to the Appearance > Customize > FrontPage Sections > Testimonial Section
Here you can choose column layout in testimonial section.
Click on Publish.
4.How to manage Background image Position & Opacity
From your dashboard, go to the Appearance > Customize > FrontPage Sections > Testimonial Section
Here you can manage Background Image Related Settings.
Click on Publish.
472. How to setup Widgets Footer 1 to Footer 4 layout
1. How to setup Footer Widget in Footer Widget Area
From your dashboard, go to the Appearance > Widgets > Footer Widget Area
Here You can click on add a widget.
Now Select widgets from the list & fill the title according to you.
Click on Publish.
473. How to manage Blog page in Owlpress Pro?
1. How to create a blog post
From your dashboard, go to the Appearance > post > add a new post
Here you can create a new blog post.
Click on Publish.
2. How to manage Content Blog Page
From your dashboard, go to the Appearance > Customize > FrontPage Sections > Blog Section
Here you can manage content Blog Section
Now Click on Publish.
474. How to manage Funfact Section in Spintech
1.How to manage Content Pro Features
From your dashboard, go to the Appearance > Customize > FrontPage Sections > Funfact Section
Here you can manage content in Funfact section.
Click on Publish.
2.How to manage Funfact Column Pro Features
From your dashboard, go to the Appearance > Customize > FrontPage Sections > Funfact Section
Here you can choose column layout in funfact section.
Click on Publish.
3.How to add Background image Pro Features
From your dashboard, go to the Appearance > Customize > FrontPage Sections > Funfact Section
Here you can change & remove background image in funfact section.
Click on Publish.
4.How to setup Background image Position Pro Features
From your dashboard, go to the Appearance > Customize > FrontPage Sections > Funfact Section
Here you can setup background image position in funfact section.
Click on Publish.
475. How to manage Contact Page in SpaBiz Pro?
1.Create a Page & Select Template
From your dashboard, go to the Dashboard > Pages > Add New
Now Create a page & Select the Template.
Click on Publish.
2.How to manage Contact head?
From your dashboard, go to the Appearance > Customize > Page Templates > Contact Page
Here you can change hide/show, Title, Subtitle & Description in Contact section.
Click on Publish.
3.How to manage content & Column?
From your dashboard, go to the Appearance > Customize > Page Templates > Contact Page
Here you can change Title, Subtitle, Subtitle2, Subtitle2, Link & Icon & Column in Contact section.
Click on Publish.
4.How to manage Contact Form Section?
From your dashboard, go to the Appearance > Customize > Page Templates > Contact Page
Here you can manage contact Form Section.
Click on Publish.
5.How to manage Map Section?
From your dashboard, go to the Appearance > Customize > Page Templates > Contact Page
Here you can manage Map Link & hide/show in map section.
Click on Publish.
476. How to manage Company About Page
1.Create a Page & Select Template
From your dashboard, go to the Dashboard > Pages > Add New
Now Create a page & Select the Template.
Click on Publish.
2.Hide/Show About Section in company About page
From your dashboard, go to the Appearance > Customize > Page Templates > Company About Page
Now click on the check box for the hide/show About section.
Click on Publish
.
3.Hide/Show CTA Section in company About page
From your dashboard, go to the Appearance > Customize > Page Templates > Company About Page
Now click on the check box for the hide/show CTA section.
Click on Publish.
4.Hide/Show Team Section in company About page
From your dashboard, go to the Appearance > Customize > Page Templates > Company About Page
Now click on the check box for the hide/show Team section.
Click on Publish.
5.Hide/Show Funfact Section in company About page
From your dashboard, go to the Appearance > Customize > Page Templates > Company About Page
Now click on the check box for the hide/show Funfact section.
Click on Publish.
6.Hide/Show Skill Section in company About page
From your dashboard, go to the Appearance > Customize > Page Templates > Company About Page
Now click on the check box for the hide/show Skill section.
Click on Publish.
477. How to manage header section in Appetizer Lite?
1. How to change the Site logo
From your dashboard, go to the Appearance > Customize > Header > Site Identity Section
Now Click on the select logo and choose a logo for your site.
If you change & remove the logo then you can use the buttons below it.
Click on Publish.
2. How to customize the width of the Site logo
From your dashboard, go to the Appearance > Customize > Header > Site Identity Section
Now Scroll bar is used for logo width Customize.
Click on Publish.
3. How to manage site title & tagline?
From your dashboard, go to the Appearance > Customize > Header > Site Identity Section
Now manage site title & tagline as per your choice.
Click on Publish.
4. How to change the site icon
From your dashboard, go to the Appearance > Customize > Header > Site Identity Section
Now Click on button & select Site icon . ;
You can use site icon size maximum 512 x 512px.
Click on Publish.
5. How to manage opening hours & phone in the above header
From your dashboard, go to the Appearance > Customize > Header > Above header Section
Here you can manage phone & opening hours.
Click on Publish.
6. How to manage social icons in the above header
From your dashboard, go to the Appearance > Customize > Header > Above header Section
Here you can manage social icons as per your choice.
Click on Publish.
7. Hide/Show Cart & Search icon in Header Navigation
From your dashboard, go to the Appearance > Customize > Header > Header Navigation Section
Now Click on the check box for Hide/Show Cart icon.
Click on Publish.
8. Manage Button in Header Navigation
From your dashboard, go to the Appearance > Customize > Header > Header Navigation Section
Now you can manage button.
Click on Publish.
9. Hide/Show Sticky Header
From your dashboard, go to the Appearance > Customize > Header > Sticky Header Section
Now Click on the check box for Hide/Show Sticky header
Click on Publish.
478. How to install Owlpress Lite?
Go to the menu Appearance > Themes and click on the Add New button.
Click on the Upload Theme button.
Click on the Browse button and navigate to the unzipped theme package on your computer.
Look for a file called Owlpress.zip Click on it to select, then click OK.
Click on the Install Now button and wait until the installation is complete.
Click on the Activate link to activate the theme on your WordPress site.
479. Manage Coming soon Page?
1.Enable/Disable coming soon page
From your dashboard, go to the Appearance > Customize > Page Templates > Coming soon Page
Now click on check box for enable/disable coming soon page.
Click on Publish.
2.How to manage Content in Comingsoon Page
From your dashboard, go to the Appearance > Customize > Page Templates > Coming soon Page
Here You Can Manage Content in coming soon page.
Click on Publish.
480. How to manage Background Image in Setto Lite?
In WordPress Dashboard go to the Appearance submenu and click on Customize.
After clicking on customizing you will in theme Customizer.
Here you have to click on the Home Page Section.
Here you have to click on the Background Image Section
In-background Image Here you can manage the image.
Go to Customize ->Home Page Section-> Background Image Section
481. How to manage Offer zone Section?
1.How to manage Offer zone Section
From your dashboard, go to the Appearance > Customize > FrontPage Sections > Offere Zone Section
Here you can manage the Offer Zone Section
Now Click on Publish.
482. Home Page Setup in CoziPress Pro
1.How to Setup Home Page?
Go to Pages > Add New > Create a Page Named Home ( the name could be anything you like). On the Right Side Under the Template, a drop-down Menu is for Choosing the Home Page.
You have to Choose the Template and publish it.
2.How to Assign Home Page as a Front Page?
From your dashboard , go to the Setting > Reading > Home Page Displays
Click on radio button of your A Static page
Click on Save Changes.
483. How to Manage Privacy Policy page in Setto Pro?
1.Create a Privacy Policy & Select Template
From your dashboard, go to the Dashboard > Pages > Add New
Now Create a page & Select the Template.
Click on Publish.
2.Manage Privacy Policy Page!
From your dashboard, go to the Dashboard > Page template >Privacy Policy Page.
Here you can manage Return Policy Page in About Page.
Click on Publish.
484. Install & Activate Burger Companion Plugin?
In the WordPress dashboard go to the appearance submenu and click on customize. After clicking on customizing you will in theme customizer. Here you have to show in the recommended plugin then click on the install & activate Button.
485. How to manage header section in Hotel Galaxy Pro
01. How to manage Site Title & Tagline?
From your dashboard, go to the Appearance > Customize > Header > Site Identity Section
Now manage the site title & taglines per your choice.
Click on Publish.
02. How do you manage the Site logo?
From your dashboard, go to the Appearance > Customize > Header > Site Identity Section
Now Click on Select logo and choose the logo for your site.
If you are change & remove the logo then you can use the buttons below it.
Here You can manage logo width
Click on Publish.
03. How to display the Site Title & Tagline?
From your dashboard, go to the Appearance > Customize > Header > Site Identity Section
Now Click on The Check box for Hide/Show Site title & tagline.
Click on Publish.
04. How to change the site icon
From your dashboard, go to the Appearance > Customize > Header > Site Identity Section.
Now Click on the button & select the Site icon.
You can use a site icon size maximum of 512 x 512px.
Click on Publish.
05. Hide/Show Sticky Header
From your dashboard, go to the Appearance > Customize > Header > Sticky Header.
Now Click on the check box for Hide/Show Sticky header
Click on Publish.
06. Hide/Show Header Style
From your dashboard, go to the Appearance > Customize > Header > Header style.
Now you can select here Header style
Click on Publish.
07. How do you Hide/Show the Above Header?
From your dashboard, go to the Appearance > Customize > Header > Above header
Check the Box on the Hide/Show above the Header option to reveal the Above header.
Click on Publish.
08. How to manage Header Office Detail in the Above Header Section
From your dashboard, go to the Appearance > Customize > Header > Above header Section
Here you can change the Header Office detail per your choice.
Click on Publish.
09. How to manage Social Media Icons in the Above Header Section
From your dashboard, go to the Appearance > Customize > Header > Above header Section
Here you can change the Social Media Icons per your choice.
Click on Publish.
10. How to manage Header Top Typing in the Above Header Section
From your dashboard, go to the Appearance > Customize > Header > Above header Section
Here you can change the Header Top Info & Header Top Info Typingper your choice.
This is Feature Header Style Two
Click on Publish.
11. How do you Hide/Show the Header Navigation?
From your dashboard, go to the Appearance > Customize > Header > Header Navigation
Check the Box on the Hide/Show above the Header option to reveal (Like:- Search, Cart, and Book now) the Header Navigation.
Click on Publish.
12. How to Manage Button Title?
From your dashboard, go to the Appearance > Customize > Header > Header Navigation
Now you can manage the Button Title.
Click on Publish
486. How to manage About page in Seokart Pro?
1. Create a Page & Select Template
From your dashboard, go to the Dashboard > Pages > Add New
Now Create a page & Select the Template.
Click on Publish.
2. Hide/Show About Section
From your dashboard, go to the Appearance > Customize > Page Templates > About Page
Now click on the check box for the hide/show About section.
Click on Publish.
3. How to manage title, Subtitle & Description
From your dashboard, go to the Appearance > Customize > Page Templates > About Page
Here you can change the title, Subtitle & Description.
Click on Publish.
4. How to manage content set up in about section
From your dashboard, go to the Appearance > Customize > Page Templates > About Page
Here you can change the content in the about section.
Click on Publish.
5. How to manage Hide/Show & title, subtitle, & description feature section in about page
From your dashboard, go to the Appearance > Customize > Page Templates > About Page
Here you can manage Hide/Show & title, subtitle, & description in the about section.
Click on Publish.
6. How to manage content & column feature section in about page
From your dashboard, go to the Appearance > Customize > Page Templates > About Page
Here you can manage content in the feature section.
Click on Publish.
7. How to manage Hide/Show & title, subtitle, & description work section in about page
From your dashboard, go to the Appearance > Customize > Page Templates >; About Page
Here you can manage Hide/Show & title, subtitle, & description in the about section.
Click on Publish.
8. How to manage content & column work section in about page
From your dashboard, go to the Appearance > Customize > Page Templates > About Page
Here you can manage content in the feature section.
Click on Publish.
9. How to manage Hide/Show & title, subtitle, & description Analizer section in about page
From your dashboard, go to the Appearance > Customize > Page Templates >; About Page
Here you can manage Hide/Show & title, subtitle, & description in the Analizer section.
Click on Publish.
10. How to manage Shortcode & image Analizer section in about page
From your dashboard, go to the Appearance > Customize > Page Templates >; About Page
Here you can manage Shortcode & image in the Analizer section.
Click on Publish.
11. How to manage Hide/Show & title, subtitle, & description Sponsor section in about page
From your dashboard, go to the Appearance > Customize > Page Templates >; About Page
Here you can manage Hide/Show & title, subtitle, & description in the sponsor section.
Click on Publish.
12. How to manage the image Sponsor section on the about page
From your dashboard, go to the Appearance > Customize > Page Templates > About Page
Here you can manage images in the sponsor section.
Click on Publish.
13. How to manage the team section in the about page
From your dashboard, go to the Appearance > Customize > Page Templates > About Page
Here you can manage images in the Team section.
Click on Publish.
487. How to manage Menu Section in SpaBiz Pro?
1.How to manage content of Menu section?
From your dashboard, go to the Appearance > Customize > FrontPage Sections > Menu Section
Here you can change Title, Subtitle, Description & content (No of Menu Display & Column)in Menu section.
Click on Publish.
488. How to manage Coming Soon Page in Seokart Pro?
From your dashboard, go to the Appearance > Customize > Page Templates > Coming soon Page
Now click on the check box for enable/disable coming soon page, Enable Form, Enable Social Icon & Style change.
Click on Publish.
2.How to manage Time & Shortcode in Comingsoon Page
From your dashboard, go to the Appearance > Customize > Page Templates > Coming soon Page
Here You Can Manage time & Shortcode.
Click on Publish.
3. How to manage social icons in Coming soon Page
From your dashboard, go to the Appearance > Customize > Page Templates > Coming soon Page
Here You Can Manage time & Shortcode.
Click on Publish.
489. How to setup Footer Widgets
1. How to setup Footer Widget in Footer Widget Area
From your dashboard , go to the Appearance > Widgets > Footer Widget Area
Here You can click on add a widget.
Now Select widgets from the list & fill title according to you.
Click on Publish.
490. How to manage footer section in Appetizer Pro?
1. How to manage the footer above section in the footer
From your dashboard, go to the Appearance > Customize > Footer > Footer Above
Here you manage the footer above related setting.
Click on Publish.
2. How to manage footer background image related setting in the footer
From your dashboard, go to the Appearance > Customize > Footer > Footer background
Here you can change the footer background image-related setting.
Click on Publish.
3. How to manage footer widget layout in footer.
From your dashboard, go to the Appearance > Customize > Footer > Footer Above
Here you can manage the footer widget layout.
Click on Publish.
4. How to manage copyright & Support section in footer.
From your dashboard, go to the Appearance > Customize > Footer > Footer Bottom
Here you can manage the copyright & Support section.
Click on Publish.
4. How to manage the payment icon in the footer.
From your dashboard, go to the Appearance > Customize > Footer > Footer Bottom
Here you can manage the payment icon
491. How to manage Gallery Section in Spintech
1.How to manage title, Subtitle & Description Pro Features
From your dashboard, go to the Appearance > Customize > FrontPage Sections > Gallery Section
Here you can change title, Subtitle & Description in Gallery section.
Click on Publish.
2.How to manage Gallery Content Pro Features
From your dashboard, go to the Appearance > Customize > FrontPage Sections > Gallery Section
Here you setup content in gallery section.
Click on Publish.
3.How to manage Gallery Column Pro Features
From your dashboard, go to the Appearance > Customize > FrontPage Sections > Gallery Section
Here you can choose column layout in gallery section.
Click on Publish.
492. How to manage Gallery Section in SpaBiz Pro?
1.How to manage content of gallery section?
From your dashboard, go to the Appearance > Customize > FrontPage Sections > Gallery Section
Here you can change content (image,title & Column)in Gallery section.
Click on Publish.
493. How to manage colors in Seokart Pro?
1. How to manage Background Color
From your dashboard , go to the Appearance > Customize > Colors > Background Color
Here You can manage background color.
494. Product Section Manage of Lingerie Home Page!
1.Product Section Manage!
From your dashboard, go to the Appearance > Customize >Lingerie Home page > Product Section
Here you can manage the Title & Select category of the Product .
Now Click on Publish.
495. How to manage Custom Section in CoziPress
1.How to manage title, Subtitle & Description Pro Features
From your dashboard, go to the Appearance > Customize > FrontPage Sections > Custom Section
Here you can change title, Subtitle & Description in Custom section.
Click on Publish.
2.How to manage custom edit section Pro Features
From your dashboard, go to the Appearance > Customize > FrontPage Sections > Custom Section
Here you can change in Custom section.
Click on Publish.
496. How to select Digipress Theme?
In the WordPress dashboard go to the appearance submenu and click on Customize
Select Theme -> Select Theme -> Select Digipress
497. How to manage background image in Seokart Lite?
In WordPress Dashboard go to the Appearance submenu and click on Customize.
After clicking on customizing you will in theme Customizer.
Here you have to click on the Home Page Section.
Here you have to click on the Background Image Section
In-background Image Here you can manage the image.
Go to Customize ->Home Page Section-> Background Image Section
498. How to manage section Reorder in Setto Pro?
1. Manage section reorder.
From your dashboard, go to the Appearance > Customize > Section Reorder
Here you can manage section reorder.
Click on Publish.
499. How to manage Call To Action Section in Owlpress Pro?
1. How to manage CTA Title & Description in a call to action
From your dashboard, go to the Appearance > Customize > FrontPage Sections > call to action Section
Here you can change the title & shortcode in a call to action section.
Click on Publish.
2. How to manage Contact & Button in a call to action
From your dashboard, go to the Appearance > Customize > FrontPage Sections > call to action Section
Here you can manage Contact & Button in a call to action section.
Click on Publish.
500. Blog Section Manage of Electronics Home Page!
1. Title & Category Blog Section!
From your dashboard, go to the Appearance > Customize > FrontPage Sections > Blog Section
Here you can manage the title & content Blog Section
Now Click on Publish.
2.Blog Column & No. of post display in Blog Section!
From your dashboard, go to the Appearance > Customize > FrontPage Sections > Blog Section
Here you can manage the blog column & no. of post display in blog Section
Now Click on Publish.
501. How to manage footer section in Spintech
1.Hide/Show social footer above Section in footer
From your dashboard, go to the Appearance > Customize > Footer > Footer Above
Now click on check box for hide/show social icon.
Click on Publish.
2.How to manage social icon in footer above section.
From your dashboard, go to the Appearance > Customize > Footer > Footer Above
Here you can manage Social icon in footer above section.
Click on Publish.
3.Hide/Show contact info footer above Section in footer
From your dashboard, go to the Appearance > Customize > Footer > Footer Above
Now click on check box for hide/show contact info.
Click on Publish.
4.How to manage content in contact info section.
From your dashboard, go to the Appearance > Customize > Footer > Footer Above
Here you can manage content in context info section.
Click on Publish.
5.How to manage footer widget layout in footer widget area .
From your dashboard, go to the Appearance > Customize > Footer > Footer Widget Area
Here you can manage footer widget layout .
Click on Publish.
6.How to manage footer bottom logo .
From your dashboard, go to the Appearance > Customize > Footer > Footer Bottom
Here you can manage footer bottom logo.
Click on Publish.
7.How to manage copyright content in the footer bottom .
From your dashboard, go to the Appearance > Customize > Footer > Footer Bottom
Here you can manage copyright content in the footer bottom.
Click on Publish.
8.Hide/Show menu in footer bottom
From your dashboard, go to the Appearance > Customize > Footer > Footer Above
Now click on the check box for the hide/show menu.
Click on Publish.
502. How to manage menu setup?
From your dashboard, go to the Appearance > Menus > Select Menu
Here Select Menu according to you
Click on Save Menu.
503. How to create new project of CoziPress
1.How to create new project of CoziPress
From your dashboard, go to the Appearance > project > add new project
Here you can create new project.
Click on Publish.
504. How to install Decorme?
Go to the menu Appearance > Themes and click on the Add New button.
Click on the Upload Theme button.
Click on the Browse button and navigate to the unzipped theme package on your computer.
Look for a file called Decorme.zip Click on it to select, then click OK.
Click on the Install Now button and wait until the installation is complete.
Click on the Activate link to activate the theme on your WordPress site.
505. Slider Manage of Goggles Home Page!
1.Goggles slider content!
From your dashboard, go to the Appearance > Customize > Goggles Home Page > Slider Section
Here you can manage the content of the slider section
Now Click on Publish.
506. How to manage Custom Section in SpaBiz Pro?
1.How to manage custom section?
From your dashboard, go to the Appearance > Customize > FrontPage Sections > Custom Section
Now click edit button
Here you can editable section content in Custom section.
Click on Publish.
507. How to Activate license in Seokart pro?
How to Activate License key in Seokart pro
Go to your WordPress website dashboard
Go to Appearance > Theme License
Enter your theme license key into the License Key field
Click Activate
508. How to Setup Home Page?
Go to Pages > Add New > Create a Page Named Home ( the name could be anything you like). On the Right Side Under the Template, the drop-down Menu is for Choosing the Home Page.
You have to Choose the Template and publish it.
2.How to Assign Home Page as a Front Page?
From your dashboard, go to the Setting > Reading > Home Page Displays
Click on the radio button of your A Static page
Click on Save Changes.
509. How to manage General Section in Spintech
1.Hide/Show Breadcrumb Section
From your dashboard, go to the Appearance > Customize > General > Breadcrumb Section
Now Click on check box for Hide/Show Breadcrumb Section.
Click on Publish.
2.How to Remove & Change Image in Breadcrumb Section
From your dashboard, go to the Appearance > Customize > General > Breadcrumb Section
Here you can Remove & Change image in Breadcrumb Section.
Click on Publish.
3.How to manage Background Attachment image
From your dashboard, go to the Appearance > Customize > General > Breadcrumb Section
Here you can set breadcrumb image according to you.
Click on Publish.
4.How to manage Min Height & opacity of Breadcrumb
From your dashboard, go to the Appearance > Customize > General > Breadcrumb Section
Here you can use scroll bar & set Height & Opacity
Click on Publish.
5.Hide/Show Preloader Pro Features
From your dashboard, go to the Appearance > Customize > General > Preloader Section
Here you can Hide/Show Preloader in Spintech Pro
Click on Publish.
6.Hide/Show Top Scroller Pro Features
From your dashboard, go to the Appearance > Customize > General > Top Scroller Section
Here you can Hide/Show Top Scroller in Spintech Pro
Click on Publish.
7.How to change Scroller Icon Pro Features
From your dashboard, go to the Appearance > Customize > General > Top Scroller Section
Here you can change Scroller icon in library
Click on Publish.
510. How to manage footer-1 in SpaBiz Pro?
1.How to manage footer type?
From your dashboard, go to the Appearance > Customize > Footer > Footer Type
here can Select footer.
Click on Publish.
2.How to manage footer background?
From your dashboard, go to the Appearance > Customize > Footer > Footer Background
Here you can change footer background image, opacity & background color setting.
Click on Publish.
3.How to manage Footer Above?
From your dashboard, go to the Appearance > Customize > Footer > Footer Above
Here you can manage hide/show, title, description, shortcode.
Click on Publish.
4.How to manage footer widget layout in footer
From your dashboard, go to the Appearance > Customize > Footer > Footer Widget Area
Here you can manage footer widget layout.
Click on Publish.
5.How to manage copyright section
From your dashboard, go to the Appearance > Customize > Footer > Footer Copyright
Here you can manage the footer Copyright.
Click on Publish.
511. How to manage Coming Soon Page in Spintech
1.Create a Page & Select Template
From your dashboard, go to the Dashboard > Pages > Add New
Now Create a page & Select the Template in Page Attributes.
Click on Publish.
2.Enable/Disable coming soon page
From your dashboard, go to the Appearance > Customize > Page Templates > Coming soon Page
Now click on check box for enable/disable coming soon page.
Click on Publish.
3.Enable/Disable form & social icons
From your dashboard, go to the Appearance > Customize > Page Templates > Coming soon Page
Now click on check box for enable/disable form & social icons.
Click on Publish.
4.How to manage logo in coming soon page
From your dashboard, go to the Appearance > Customize > Page Templates > Coming soon Page
Here you can manage logo in coming soon page.
Click on Publish.
5.How to manage title & Description in coming soon page
From your dashboard, go to the Appearance > Customize > Page Templates > coming soon page
Here you can change title & Description in coming soon page.
Click on Publish.
6.How to manage time & date in coming soon page
From your dashboard, go to the Appearance > Customize > Page Templates > coming soon page
Here you can manage time & date in coming soon page.
Click on Publish.
7.How to manage shortcode in coming soon page
From your dashboard, go to the Appearance > Customize > Page Templates > coming soon page
Here you can manage time & date in coming soon page.
Click on Publish.
8.How to manage social icons in coming soon page
From your dashboard, go to the Appearance > Customize > Page Templates > coming soon page
Here you can manage social icon in coming soon page.
Click on Publish.
9.How to manage background image in coming soon page
From your dashboard, go to the Appearance > Customize > Page Templates > coming soon page
Here you can manage background image in coming soon page.
Click on Publish.
512. How to manage Gallery Section in Kundoo
1.How to manage title, Subtitle & Description
From your dashboard, go to the Appearance > Customize > FrontPage Sections > Gallery Section
Here you can change title, Subtitle & Description in Gallery section.
Click on Publish.
2.How to manage Gallery Content
From your dashboard, go to the Appearance > Customize > FrontPage Sections > Gallery Section
Here you setup content in gallery section.
Click on Publish.
513. How to manage Team Section in Appetizer Pro?
1. How to manage title & Description
From your dashboard, go to the Appearance > Customize > FrontPage Sections > Team Section
Here you can change the title & Description in the team section.
Click on Publish.
2. How to manage content & Column
From your dashboard, go to the Appearance > Customize > FrontPage Sections > Team Section
Here you can change content & Column in the team section.
Click on Publish.
514. How to manage Project Page in Kundoo
1.How to manage title, Subtitle & Description
From your dashboard, go to the Appearance > Customize >Page Templates > Project Page
Here you can change title, Subtitle & Description in project Page.
Click on Publish.
515. How to setup countdown on Products?
Step 1
1.Install Plugin WPC Countdown Timer for WooCommerce
Step 2
1.Setting of Countdown in Plugin
Step 3
1.Setup Countdown setting in Product
516. How to manage footer section in Seokart Pro?
1. How to manage footer background image related setting in the footer
From your dashboard, go to the Appearance > Customize > Footer > Footer background
Here you can change the footer background image-related setting.
Click on Publish.
2. How to manage the footer above section in the footer
From your dashboard, go to the Appearance > Customize > Footer > Footer Above
Here you manage the footer above related setting.
Click on Publish.
3. How to manage footer widget layout in footer.
From your dashboard, go to the Appearance > Customize > Footer > Footer Above
Here you can manage the footer widget layout.
Click on Publish.
4. How to manage footer layout & copyright in footer.
From your dashboard, go to the Appearance > Customize > Footer > Footer Bottom
Here you can manage layout & copyright.
Click on Publish.
5. How to manage social icons in the footer.
From your dashboard, go to the Appearance > Customize > Footer > Footer Bottom
Here you can hide/show & manage social icons.
Click on Publish.
517. How to Demo Import for Seokart pro?
Demo Import For Seokart pro
Install One Click Demo Import plugin in your site
After installing the plugin,
Go to Appearance > Premade Demos
Finally, click Import Demo Data Button
Wait for the import to finish
You are done!!!
518. How to manage Blog Masonary in Decorme?
1.How to manage Blog Masonary?
From your dashboard, go to the Appearance > Customize > Page Template > Blog Page
Here you can Select Category for Blog Masonry Page .
Click on Publish.
519. Product Section Manage of Electronics Home Page!
1.Product Section Manage!
From your dashboard, go to the Appearance > Customize > Electronics Home Page Sections > Product Section
Here you can manage the Title, Subtitle & Select category of the Product .
Now Click on Publish
2. Create a products!
From your dashboard, go to the Product > Add New>
Here you can add new products.
520. How to manage background image?
In WordPress Dashboard go to the Appearance submenu and click on Customize.
After clicking on customizing you will in theme Customizer.
Here you have to click on the Home Page Section.
In-background Image Here you can manage the image.
Go to Customize ->Home Page Section-> Background Image Section
521. How to manage Testimonial Section in Decorme?
1.How to manage content Testimonial Section?
From your dashboard, go to the Appearance > Customize > FrontPage Sections > Testimonial Section
Here you can change title, Subtitle & Description (content , image ETC) in Testimonial section.
Click on Publish.
522. How to manage Pricing Page in Kundoo
1.Create Pricing Filter Page & Select Template
From your dashboard, go to the Dashboard > Pages > Add New
Now Create a page & Select the Template.
Click on Publish.
2.How to manage title, Subtitle & Description Pro Features
From your dashboard, go to the Appearance > Customize > Page Templates > Pricing Page
Here you can change title, Subtitle & Description in Pricing section.
Click on Publish.
3.How to manage Pricing Column Pro Features
From your dashboard, go to the Appearance > Customize > Page Template > Pricing Page
Here you can choose column layout in pricing section.
Click on Publish.
4.How to manage Your Pricing Pro Features
From your dashboard, go to the Appearance > Customize > Page Template > Pricing Page
Here you can Select Your Pricing
Click on Publish.
523. How to manage Typography?
1. How to manage Font Size & Line height in Body Typography
From your dashboard , go to the Appearance > Customize > typography > body typography Section
Here You can manage Font Size &; line Height.
Click on Publish.
2. How to manage Font Style & Transform in Body Typography
From your dashboard , go to the Appearance > Customize > typography > body typography Section
Here You can manage Font Style & Transform.
Click on Publish.
3. How to manage Font Size & Line height H1 to H6 in Headings Typography
From your dashboard, go to the Appearance > Customize > typography > Heading Section
Here You can manage Font Size & line Height.
Click on Publish.
4. How to manage Font Style & Transform H1 to H6 in Headings Typography
From your dashboard, go to the Appearance > Customize > typography > Heading Section
Here You can manage Font Style & Transform.
Click on Publish.
524. Newsletter Section Manage of Watch Home Page!
1.Newsletter Section Manage!
From your dashboard, go to the Appearance > Customize > watch Home page > Newsletter Section
Here you can manage the Video Link, Title, Subtitle & Short code of Form .
Now Click on Publish .
525. How to manage Typography in Seokart Pro?
1. How to manage Font Size & Line height in Body Typography
From your dashboard , go to the Appearance > Customize > typography > body typography Section
Here You can manage Font Size &; line Height.
Click on Publish.
2. How to manage letter spacing in Body Typography
From your dashboard , go to the Appearance > Customize > typography > body typography Section
Here You can manage letter spacing.
Click on Publish.
3. How to manage Font Style & Transform in Body Typography
From your dashboard , go to the Appearance > Customize > typography > body typography Section
Here You can manage Font Style & Transform.
Click on Publish.
4. How to manage weight & text decoration in Body Typography
From your dashboard , go to the Appearance > Customize > typography > body typography Section
Here You can manage weight & text decoration.
Click on Publish.
5. How to manage Font Size & Line height H1 to H6 in Headings Typography
From your dashboard, go to the Appearance > Customize > typography > Heading Section
Here You can manage Font Size & line Height.
Click on Publish.
6. How to manage letter spacing in Heading Typography
From your dashboard , go to the Appearance > Customize > typography > body typography Section
Here You can manage letter spacing.
Click on Publish.
7. How to manage Font Style & Transform H1 to H6 in Headings Typography
From your dashboard, go to the Appearance > Customize > typography > Heading Section
Here You can manage Font Style & Transform.
Click on Publish.
8. How to manage weight & text decoration in Heading Typography
From your dashboard , go to the Appearance > Customize > typography > body typography Section
Here You can manage weight & text decoration.
Click on Publish.
526. How to manage General Section in Appetizer Lite?
1. Hide/Show Breadcrumb Section
From your dashboard, go to the Appearance > Customize > General > Breadcrumb Section
Now Click on the check box for Hide/Show Breadcrumb Section.
Click on Publish.
2. Manage Min Height
From your dashboard, go to the Appearance > Customize > General > Breadcrumb Section
Now you can manage min-height in Breadcrumb.
Click on Publish.
3. How to Remove & Change Image in Breadcrumb Section
From your dashboard, go to the Appearance > Customize > General > Breadcrumb Section
Here you can Remove & Change images in Breadcrumb Section.
Click on Publish.
4. How to manage Background Attachment image
From your dashboard, go to the Appearance > Customize > General > Breadcrumb Section
Here you can set the breadcrumb image according to you.
Click on Publish.
5. Manage opacity in Breadcrumb
From your dashboard, go to the Appearance > Customize > General > Breadcrumb Section
Here you can manage opacity in Breadcrumb.
Click on Publish.
527. How to manage Specific Questions Section in Astrocare Pro
1. How to manage the Title in the Specific Questions Section?
From your dashboard, go to the Appearance > Customize > FrontPage Sections >Specific Question Section
Here you can manage content (Like- Title & Button) in the Specific Question section.
Click on Publish.
2. How to Hide/Show Button in the Specific Questions Section?
From your dashboard, go to the Appearance > Customize > FrontPage Sections >Specific Question Section
3. How to manage content in the Specific Questions Section?
From your dashboard, go to the Appearance > Customize > FrontPage Sections >Specific Question Section
Here you can manage content in the Specific Question section.
Click on Publish.
4. Astrocare Pro allows you to add even more Specific Questions Section.Pro Features
From your dashboard, go to the Appearance > Customize > FrontPage Sections >Specific Question Section
Here you can add more Specific Questions to the Specific Question section.
Click on Publish.
5. How to add a Background image in the Specific Questions section?
From your dashboard, go to the Appearance > Customize > FrontPage Sections >Specific Question Section
Here you can add & remove the background image in the Specific Question section.
Click on Publish.
528. How to manage Project Section in Spintech
1.How to manage title, Subtitle & Description
From your dashboard, go to the Appearance > Customize > FrontPage Sections > Project Section
Here you can change title, Subtitle & Description in project section.
Click on Publish.
2.How to add loadmore label
From your dashboard, go to the Appearance > Customize > FrontPage Sections > Project Section
Here you can change title, Subtitle & Description in project section.
Click on Publish.
529. Testimonial Section Manage of Watch Home Page!
1.Testimonial Section Manage!
From your dashboard, go to the Appearance > Customize > watch Home page > Testimonial Section
Here you can manage the Video Link, Title, Subtitle & Change Background image .
Now Click on Publish
530. How to setup Background image in Owlpress Pro?
1. How to the setup Background image
From your dashboard, go to the Appearance > Customize > Background image
Here You can set up a background image.
If you change & remove the logo then you can use the buttons below it.
Click on Publish.
2. How to setup preset image
From your dashboard, go to the Appearance > Customize > Background image
Here You can set up preset background images.
Click on Publish.
3. How to manage image position & size
From your dashboard, go to the Appearance > Customize > Background image
Here You can manage the position & size of the background image.
Click on Publish.
4. How to manage repeat background images & scroll with the page
From your dashboard, go to the Appearance > Customize > Background image
Here You can manage repeat background images & scroll with page background images.
Click on Publish.
531. How to manage Portfolio Page in Seokart Pro?
1. How to manage Portfolio Page?
From your dashboard, go to the Appearance > Customize > Page Templates > Portfolio Page
Here you can manage here button label, column setting & Title.
Click on Publish.
532. How to manage the General Section
1. Hide/Show Pre-loader Section
From your dashboard, go to the Appearance > Customize > General > Pre-loader Section.
Now Click on the check box for Hide/Show Pre-loader Section.
Click on Publish.
2. Hide/Show Breadcrumb Section, Page Title and Page Path
From your dashboard, go to the Appearance > Customize > General > Breadcrumb Section.
Now Click on the check box for Hide/Show Breadcrumb Section.
Click on Publish.
3. How to Manage Min Height Breadcrumb Section?
From your dashboard, go to the Appearance > Customize > General > Breadcrumb Section
Here you can manage the minimum height in the Breadcrumb Section.
Click on Publish.
4. How to Remove & Change BG Image in Breadcrumb Section?
From your dashboard, go to the Appearance > Customize > General > Breadcrumb Section
Here you can Remove & Change the image in the Breadcrumb Section.
Click on Publish.
5. How to change the Background Attachment in the Breadcrumb Section?
From your dashboard, go to the Appearance > Customize > General > Breadcrumb Section
Here you can change the background attachment in the Breadcrumb Section.
Click on Publish.
6. How to manage the Opacity in the Breadcrumb Section?
From your dashboard, go to the Appearance > Customize > General > Breadcrumb Section
Here you can change the opacity in the Breadcrumb Section.
Click on Publish.
7. Hide/Show Top Scroller Button
From your dashboard, go to the Appearance > Customize > General >Top Scroller Button.
Now Click on the check box for Hide/Show Top Scroller Section.
Click on Publish.
8. How to change the icon top scroller button
From your dashboard, go to the Appearance > Customize > General >Top Scroller Button.
Here you can change the icon
Click on Publish.
533. How to Setup Home Page?
How to Setup Home Page?
Go to Pages > Add New > Create a Page Named Home ( the name could be anything you like). On the Right Side Under the Template, the drop-down Menu is for Choosing the Home Page.
You have to Choose the Template and publish it.
2.How to Assign Home Page as a FrontPage?
From your dashboard, go to the Setting > Reading > Home Page Displays
From your dashboard, go to the Appearance > Customize > Style Configurator > Page Layout
Here you can manage the website layout & preset background image.
Click on Publish.
2. Manage prebuilt theme color.
From your dashboard, go to the Appearance > Customize > Style Configurator > prebuilt theme color
Here you can manage prebuilt theme color.
Click on Publish.
3.Enable/disable custom color.
From your dashboard, go to the Appearance > Customize > Style Configurator > custom color
Here you can manage custom colors.
Click on Publish.
4.Manage custom primary.
From your dashboard, go to the Appearance > Customize > Style Configurator > custom color
Here you can manage custom primary color.
Click on Publish.
5.Enable/disable the front palate.
From your dashboard, go to the Appearance > Customize > Style Configurator > Front Pallate
Here you can enable/disable the front palate.
Click on Publish.
535. How to manage team page in Astrocare
1. Create a Page & Select Template
From your dashboard, go to the Dashboard > Pages > Add New
Now Create a page & Select the Template.
Click on Publish.
2. How to manage title & subtitle
From your dashboard, go to the Appearance > Customize > Page Templates > Team Page
Now you can manage the title & subtitle.
Click on Publish.
3. How do we manage the Content & Team Column on the team page?
From your dashboard, go to the Appearance > Customize > Page Templates > Team Page
Now you can manage the content & column.
Click on Publish.
536. How to manage Typography in Seokart Pro?
1. How to manage Font Size & Line height in Body Typography
From your dashboard , go to the Appearance > Customize > typography > body typography Section
Here You can manage Font Size &; line Height.
Click on Publish.
2. How to manage letter spacing in Body Typography
From your dashboard , go to the Appearance > Customize > typography > body typography Section
Here You can manage letter spacing.
Click on Publish.
3. How to manage Font Style & Transform in Body Typography
From your dashboard , go to the Appearance > Customize > typography > body typography Section
Here You can manage Font Style & Transform.
Click on Publish.
4. How to manage weight & text decoration in Body Typography
From your dashboard , go to the Appearance > Customize > typography > body typography Section
Here You can manage weight & text decoration.
Click on Publish.
537. How to manage header section in Decorme?
1. How to change the Site logo
From your dashboard, go to the Appearance > Customize > Header > Site Identity Section
Now Click on the select logo and choose a logo for your site.
If you change & remove the logo then you can use the buttons below it.
Click on Publish.
2. How to customize the width of the Site logo
From your dashboard, go to the Appearance > Customize > Header > Site Identity Section
Now Scroll bar use for logo width Customize.
Click on Publish.
3. How to manage Site Title & Tagline
From your dashboard, go to the Appearance > Customize > Header > Site Identity Section
Now manage site title & tagline as per your choice.
Click on Publish.
4.How to change the site icon
From your dashboard, go to the Appearance > Customize > Header > Site Identity Section
Now Click on button & select Site icon . ;
You can use site icon size maximum 512 x 512px.
Click on Publish.
5.How to Customize Site title & description font size
From your dashboard, go to the Appearance > Customize > Header > Site Identity Section
Here you can customize the Site title & description.
Click on Publish.
6.How to change Header Type?
From your dashboard, go to the Appearance > Customize > Header > Header Style Section
Here you can choose Header Type.
Click on Publish.
7.Hide/Show Search, Cart & Button label icon in Header Navigation
From your dashboard, go to the Appearance > Customize > Header > Header Navigation Section
Now Click on the check box for Hide/Show Cart icon.
Click on Publish.
8.Hide/Show Sticky Header
From your dashboard, go to the Appearance > Customize > Header > Sticky Header Section
Now Click on the check box for Hide/Show Sticky header
Click on Publish.
538. How to manage Service Section in Appetizer Lite?
1. How to add title, Description & hide/show service section?
From your dashboard, go to the Appearance > Customize > FrontPage Sections > Service Section
Here you can change the title, Subtitle & Description in the Service section.
Click on Publish.
2. How to manage content Service Section
From your dashboard, go to the Appearance > Customize > FrontPage Sections > Service Section
Here you can manage content in the Service section.
Click on Publish.
539. How to manage Service page in SpaBiz Pro?
1.Create a Page & Select Template
From your dashboard, go to the Dashboard > Pages > Add New
Now Create a page & Select the Template.
Click on Publish.
2.How to manage title, Subtitle , hide/show & Description?
From your dashboard, go to the Appearance > Customize > Page Template > Service Page
Here you can change title, Subtitle, hide/show & Description in service section.
Click on Publish.
3.How to manage Service Content?
From your dashboard, go to the Appearance > Customize > Page Template > Service Page
Here you setup content & Columnn service page.
Click on Publish.
4.How to manage video & sponsor Sections in Service Page?
From your dashboard, go to the Appearance > Customize > Page Template > Service Page
Here you can manage Video & Sponsor sections in Service section.
Click on Publish.
540. How to manage Contact Page in Decorme?
1.Create a Page & Select Template
From your dashboard, go to the Dashboard > Pages > Add New
Now Create a page & Select the Template.
Click on Publish.
2.How to manage Contact Form Section?
From your dashboard, go to the Appearance > Customize > Page Templates > Contact Page
Here you can manage contact Form Section.
Click on Publish.
3.How to manage Opening Hours (Contact Page 3)?
From your dashboard, go to the Appearance > Customize > Page Templates > Contact Page
Here you can manage contact Form Section.
Click on Publish.
4.How to manage Contact Service (Contact Page 3)?
From your dashboard, go to the Appearance > Customize > Page Templates > Contact Page
Here you can manage contact Service.
Click on Publish.
5.How to manage Contact Social (Contact Page 3)?
From your dashboard, go to the Appearance > Customize > Page Templates > Contact Page
Here you can manage contact social icon.
Click on Publish.
541. How to manage General Section?
1.Hide/Show Breadcrumb Section
From your dashboard, go to the Appearance > Customize > General > Breadcrumb Section
Now Click on the check box for Hide/Show Breadcrumb Section.
Click on Publish.
2.How to manage background image & Background Attachment Breadcrumb Section
From your dashboard, go to the Appearance > Customize > General > Breadcrumb Section
Now Here you can manage background image & background attachment.
Click on Publish.
3.Mangae Hide/Show Preloader!
From your dashboard, go to the Appearance > Customize > General > Preloader Section
Now Click on the check box for Hide/Show Preloader.
Click on Publish.
4.How to manage Top Scroller in SpaBiz Pro?
From your dashboard, go to the Appearance > Customize > General > Top Scroller
Here you can manage the Hide/Show setting.
Click on Publish.
542. How to manage Custom Section in Owlpress Pro?
1. How to manage title, Subtitle & Description
From your dashboard, go to the Appearance > Customize > FrontPage Sections > Custom Section
Here you can change the title, Subtitle & Description in the Custom section.
Click on Publish.
2. How to manage custom edit section
From your dashboard, go to the Appearance > Customize > FrontPage Sections > Custom Section
Here you can change in the Custom section.
Click on Publish.
543. How to manage payment page in Setto Pro?
1.Manage Payment content!
From your dashboard, go to the Dashboard > Page template > Payment Page.
Here you can manage Title, Description & No of FAQ Display.
Click on Publish.
544. How to manage colors in Spintech
1. How to manage Header Text Color
From your dashboard , go to the Appearance > Customize > Colors > Header Text Color
Here You can manage header text color.
Click on Publish.
2. How to manage Background Color
From your dashboard , go to the Appearance > Customize > Colors > Background Color
Here You can manage background color.
Click on Publish.
545. How to add Additional CSS?
1.How to add Additional CSS
From your dashboard, go to the Appearance > Additional CSS >
Here you can paste your Additional CSS
Click on Publish.
546. How to manage Typography in CoziPress
1. How to manage Font Size & Line height in Body Typography
From your dashboard , go to the Appearance > Customize > typography > body typography Section
Here You can manage Font Size &; line Height.
Click on Publish.
2. How to manage letter spacing in Body Typography Pro Features
From your dashboard , go to the Appearance > Customize > typography > body typography Section
Here You can manage letter spacing.
Click on Publish.
3. How to manage Font Style & Transform in Body Typography
From your dashboard , go to the Appearance > Customize > typography > body typography Section
Here You can manage Font Style & Transform.
Click on Publish.
4. How to manage weight & text decoration in Body Typography Pro Features
From your dashboard , go to the Appearance > Customize > typography > body typography Section
Here You can manage weight & text decoration.
Click on Publish.
5.How to manage Font Size & Line height H1 to H6 in Headings Typography
From your dashboard , go to the Appearance > Customize > typography > Heading Section
Here You can manage Font Size & line Height.
Click on Publish.
6. How to manage letter spacing in Heading Typography Pro Features
From your dashboard , go to the Appearance > Customize > typography > body typography Section
Here You can manage letter spacing.
Click on Publish.
7. How to manage Font Style & Transform H1 to H6 in Headings Typography
From your dashboard , go to the Appearance > Customize > typography > Heading Section
Here You can manage Font Style & Transform.
Click on Publish.
8. How to manage weight & text decoration in Heading Typography Pro Features
From your dashboard , go to the Appearance > Customize > typography > body typography Section
Here You can manage weight & text decoration.
Click on Publish.
547. How to setup Background image in Appetizer Pro?
1. How to the setup Background image
From your dashboard, go to the Appearance > Customize > Background image
Here You can set up a background image.
If you change & remove the logo then you can use the buttons below it.
Click on Publish.
2. How to setup preset image
From your dashboard, go to the Appearance > Customize > Background image
Here You can set up a preset background image.
Click on Publish.
3. How to manage image position & size
From your dashboard, go to the Appearance > Customize > Background image
Here You can manage the position & size background image.
Click on Publish.
4. How to manage repeat background images & scroll with the page
From your dashboard, go to the Appearance > Customize > Background image
Here You can manage repeat background images & scroll with page background images.
Click on Publish.
548. How to manage Custom Section in Decorme?
1.How to manage custom section?
From your dashboard, go to the Appearance > Customize > FrontPage Sections > Custom Section
Now click edit button
Here you can editable section content in Custom section.
Click on Publish.
549. How to manage Horoscope page in Astrocare Pro
1. Create a Page & Select Template
From your dashboard, go to the Dashboard > Pages > Add New
Now Create a page & Select the Template.
Click on Publish.
550. How to manage 404 Page in Kundoo
1.How to manage Content in 404 Page
From your dashboard, go to the Appearance > Customize > Page Templates > 404 page
Here you can change title, Subtitle button label & Link in 404 page.
Click on Publish.
551. How to manage FAQ section in Astrocare
1. How to manage titles & Subtitles?
From your dashboard, go to the Appearance > Customize > Frontpage sections >FAQ Section
Here you can change the titles & Subtitles in the FAQ Section.
Click on Publish.
2. How to manage the content of the FAQ section.
From your dashboard, go to the Appearance > Customize > Frontpage sections >FAQ Section
Here you can change the contents in the FAQ Section.
Click on Publish.
3. How to Change/Remove an image in the FAQ section?
From your dashboard, go to the Appearance > Customize > Frontpage sections >FAQ Section
Here you can Change/Remove the Image
Click on Publish.
4. Astrocare Pro allows you to add even more FAQs.Pro Features
From your dashboard, go to the Appearance > Customize > FrontPage Sections > FAQ Section
Here you can add more FAQs in the FAQ section.
Click on Publish.
552. How to Set Home Page2?
Front Look Home Page2
Go to Pages > Add New > Create a Page Named Home ( the name could be anything you like). On the Right Side Under the Template, the drop-down Menu is for Choosing the Home Page.
You have to Choose the Template and publish it.
553. How to manage Pricing Page in Seokart Pro?
1. How to manage Pricing Page?
From your dashboard, go to the Appearance > Customize > Page Templates > Pricing Page
Here you can manage here title, description & column.
Click on Publish.
2. How to Create Pricing 2?
The free plugin has been supported to make pricing 2, for this, you have to go to the free plugin and search Pricing Table by Supsystic, after activating this plugin you can create pricing 2.
Here copy the shortcode and go to the dashboard and paste it into the pricing page as shown in the screenshot below.
554. How to manage Service Section in CoziPress
1.How to manage title, Subtitle & Description
From your dashboard, go to the Appearance > Customize > FrontPage Sections > Service Section
Here you can change title, Subtitle & Description in Service section.
Click on Publish.
2.How to manage content Service Section
From your dashboard, go to the Appearance > Customize > FrontPage Sections > Service Section
Here you can manage content in Service section.
Click on Publish.
3.How to select image type Pro Features
From your dashboard, go to the Appearance > Customize > FrontPage Sections > Service Section
Here you can select image/icon in Service section.
Click on Publish.
CoziPress Pro allows you to add even more services.Pro Features
4.How to manage column layout
From your dashboard, go to the Appearance > Customize > FrontPage Sections > Service Section
Here you can manage Column Layout in Service section.
Click on Publish.
555. How to manage General Section?
1.Hide/Show Breadcrumb Section
From your dashboard, go to the Appearance > Customize > General > Breadcrumb Section
Now Click on the check box for Hide/Show Breadcrumb Section.
Click on Publish.
2.How to manage background image & color Breadcrumb Section
From your dashboard, go to the Appearance > Customize > General > Breadcrumb Section
Now Here you can manage background image & Color.
Click on Publish.
3.Mangae Hide/Show Preloader!
From your dashboard, go to the Appearance > Customize > General > Preloader Section
Now Click on the check box for Hide/Show Preloader.
Click on Publish.
4.How to manage Top Scroller in Decorme?
From your dashboard, go to the Appearance > Customize > General > Top Scroller
Here you can manage the Scroller icon & also the Hide/Show setting.