8. How to add icon to category on electronic homepage?
9. Product Section Manage of Electronics Home Page!
10. Banner Section Manage of Electronics Home Page!
11. Deal Section Manage of Electronics Home Page!
12. Newsletter Section Manage of Electronics Home Page!
13. Blog Section Manage of Electronics Home Page!
14. Custom Section Manage of Electronics Home Page!
15. Slider Manage of Watch Home Page!
16. About Section Manage of Watch Home Page!
17. Banner Section Manage of Watch Home Page!
18. Product Section Manage of Watch Home Page!
19. Newsletter Section Manage of Watch Home Page!
20. Sponsor Section Manage of Watch Home Page!
21. Testimonial Section Manage of Watch Home Page!
22. Collection Section Manage of Goggles Home Page!
23. Video Section Manage of Watch Home Page!
24. Sponsor Section Manage of Goggles Home Page!
25. Slider Manage of Goggles Home Page!
26. Info Section Manage of Goggles Home Page!
27. Banner Section Manage of Goggles Home Page!
28. Product Section Manage of Goggles Home Page!
29. Testimonial Section Manage of Home Page!
30. Blog Section Manage of Goggles Home Page!
31. Slider Manage of Lifestyle Home Page!
32. Product Section Manage of Lifestyle Home Page!
33. Deal Section Manage of Lifestyle Home Page!
34. Service Section Manage of Lifestyle Home Page!
35. Newsletter Section Manage of Lifestyle Home Page!
36. Browse Category Section Manage of Lifestyle Home Page!
37. Banner Section Manage of Lingerie Home Page!
38. Slider Manage of Lingerie Home Page!
39. Slider Category Manage of Lingerie Home Page!
40. Product Section Manage of Lingerie Home Page!
41. Collection Section Manage of Lingerie Home Page!
42. Newsletter Section Manage of Lingerie Home Page!
43. Insta Section Manage of Lingerie Home Page!
44. How to manage About page in Setto Pro?
45. How to manage Return Policy page in Setto Pro?
46. How to manage payment page in Setto Pro?
47. How to manage FAQ page in Setto Pro?
48. How to Manage Privacy Policy page in Setto Pro?
49. How to manage Term & Condition page in Setto Pro?
50. How to manage Contact page in Setto Pro?
51. How to manage 404 page in Setto Pro?
52. How to manage footer section Setto Pro?
53. How to manage style configurator?
54. How to manage section Reorder in Setto Pro?
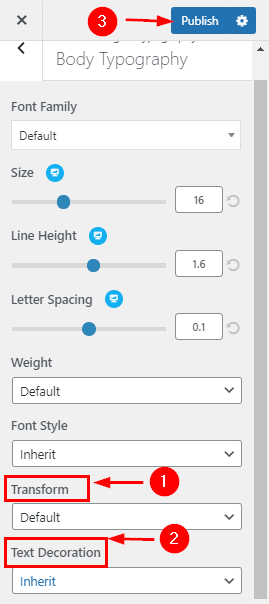
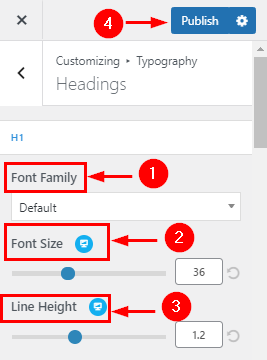
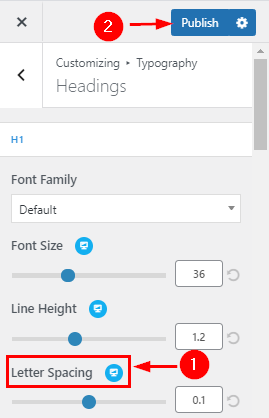
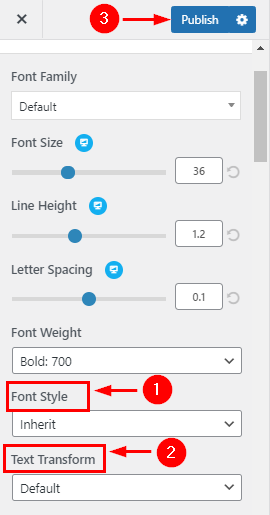
55. How to manage Typography?
56. How to manage colors in Setto pro?
57. How to manage Header Image in Setto Pro?
58. How to setup countdown on Products?
1. How to install Setto Pro?
Go to the menu Appearance > Themes and click on the Add New button.
Click on the Upload Theme button.
Click on the Browse button and navigate to the unzipped theme package on your computer.
Look for a file called Setto.zip Click on it to select, then click OK.
Click on the Install Now button and wait until the installation is complete.
Click on the Activate link to activate the theme on your WordPress site.
2. How to Activate license in Setto Pro?
Go to your WordPress website dashboard
Go to Appearance > Theme License
Enter your theme license key into the License Key field
Click Activate
3. Demo Import For Setto Pro?
Install One Click Demo Import plugin on your site
After installing the plugin,
Go to Appearance > Premade Demos
Finally, click Import Demo Data Button
Wait for the import to finish
You are done!!!
4. How to setup Home Page?
1.How to create a Homepage
Go to Pages > Add New > Create a Page Named Home ( the name could be anything you like). On the Right Side Under the Template, the drop-down Menu is for Choosing the Home Page.
You have to Choose the Template and publish it.
2. How to Assign Home Page as a FrontPage?
From your dashboard, go to the Setting > Reading > Home Page Displays
Click on the radio button of your A Static page
Click on Save Changes.
5. How to manage header section in Setto Pro?
1. How to change the Site logo?
From your dashboard, go to the Appearance > Customize > Header > Site Identity Section
Now Click on the select logo and choose a logo for your site.
If you change & remove the logo then you can use the buttons below it.
Click on Publish.
2. How to customize the width of the Site logo
From your dashboard, go to the Appearance > Customize > Header > Site Identity Section
Now Scroll bar is used for logo width Customize.
Click on Publish.
3. How to manage site title & tagline?
From your dashboard, go to the Appearance > Customize > Header > Site Identity Section
Now manage site title & tagline as per your choice.
Click on Publish.
4. How to change the site icon?
From your dashboard, go to the Appearance > Customize > Header > Site Identity Section
Now Click on button & select Site icon . ;
You can use site icon size maximum 512 x 512px.
Click on Publish.
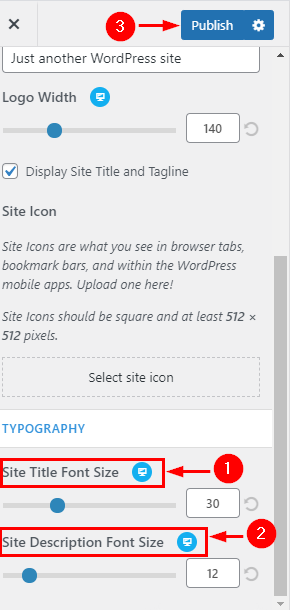
5.How to Customize Site title & description font size?
From your dashboard, go to the Appearance > Customize > Header > Site Identity Section
Here you can customize the Site title & description.
Click on Publish.
6.How to select Header type ?
From your dashboard, go to the Appearance > Customize > Header > Header Type Section
Here you can select Header type
Click on Publish.
7. How to manage info 1 in the above header
From your dashboard, go to the Appearance > Customize > Header > Above header Section
Here you can manage left content.
Click on Publish.
8. How to manage info 2 & info 3 in the above header
From your dashboard, go to the Appearance > Customize > Header > Above header Section
Here you can manage social icons as per your choice.
Click on Publish.
9. Hide/Show Search, My Account, Wishlist & Cart icon in Header Navigation
From your dashboard, go to the Appearance > Customize > Header > Header Navigation Section
Now Click on the check box for Hide/Show icon.
Click on Publish.
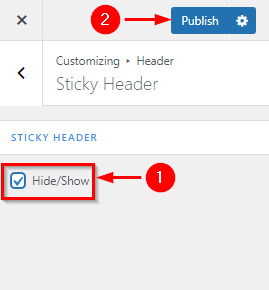
10. Hide/Show Sticky Header
From your dashboard, go to the Appearance > Customize > Header > Sticky Header Section
Now Click on the check box for Hide/Show Sticky header
Click on Publish.
6. How to manage General Section in Setto Pro?
1. Hide/Show Breadcrumb & Enable Page Path on Breadcrumb
From your dashboard, go to the Appearance > Customize > General > Breadcrumb Section
Now Click on the check box for Hide/Show Breadcrumb Section.
Click on Publish.
2. Manage Min Height
From your dashboard, go to the Appearance > Customize > General > Breadcrumb Section
Now you can manage min-height in Breadcrumb.
Click on Publish.
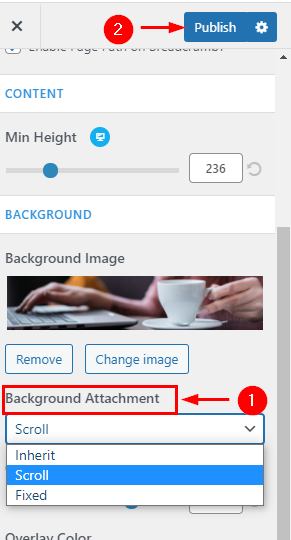
3.How to manage Background Image & Attachment image
From your dashboard, go to the Appearance > Customize > General > Breadcrumb Section
Here you can set the breadcrumb image according to you.
Click on Publish.
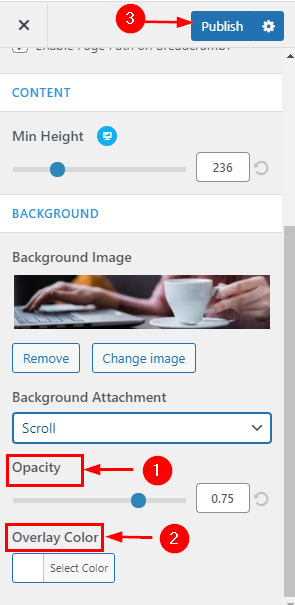
4.How to manage opacity & Overlay Color of Breadcrumb
From your dashboard, go to the Appearance > Customize > General > Breadcrumb Section
Here you can manage opacity & Color Overlay
Click on Publish.
7.How to manage Top Scroller?
From your dashboard, go to the Appearance > Customize > General > Preloader Section
Here you can manage the Scroller icon & also the Hide/Show setting.
Click on Publish.
7. Slider Manage of Electronics Home Page!
1.Electronics slider content!
From your dashboard, go to the Appearance > Customize > FrontPage Sections > Slider Section
Here you can manage the content of the slider section
Now Click on Publish
8. How to add icon to category on electronic homepage?
1. How to Hide/Show Browse Category Section?
From your dashboard, go to the Appearance > Customize > FrontPage Sections > Browse Category Section
Here you can Hide/Show Browse Category Section.
2. How to add icon in Browser category?
From your dashboard, go to the Product > category > edit
Here you can paste icofont code in Browse Category Section.
9. Product Section Manage of Electronics Home Page!
1.Product Section Manage!
From your dashboard, go to the Appearance > Customize > Electronics Home Page Sections > Product Section
Here you can manage the Title, Subtitle & Select category of the Product .
Now Click on Publish
2. Create a products!
From your dashboard, go to the Product > Add New>
Here you can add new products.
10. Banner Section Manage of Electronics Home Page!
1.Banner Section Manage!
From your dashboard, go to the Appearance > Customize > FrontPage Sections > Banner Section
Here you can manage the content of the Banner section
Now Click on Publish
11. Deal Section Manage of Electronics Home Page!
1.Deal Section Manage!
From your dashboard, go to the Appearance > Customize > Electronics Home Page Sections > Deal Section
Here you can manage the Title, Subtitle & Select category of the Product .
Now Click on Publish
12. Newsletter Section Manage of Electronics Home Page!
1.Service Section Manage!
From your dashboard, go to the Appearance > Customize > Electronics Home Page Sections > Newsletter Section
Here you can manage the Service section .
Now Click on Publish
2. Banner Section Manage!
From your dashboard, go to the Appearance > Customize > Electronics Home Page Sections > Newsletter Section
Here you can manage the Banner section .
Now Click on Publish
3. Newsletter Section Manage!
From your dashboard, go to the Appearance > Customize > Electronics Home Page Sections > Newsletter Section
Here you can manage the (Form) Newsletter section .
Now Click on Publish
13. Blog Section Manage of Electronics Home Page!
1. Title & Category Blog Section!
From your dashboard, go to the Appearance > Customize > FrontPage Sections > Blog Section
Here you can manage the title & content Blog Section
Now Click on Publish.
2.Blog Column & No. of post display in Blog Section!
From your dashboard, go to the Appearance > Customize > FrontPage Sections > Blog Section
Here you can manage the blog column & no. of post display in blog Section
Now Click on Publish.
14. Custom Section Manage of Electronics Home Page!
1. Manage Custom Section!
From your dashboard, go to the Appearance > Customize > Electronics Home Page > Custom Section
Here you can manage the title & content Blog Section
Now Click on Publish.
15. Slider Manage of Watch Home Page!
1.Watch slider content!
From your dashboard, go to the Appearance > Customize > Watch Home Page > Slider Section
Here you can manage the content of the slider section
Now Click on Publish
16. About Section Manage of Watch Home Page!
1.Left Content in About Section !
From your dashboard, go to the Appearance > Customize > Watch Home Page > About Section
Here you can manage the left content of the About section
Now Click on Publish.
2.Right Content in About Section !
From your dashboard, go to the Appearance > Customize > Watch Home Page > About Section
Here you can manage the Right content of the About section
Now Click on Publish.
17. Banner Section Manage of Watch Home Page!
1.Banner Section Manage!
From your dashboard, go to the Appearance > Customize > Watch Homepage > Banner Section
Here you can manage the content of the Banner section
Now Click on Publish.
18. Product Section Manage of Watch Home Page!
1.Product Section Manage!
From your dashboard, go to the Appearance > Customize > watch Home page > Product Section
Here you can manage the Title, Subtitle & Select category of the Product .
Now Click on Publish
2. Create a products!
From your dashboard, go to the Product > Add New>
Here you can add new products.
19. Newsletter Section Manage of Watch Home Page!
1.Newsletter Section Manage!
From your dashboard, go to the Appearance > Customize > watch Home page > Newsletter Section
Here you can manage the Video Link, Title, Subtitle & Short code of Form .
Now Click on Publish .
20. Sponsor Section Manage of Watch Home Page!
1.Sponsor Section Manage!
From your dashboard, go to the Appearance > Customize > watch Home page > Sponsor Section
Here you can manage the Sponsor Content (Like : Link & image) .
Now Click on Publish
21. Testimonial Section Manage of Watch Home Page!
1.Testimonial Section Manage!
From your dashboard, go to the Appearance > Customize > watch Home page > Testimonial Section
Here you can manage the Video Link, Title, Subtitle & Change Background image .
Now Click on Publish
22. Collection Section Manage of Goggles Home Page!
1.Collection Section Content!
From your dashboard, go to the Appearance > Customize > Goggles Home Page > Slider Section
Here you can manage the title & category.
Now Click on Publish.
23. Video Section Manage of Watch Home Page!
1.Video Section Manage!
From your dashboard, go to the Appearance > Customize > watch Home page > Video Section
Here you can manage the Video Link, Title, Subtitle & Change Background image .
Now Click on Publish
24. Sponsor Section Manage of Goggles Home Page!
1.Sponsor Section Manage!
From your dashboard, go to the Appearance > Customize > Goggles Home page > Sponsor Section
Here you can manage the Sponsor Content (Like : Link & image) .
Now Click on Publish
25. Slider Manage of Goggles Home Page!
1.Goggles slider content!
From your dashboard, go to the Appearance > Customize > Goggles Home Page > Slider Section
Here you can manage the content of the slider section
Now Click on Publish.
26. Info Section Manage of Goggles Home Page!
1.Info Section Content!
From your dashboard, go to the Appearance > Customize > Goggles Home Page > Slider Section
Here you can manage the content of the slider section
Now Click on Publish.
27. Banner Section Manage of Goggles Home Page!
1.Banner Section Manage!
From your dashboard, go to the Appearance > Customize > Goggles Homepage > Banner Section
Here you can manage the content of the Banner section
Now Click on Publish.
28. Product Section Manage of Goggles Home Page!
1.Product Section Manage!
From your dashboard, go to the Appearance > Customize > Goggles Home page > Product Section
Here you can manage the Title & Select category of the Product .
Now Click on Publish
2. Create a products!
From your dashboard, go to the Product > Add New>
Here you can add new products.
29. Testimonial Section Manage of Home Page!
1.Testimonial Section Manage!
From your dashboard, go to the Appearance > Customize > Goggles Home page > Testimonial Section
Here you can manage the Video Link, Title, Subtitle ,Link & image .
Now Click on Publish
30. Blog Section Manage of Goggles Home Page!
1. Title & Category Blog Section!
From your dashboard, go to the Appearance > Customize > FrontPage Sections > Blog Section
Here you can manage the title & content Blog Section
Now Click on Publish.
2.Blog Column & No. of post display in Blog Section!
From your dashboard, go to the Appearance > Customize > FrontPage Sections > Blog Section
Here you can manage the blog column & no. of post display in blog Section
Now Click on Publish.
31. Slider Manage of Lifestyle Home Page!
1.Lifestyle slider content!
From your dashboard, go to the Appearance > Customize > Lifestyle Home Page > Slider Section
Here you can manage the content of the slider section
Now Click on Publish.
32. Product Section Manage of Lifestyle Home Page!
1.Product Section Manage!
From your dashboard, go to the Appearance > Customize > Lifestyle Home page > Product Section
Here you can manage the Title & Select category of the Product .
Now Click on Publish
2. Create a products!
From your dashboard, go to the Product > Add New>
Here you can add new products.
33. Deal Section Manage of Lifestyle Home Page!
1.Deal Section Manage!
From your dashboard, go to the Appearance > Customize > Deal Home Page > Deal Section
Here you can manage the Title, Subtitle & Select category of the Product .
Now Click on Publish.
34. Service Section Manage of Lifestyle Home Page!
1.Service Section Manage!
From your dashboard, go to the Appearance > Customize > Lifestyle Home Page > Service Section
Here you can manage the content of the service section
Now Click on Publish.
35. Newsletter Section Manage of Lifestyle Home Page!
1.Newsletter Section Manage!
From your dashboard, go to the Appearance > Customize > Lifestyle Home page > Newsletter Section
Here you can manage the content of Newsletter section .
Now Click on Publish .
36. Browse Category Section Manage of Lifestyle Home Page!
1.Browse Category Section Manage!
From your dashboard, go to the Appearance > Customize > Lifestyle Home page > Browse Category Section
Here you can manage the Title, Subtitle & Content .
Now Click on Publish.
37. Banner Section Manage of Lingerie Home Page!
1.Banner Section Manage!
From your dashboard, go to the Appearance > Customize > Lingerie Homepage > Banner Section
Here you can manage the content of the Banner section
Now Click on Publish.
38. Slider Manage of Lingerie Home Page!
1.Lifestyle slider content!
From your dashboard, go to the Appearance > Customize > Lifestyle Home Page > Slider Section
Here you can manage the content of the slider section
Now Click on Publish.
39. Slider Category Manage of Lingerie Home Page!
1.Slider Category content!
From your dashboard, go to the Appearance > Customize > Lingerie Home Page > Slider Section
Here you can manage the content of the slider section
Now Click on Publish.
40. Product Section Manage of Lingerie Home Page!
1.Product Section Manage!
From your dashboard, go to the Appearance > Customize >Lingerie Home page > Product Section
Here you can manage the Title & Select category of the Product .
Now Click on Publish.
41. Collection Section Manage of Lingerie Home Page!
1.Collection Section Content!
From your dashboard, go to the Appearance > Customize > Lingerie Home Page > Slider Section
Here you can manage the title & category.
Now Click on Publish.
42. Newsletter Section Manage of Lingerie Home Page!
1.Testimonial Section Manage!
From your dashboard, go to the Appearance > Customize > Lingerie Home page > Testimonial Section
Here you can manage the content .
Now Click on Publish.
2.Newsletter Section Manage!
From your dashboard, go to the Appearance > Customize > Lingerie Home page > Newsletter Section
Here you can manage the Video Link, Title, Subtitle & Short code of Form .
Now Click on Publish .
43. Insta Section Manage of Lingerie Home Page!
1.Insta Section Manage!
From your dashboard, go to the Appearance > Customize > Lingerie Home page > Insta Section
Here you can manage the content .
Now Click on Publish.
44. How to manage About page in Setto Pro?
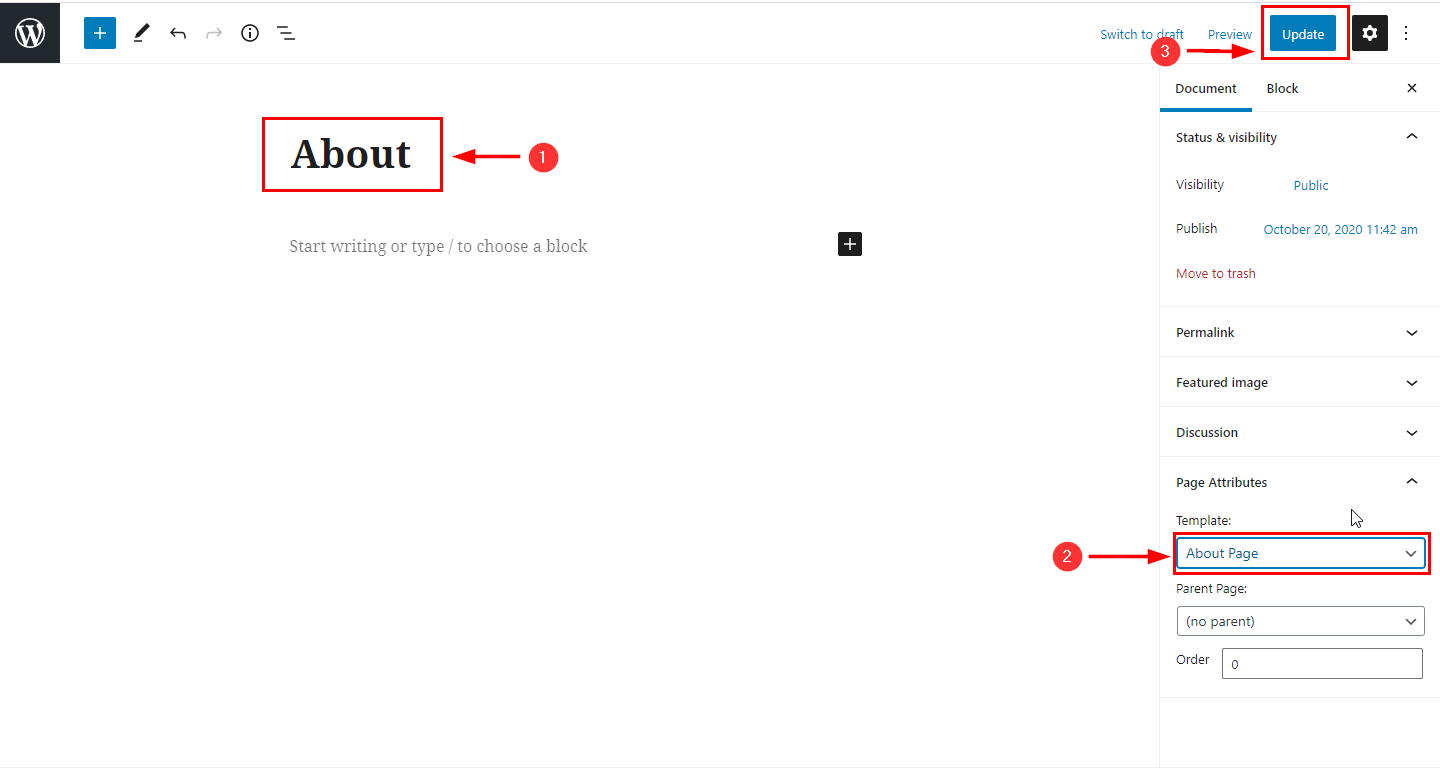
1.Create a Page & Select Template
From your dashboard, go to the Dashboard > Pages > Add New
Now Create a page & Select the Template.
Click on Publish.
2.Manage About section content!
From your dashboard, go to the Dashboard > Appearance > Page template > About Page.
Here you can manage about Section content & Hide/Show Section.
Click on Publish.
3.Manage Vision section content!
From your dashboard, go to the Dashboard > Appearance > Page template > About Page> Vision Section.
Here you can manage about Section content & Hide/Show Section.
Click on Publish.
4.Counter section content!
From your dashboard, go to the Dashboard > Appearance > Page template > About Page> Counter Section.
Here you can manage Counter Section content & Hide/Show Section.
Click on Publish.
5.Team section content!
From your dashboard, go to the Dashboard > Appearance > Page template > About Page> Team Section.
Here you can manage Counter Section content & Hide/Show Section.
Click on Publish.
45. How to manage Return Policy page in Setto Pro?
1.Create a Return Policy & Select Template
From your dashboard, go to the Dashboard > Pages > Add New
Now Create a page & Select the Template.
Click on Publish.
2.Manage Return Policy Page!
From your dashboard, go to the Dashboard > Page template >Return Policy Page.
Here you can manage Return Policy Page in About Page.
Click on Publish.
46. How to manage payment page in Setto Pro?
1.Manage Payment content!
From your dashboard, go to the Dashboard > Page template > Payment Page.
Here you can manage Title, Description & No of FAQ Display.
Click on Publish.
47. How to manage FAQ page in Setto Pro?
1.Create a Page FAQ & Select Template
From your dashboard, go to the Dashboard > Pages > Add New
Now Create a page & Select the Template.
Click on Publish.
2.Manage FAQ section content!
From your dashboard, go to the Dashboard > Page template > FAQ Page.
Here you can manage about Section content & Hide/Show Section.
Click on Publish.
48. How to Manage Privacy Policy page in Setto Pro?
1.Create a Privacy Policy & Select Template
From your dashboard, go to the Dashboard > Pages > Add New
Now Create a page & Select the Template.
Click on Publish.
2.Manage Privacy Policy Page!
From your dashboard, go to the Dashboard > Page template >Privacy Policy Page.
Here you can manage Return Policy Page in About Page.
Click on Publish.
49. How to manage Term & Condition page in Setto Pro?
1.Manage Term & Condition content!
From your dashboard, go to the Dashboard > Page template > Payment Page.
Here you can manage Title & Content.
Click on Publish.
50. How to manage Contact page in Setto Pro?
1.Manage Contact Section content!
From your dashboard, go to the Dashboard > Page template > contact Page.
Here you can manage Section content & Hide/Show Section.
Click on Publish.
2.Manage Contact Form content!
From your dashboard, go to the Dashboard > Page template > contact Page.
Here you can manage Contact form Section content & Hide/Show Section.
Click on Publish.
51. How to manage 404 page in Setto Pro?
1.Manage 404 page content!
From your dashboard, go to the Dashboard > Appearance > Page template > 404 Page.
Here you can manage content of 404 page .
Click on Publish.
52. How to manage footer section Setto Pro?
1. Manage Footer Type
From your dashboard, go to the Appearance > Customize > Footer > Footer Type
Here you can manage footer content in the above Section.
Click on Publish.
2.Manage footer widget layout in footer
From your dashboard, go to the Appearance > Customize > Footer > Footer Widget Area
Here you can manage the footer widget layout.
Click on Publish.
3.How to manage footer bottom
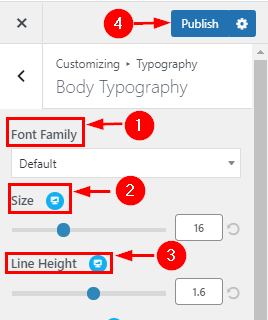
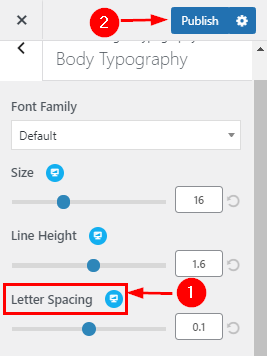
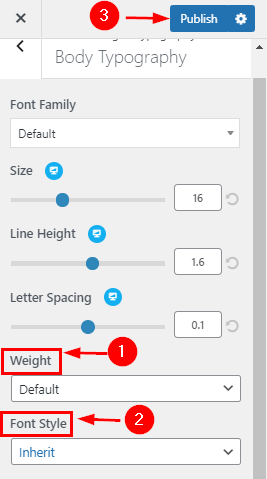
From your dashboard, go to the Appearance > Customize > Footer > Footer Bottom
Here you can manage the footer bottom.
Click on Publish.
4.How to manage copyright section
From your dashboard, go to the Appearance > Customize > Footer > Footer Copyright